Esta versão pode conter edições incorretas. Mude para o último instantâneo verificado.
O que você precisa
-
-
Remova os dois parafusos Pentalobe de 3,4 mm dispostos em ambos os lados do conector Lightning.
-
-
-
Puxe a pega azul para trás para destravar os braços do Anti-Clamp.
-
Deslize os braços pela borda esquerda ou direita do seu iPhone.
-
Posicione as ventosas próximo à borda inferior do iPhone, diretamente acima do botão home - uma pela dianteira e a outra pela traseira.
-
Aperte as ventosas uma contra a outra para aplicar sucção na área desejada.
-
-
Este passo não foi traduzido. Ajude a traduzi-lo
-
If you don't have an Anti-Clamp, follow the next three steps to use a suction handle.
-
Apply mild heat to the lower edge of the iPhone using an iOpener or hair dryer for about a minute.
-
-
-
Segure com cuidado o conjunto do display e eleve-o para abrir o telefone, usando os clipes na parte superior do painel dianteiro como uma dobradiça.
-
Abra o display a um ângulo de cerca de 90º e apoie-o em algo que o sustente enquanto você está trabalhando no telefone.
-
Engate uma faixa de elástico para fixar seguramente o display enquanto você trabalha. Isso previne uma tensão indevida nos cabos do display.
-
-
-
Remova os seguintes parafusos Phillips que seguram o suporte do conector da bateria à placa lógica:
-
Um parafuso de 2,9 mm
-
Um parafuso de 2,3 mm
-
-
-
Remova os seguintes parafusos Phillips:
-
Três parafusos de 1,3 mm
-
Um parafuso de 1,6 mm
-
Um parafuso de 3,0 mm
-
-
-
Este passo não foi traduzido. Ajude a traduzi-lo
-
Peel up any tape covering the iSight camera bracket screws.
-
-
Este passo não foi traduzido. Ajude a traduzi-lo
-
Remove the following Phillips screws over the camera bracket:
-
One 1.9 mm screw
-
One 2.4 mm screw
-
-
Este passo não foi traduzido. Ajude a traduzi-lo
-
Disconnect the iSight camera connector from its socket on the logic board.
-
-
Este passo não foi traduzido. Ajude a traduzi-lo
-
Insert the flat end of the spudger between the iSight camera and rear casing.
-
Gently pry the camera out from its housing.
-
-
Este passo não foi traduzido. Ajude a traduzi-lo
-
Insert a SIM eject tool into the hole in the SIM tray.
-
Press to eject the SIM tray.
-
-
Este passo não foi traduzido. Ajude a traduzi-lo
-
Remove the single 1.4 mm Phillips screw holding the NFC bracket in place.
-
-
Este passo não foi traduzido. Ajude a traduzi-lo
-
Remove the two 2.7 mm Phillips screws securing the audio control cable bracket to the logic board.
-
-
Este passo não foi traduzido. Ajude a traduzi-lo
-
Disconnect the audio control cable by prying its connector straight up from its socket on the logic board.
-
-
Este passo não foi traduzido. Ajude a traduzi-lo
-
Disconnect the cellular antenna cable by prying its connector straight up from its respective socket on the logic board.
-
-
Este passo não foi traduzido. Ajude a traduzi-lo
-
Disconnect the Wi-Fi diversity antenna cable by prying its connector up from the logic board.
-
-
Este passo não foi traduzido. Ajude a traduzi-lo
-
Disconnect the power button flex cable from its socket on the logic board.
-
-
Este passo não foi traduzido. Ajude a traduzi-lo
-
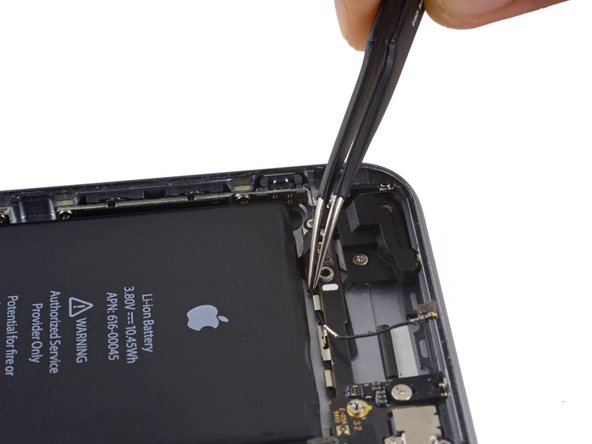
Disconnect the antenna cable by prying it up from the logic board.
-
-
Este passo não foi traduzido. Ajude a traduzi-lo
-
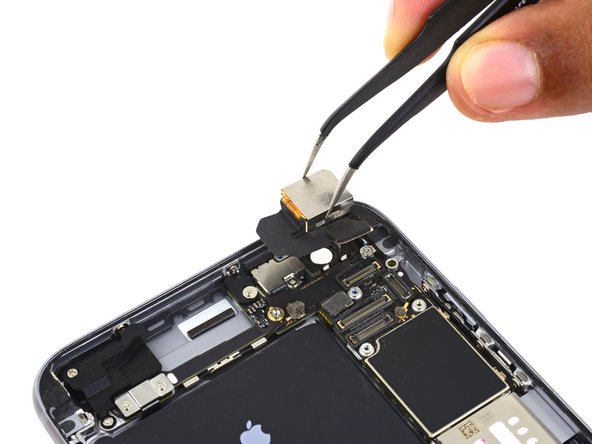
Use the flat end of a spudger to disconnect the Lightning connector flex cable from the logic board.
-
-
Este passo não foi traduzido. Ajude a traduzi-lo
-
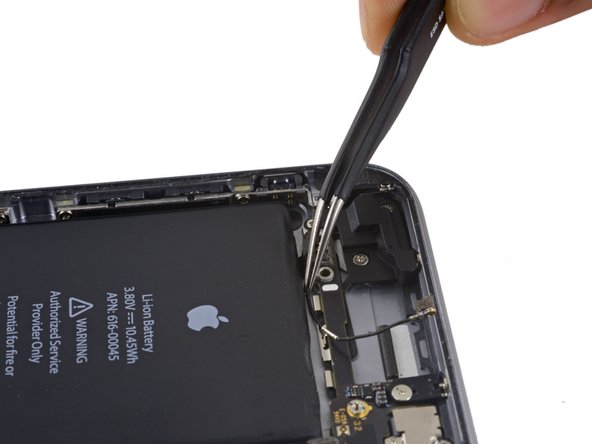
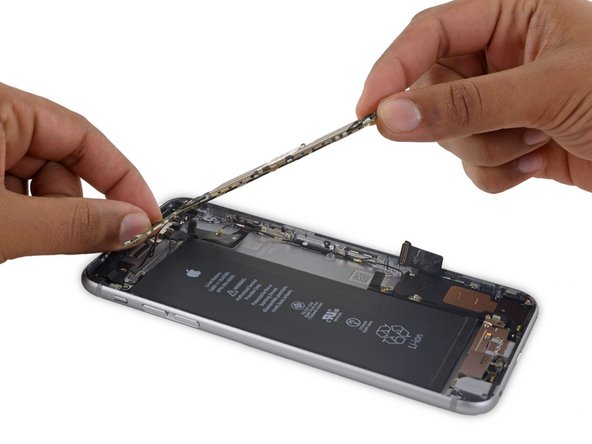
Deroute the antenna cable from the two clips on the right edge of the logic board.
-
-
Este passo não foi traduzido. Ajude a traduzi-lo
-
Remove the following screws:
-
One 1.3 mm Phillips screw
-
One 2.6 mm Phillips screw
-
One 2.2 mm standoff screw
-
-
Este passo não foi traduzido. Ajude a traduzi-lo
-
Deroute the upper left cellular antenna cable from the first logic board clip by nudging it out from under the clip, towards the battery.
-
-
Este passo não foi traduzido. Ajude a traduzi-lo
-
Continue derouting the cellular antenna cable from the second and third logic board clips.
-
Use the pointed tip of a spudger to gently pry the cellular antenna cable from the middle logic board clip.
-
-
Este passo não foi traduzido. Ajude a traduzi-lo
-
Remove the final 2.0 mm Phillips screw directly below the SIM card reader.
-
-
Este passo não foi traduzido. Ajude a traduzi-lo
-
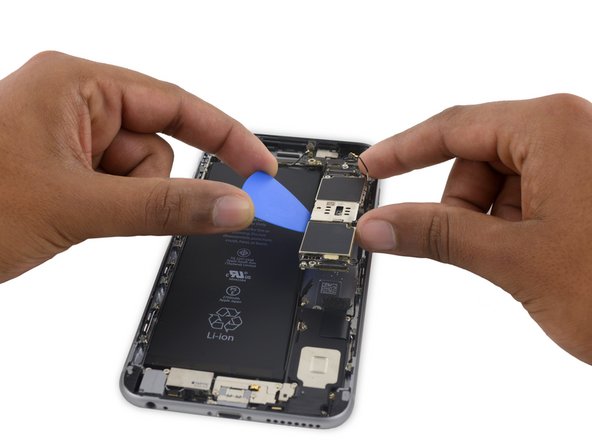
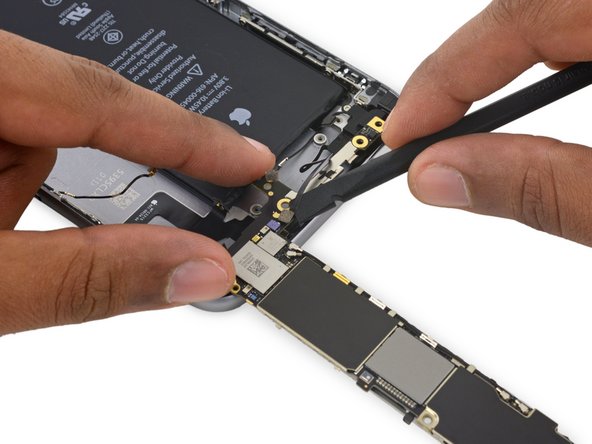
Carefully raise—but do not remove—the logic board, lifting it from the bottom edge nearest the Lightning connector.
-
-
Este passo não foi traduzido. Ajude a traduzi-lo
-
Tip the logic board up to a vertical position to expose the single antenna connector on the underside, near the top edge of the board.
-
-
Este passo não foi traduzido. Ajude a traduzi-lo
-
Gently lay the logic board upside-down, with the top portion resting against the rear case of the iPhone.
-
Use the flat end of the spudger to disconnect the Wi-Fi/Bluetooth antenna cable from its socket on the back of the logic board.
-
-
Este passo não foi traduzido. Ajude a traduzi-lo
-
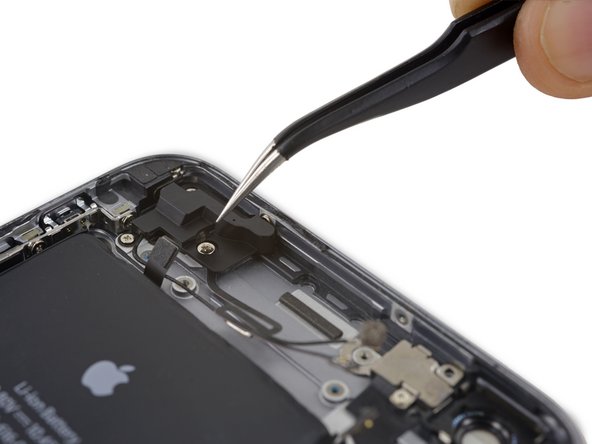
Remove the sticker over the third screw holding the cellular antenna in place.
-
-
Este passo não foi traduzido. Ajude a traduzi-lo
-
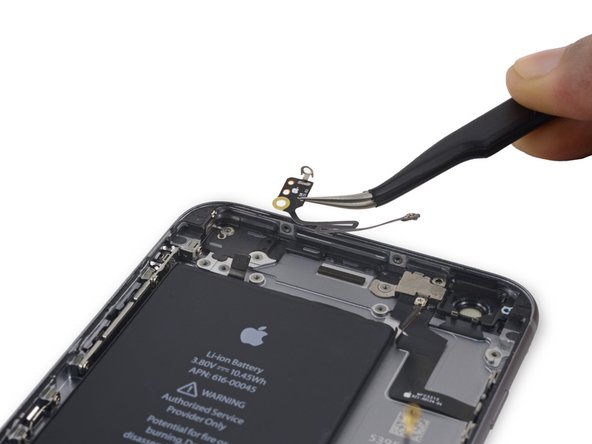
Remove the following three Phillips screws holding the cellular antenna in place:
-
One 2.7 mm screw
-
One 1.7 mm screw
-
One 1.3 mm screw
-
-
Este passo não foi traduzido. Ajude a traduzi-lo
-
Remove the single 1.3 mm Phillips screw securing the antenna to the rear case.
-


Cancelar: não concluí este guia.
33 outras pessoas executaram este guia.

15 comentários
Omg
That was an intense read.
in iphone 6s 4.7" wifi antenna is the same and is in the same place?
Didn't you forget to mention first step to remove the two little screws by the power connector? First time doing this and I ended up breaking the metal threaded tabs that the screws go into :(
I guess I should have realized it would have screws somewhere and also researched some more before attempting the repair.
Oh well, looks like I will need to get some teflon tape or something to hold things together.
Exactly! I also broke them, but fortunately I was also replacing the LCD Screen/Digitizer.
Hi, is this repair guide (and the antenna you sell) also valid for the non functioning bluetooth of an Iphone 6S ?