
iPhone 6s Battery Connection

Prerequisite Only
This guide is only intended to be used as a prerequisite for other guides. It's incomplete by itself.

What you need

  1. iPhone 6s Battery Connection, Battery Connection: step 1, image 1 of 1
    • Power off your iPhone before beginning disassembly.

    • Remove the two 3.4 mm Pentalobe screws surrounding the Lightning connector.

  2. iPhone 6s Battery Connection: step 2, image 1 of 1
    Tool used on this step:
    iSclack
    $24.99
    Buy
    • If you don't have an iSclack, use a single suction cup to lift the front panel:

    • Press a suction cup onto the screen, just above the home button.

    • Be sure the cup is pressed securely onto the screen to get a tight seal.

  3. iPhone 6s Battery Connection: step 3, image 1 of 3 iPhone 6s Battery Connection: step 3, image 2 of 3 iPhone 6s Battery Connection: step 3, image 3 of 3
    • There is a notch on the underside of the display just above the headphone jack that is the safest place to begin prying the phone open.

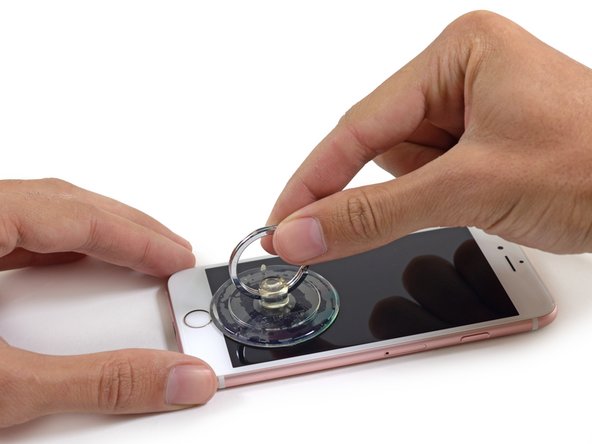
    • Pull up on the suction cup to slightly separate the front panel assembly from the rear case.

    • Take your time and apply firm, constant force. The display assembly is a much tighter fit than most devices and is held down with adhesive.

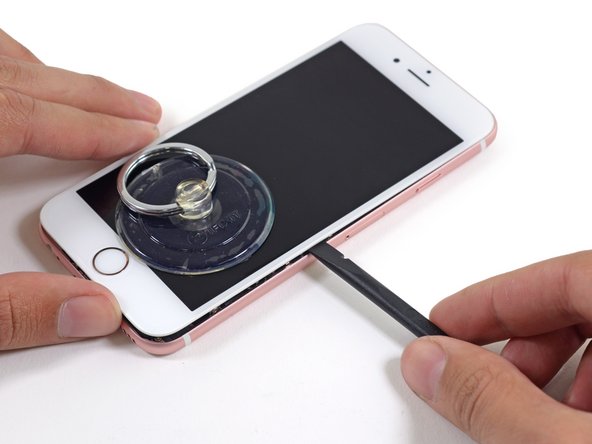
    • Once a small gap has been opened, insert the flat end of a spudger above the headphone jack.

  4. iPhone 6s Battery Connection: step 4, image 1 of 2 iPhone 6s Battery Connection: step 4, image 2 of 2
    • Twist the spudger to open the gap more and break it free from the adhesive.

    • Keep pulling up on the suction cup while twisting the spudger.

  5. iPhone 6s Battery Connection: step 5, image 1 of 2 iPhone 6s Battery Connection: step 5, image 2 of 2
    • Use the edge of a spudger to slice through the adhesive on either side of the phone.

  6. iPhone 6s Battery Connection: step 6, image 1 of 2 iPhone 6s Battery Connection: step 6, image 2 of 2
    • Use the edge of a spudger to slice through the adhesive on either side of the phone.

  7. iPhone 6s Battery Connection: step 7, image 1 of 3 iPhone 6s Battery Connection: step 7, image 2 of 3 iPhone 6s Battery Connection: step 7, image 3 of 3
    • Use the suction cup to open the display, breaking the last of the adhesive.

    • Don't open the display more than 90 degrees, as it is still connected at the top by three cables that may break if stretched.

  8. iPhone 6s Battery Connection: step 8, image 1 of 1
    • Lean the display against something to keep it propped up while you're working on the phone.

  9. iPhone 6s Battery Connection: step 9, image 1 of 1
    • Remove the following screws from the battery connector bracket:

    • One 3.0 mm Phillips #00 screw

    • One 2.3 mm Phillips #00 screw

  10. iPhone 6s Battery Connection: step 10, image 1 of 1
    • Remove the metal battery connector bracket from the iPhone.

  11. iPhone 6s Battery Connection: step 11, image 1 of 3 iPhone 6s Battery Connection: step 11, image 2 of 3 iPhone 6s Battery Connection: step 11, image 3 of 3
    • Use the flat end of a spudger to disconnect the battery connector from the logic board.

    • Push the connector to the side to ensure it doesn't accidentally make contact and power on the phone while you're working on it.

Sam Goldheart

Member since: 10/18/12

465,602 Reputation

538 Guides authored

Team

iFixit Member of iFixit

Staff

135 Members

16,718 Guides authored

View Statistics:

Past 24 Hours: 0

Past 7 Days: 0

Past 30 Days: 0

All Time: 405