Esta versão pode conter edições incorretas. Mude para o último instantâneo verificado.
O que você precisa
-
Este passo não foi traduzido. Ajude a traduzi-lo
-
Remove the two 1.8 mm Phillips screws securing the dock connector cable cover to the logic board.
-
Remove the metal dock connector cable cover.
-
-
Este passo não foi traduzido. Ajude a traduzi-lo
-
Use the edge of a plastic opening tool to pry the dock cable up from its socket on the logic board.
-
-
Este passo não foi traduzido. Ajude a traduzi-lo
-
Peel the dock connector cable off the adhesive securing it to the logic board and the side of the speaker enclosure.
-
-
-
Este passo não foi traduzido. Ajude a traduzi-lo
-
Remove the 1.6 mm Phillips screw securing the pressure contact to the logic board near the vibrator.
-
Remove the pressure contact.
-
-
Este passo não foi traduzido. Ajude a traduzi-lo
-
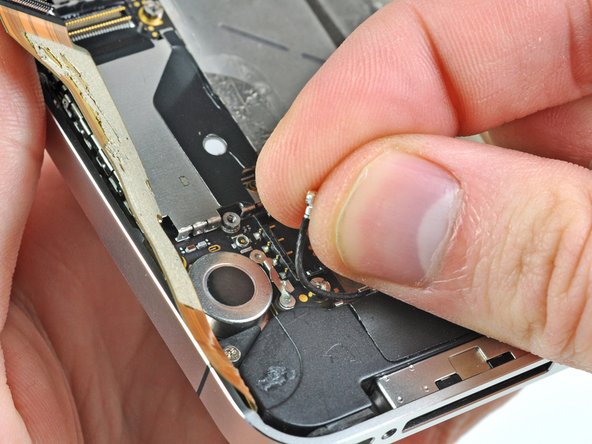
Use the edge of a plastic opening tool to pry the Wi-Fi antenna cable up from its socket on the logic board.
-
De-route the Wi-Fi antenna cable out from under the metal fingers attached to the logic board.
-
-
Este passo não foi traduzido. Ajude a traduzi-lo
-
Remove the two 2.4 mm Phillips screws securing the speaker enclosure assembly to the outer case.
-
-
Este passo não foi traduzido. Ajude a traduzi-lo
-
Remove the small black spacer that was under the Phillips screw near the vibrator.
-
-
Este passo não foi traduzido. Ajude a traduzi-lo
-
Use a plastic opening tool to lift the speaker enclosure assembly out of the case, being sure not to damage the EMI fingers on the attached Wi-Fi antenna.
-
Remove the speaker enclosure assembly.
-