Esta versão pode conter edições incorretas. Mude para o último instantâneo verificado.
O que você precisa
-
Este passo não foi traduzido. Ajude a traduzi-lo
-
If your display glass is cracked, keep further breakage contained and prevent bodily harm during your repair by taping the glass.
-
Lay overlapping strips of clear packing tape over the iPhone's display until the whole face is covered.
-
-
Este passo não foi traduzido. Ajude a traduzi-lo
-
Remove the two Phillips #00 screws from the dock-connector end of the iPhone.
-
-
Este passo não foi traduzido. Ajude a traduzi-lo
-
Remove the metal handle from the suction cup. It's easier and safer to grip the suction cup's base instead of the metal handle.
-
Use a small suction cup near the Home button to gently pull up the lower portion of the iPhone's display assembly.
-
-
Este passo não foi traduzido. Ajude a traduzi-lo
-
Rotate the display assembly up until it is at an angle of approximately 45 degrees.
-
-
Este passo não foi traduzido. Ajude a traduzi-lo
-
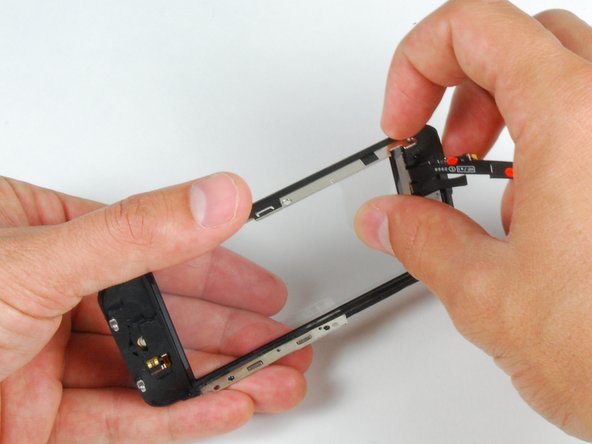
Continue to hold the display assembly with one hand, and use your other hand and a spudger to disconnect the black ribbon cable labeled "1."
-
Ribbon cable "1" is connected with a plug style connector. The block at the end of the cable is the plug which is simply pushed into a socket on the circuit board. No other locking mechanism is used.
-
-
Este passo não foi traduzido. Ajude a traduzi-lo
-
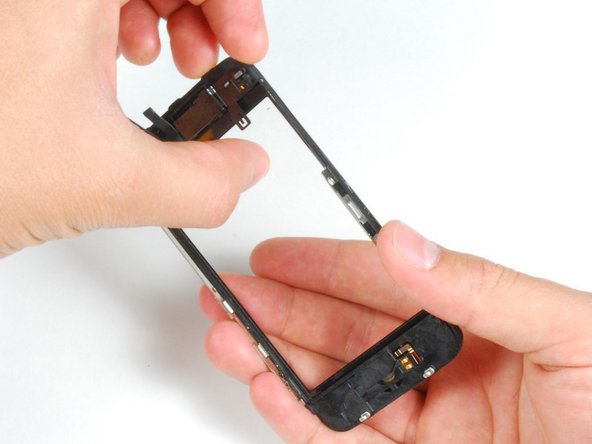
Rotate the display assembly up until it is roughly vertical. This will allow easier access for disconnecting the remaining cables.
-
Use a spudger to disconnect the black ribbon cable labeled "2."
-
-
Este passo não foi traduzido. Ajude a traduzi-lo
-
Slide the ribbon cable out of the connector, and remove the display assembly from the iPhone.
-
-
Este passo não foi traduzido. Ajude a traduzi-lo
-
Remove the single Phillips #00 screw from the corner of the display assembly.
-
-
Este passo não foi traduzido. Ajude a traduzi-lo
-
Remove the two Phillips #00 screws from the right side of the display assembly.
-
-
-
Este passo não foi traduzido. Ajude a traduzi-lo
-
Turn the display around, and if there is a thin strip of black tape on the edge of the display assembly, carefully peel it up.
-
-
Este passo não foi traduzido. Ajude a traduzi-lo
-
Remove the three Phillips #00 screws from the left side of the display assembly.
-
-
Este passo não foi traduzido. Ajude a traduzi-lo
-
Turn the display assembly over and again carefully insert a metal spudger between the two metal rails along the edge of the display assembly. Gently rotate the spudger to lift the LCD up from the glass.
-
-
Este passo não foi traduzido. Ajude a traduzi-lo
-
Separate the LCD and glass by sliding the LCD panel away from the ribbon cables on the glass.
-
-
Este passo não foi traduzido. Ajude a traduzi-lo
-
This is what should be left after removing the LCD.
-
-
Este passo não foi traduzido. Ajude a traduzi-lo
-
If the glass has shattered at the top or bottom be especially patient and gentle when removing fragments. In extreme cases you may have to pick off any glass shards that remain glued to the plastics.
-
Using a heat gun or hairdryer, heat the top left area of the touch screen.
-
Use your fingernails to slowly lift up the left corner. The touch screen plastics are held to the touch screen with adhesive. It may take some work to free the corners.
-
Heat and repeat for the right side.
-
-
Este passo não foi traduzido. Ajude a traduzi-lo
-
Once the top is free, use the heat gun to heat the sides of the touch screen.
-
Use a spudger to free the sides of the touch screen plastics.
-
-
Este passo não foi traduzido. Ajude a traduzi-lo
-
Heat the bottom corners with the heat gun.
-
Again, use your fingernails to free the corners.
-
Remove the touch screen plastics from the touch screen.
-
-
Este passo não foi traduzido. Ajude a traduzi-lo
-
In order to adhere the new panel, peel as much of the existing adhesive off of the front panel frame as you can.
-
-
Este passo não foi traduzido. Ajude a traduzi-lo
-
Place custom fit adhesive strips or double stick tape on the upper area of the front panel plastics.
-
Use the flat end of a spudger to press the adhesive strips to the plastic frame.
-
-
Este passo não foi traduzido. Ajude a traduzi-lo
-
Place the second adhesive strip or double stick tape on the home button end of the front panel frame.
-
Run the flat end of a spudger over the strip to stick it down and push bubbles out from under the sticker.
-
-
Este passo não foi traduzido. Ajude a traduzi-lo
-
Using the tip of a spudger to start, peel the adhesive backings off of the strips on the front panel plastic.
-
-
Este passo não foi traduzido. Ajude a traduzi-lo
-
Peel the protective plastic off of the inside of the front panel glass.
-
-
Este passo não foi traduzido. Ajude a traduzi-lo
-
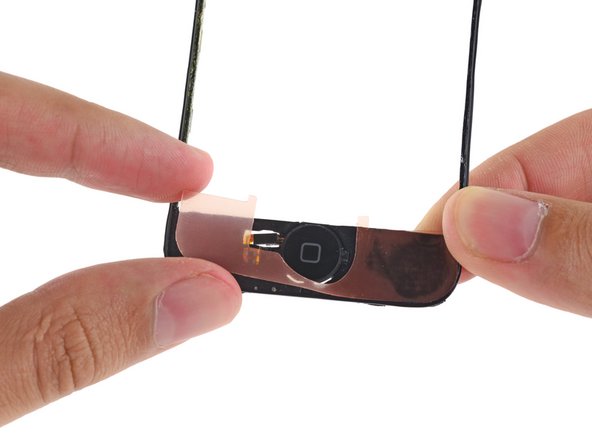
Fold the front panel cables down toward the home button recess to get them out of the way.
-
-
Este passo não foi traduzido. Ajude a traduzi-lo
-
Ensuring that the upper cables are folded clear, align the top of the front glass with the front panel frame.
-
-
Este passo não foi traduzido. Ajude a traduzi-lo
-
Press the front panel and front panel frame together, ensuring the the home button ends are aligned.
-
-
Este passo não foi traduzido. Ajude a traduzi-lo
-
Firmly press both ends of the phone to ensure the attachment of the adhesive.
-


Cancelar: não concluí este guia.
540 outras pessoas executaram este guia.

8 comentários
Step 15:
the screen sort of sits in the plastic because of the band of material running around the perimeter of the assembly being more firmly attached to the plastic than the screen. I found this step much easier to complete the second time around because i knew to dig my nail in between the screen and the material running around the perimeter of the assembly in a front to back motion. Then i pivoted my nail up 90 degrees so it was between the plastic and the screen and was able to gently pry them apart while heating.
i second that, it should really be another bulletpoint because its really hard to see if you are not looking for it. Something like:
Push gently on the thin plastic bezel surrounding the frontpanel, do not try to push into the side of the assembly. It can look like there is a seam but there is not!
Its really the only way to get it done without ripping off any parts of the plastic bezel... it does not show when reassembled but its creating a wide portal for dust particles.
NOTE: Just completed the installation and was supremely frustrated when the screen didn't turn back on. My first inclination was that the 3rd connector wasn't seated properly...so I opened up and re-attached 3 times. With girlfriend peering over my 'soon to be a failure of a bf' shoulder, I asked her to google up a 'hard reset'. Eureka. Hold down the black nav button and the top power button at the same time until the silver apple reappears. Crisis averted, great tutorial otherwise!
When removing the broken glass, be sure to remove adhesive from the side rails of the iPhone front panel assembly, otherwise your front panel won't fit as snugly as it should.
When reassembling, take care to properly insert ribbon cable 3, as it is much easier to remove it than it is to install it. Having an extra set of hands was invaluable for this repair.
I wish the instructions warned me to make sure a sim card is in the socket before reassembling, and/or they gave detailed reassembly instructions, and/or had higher quality pictures (I zoomed in on the pictures multiple times while reassembling, and could not see exactly how things were supposed to fit back together). My replacement went well, and all was working perfectly, but a piece of the cable was apparently sticking down into the sim card socket, and when my 21 yr old son forced the sim card it, it destroyed the cable that is attached to the plastic speaker assembly. Now I get to buy the more expensive repair kit that includes that part, and try again. D amn, I'm frustrated. -Bill