Ir para o conteúdo principal

iPad Pro 11" LiDAR Sensor Assembly Replacement

Pré-requisito somente
Este guia destina-se apenas a ser usado como pré-requisito para outros guias. É incompleto por si só.

O que você precisa

  1. iPad Pro 11" LiDAR Sensor Assembly Replacement, LiDAR sensor assembly information: passo 1, imagem 1 %32 iPad Pro 11" LiDAR Sensor Assembly Replacement, LiDAR sensor assembly information: passo 1, imagem 2 %32
    • The LiDAR sensor assembly is paired to the Face ID hardware. You'll need to transfer it to your replacement screen to keep Face ID functionality. The following steps show how to remove the sensor assembly and install it on your replacement screen.

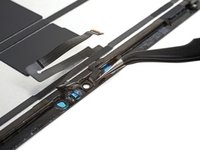
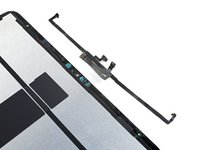
    • The LiDAR sensor assembly is composed of four total sensors:

    • Two ambient light sensors

    • One proximity sensor

    • One microphone

    • You'll need to separate each sensor from the screen before removing the entire assembly.

  2. iPad Pro 11" LiDAR Sensor Assembly Replacement, Heat the top sensor assembly: passo 2, imagem 1 %32
  3. iPad Pro 11" LiDAR Sensor Assembly Replacement, Separate the ambient light sensors: passo 3, imagem 1 %32 iPad Pro 11" LiDAR Sensor Assembly Replacement, Separate the ambient light sensors: passo 3, imagem 2 %32
    Ferramenta utilizada neste passo:
    Tweezers
    $3.99
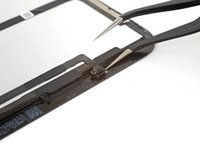
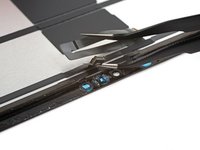
    • Insert one arm of your angled tweezers between the ambient light sensor and the screen.

    • You can also use a precision knife, but be careful not to damage the ribbon cable.

    • Pry up to separate the sensor from the screen.

    • This might take significant force.

    • Repeat this procedure for the other ambient light sensor.

  4. iPad Pro 11" LiDAR Sensor Assembly Replacement, Separate the proximity sensor: passo 4, imagem 1 %32 iPad Pro 11" LiDAR Sensor Assembly Replacement, Separate the proximity sensor: passo 4, imagem 2 %32 iPad Pro 11" LiDAR Sensor Assembly Replacement, Separate the proximity sensor: passo 4, imagem 3 %32
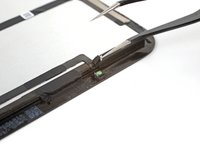
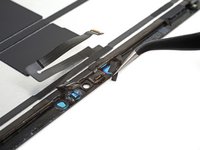
    • Insert one arm of your angled tweezers between the proximity sensor cable and the screen.

    • Slide the tweezers toward the screen while prying to separate the sensor from the screen.

    • This might take significant force and multiple iOpener heating cycles.

  5. iPad Pro 11" LiDAR Sensor Assembly Replacement, Peel away the tape: passo 5, imagem 1 %32 iPad Pro 11" LiDAR Sensor Assembly Replacement, Peel away the tape: passo 5, imagem 2 %32
    • Peel off any tape covering the microphone.

    • Set the tape aside. You'll use it during reassembly.

  6. iPad Pro 11" LiDAR Sensor Assembly Replacement, Separate the microphone: passo 6, imagem 1 %32 iPad Pro 11" LiDAR Sensor Assembly Replacement, Separate the microphone: passo 6, imagem 2 %32 iPad Pro 11" LiDAR Sensor Assembly Replacement, Separate the microphone: passo 6, imagem 3 %32
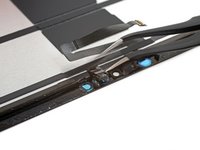
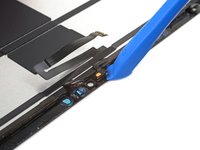
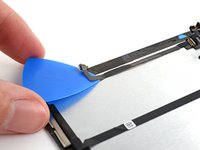
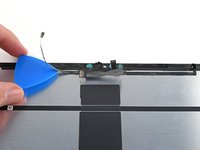
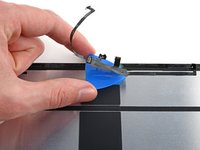
    • Slide an opening tool under the microphone to separate its adhesive.

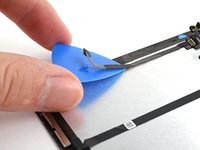
    • Pry up to separate the microphone from the screen.

  7. iPad Pro 11" LiDAR Sensor Assembly Replacement, Remove the LiDAR sensor assembly: passo 7, imagem 1 %32 iPad Pro 11" LiDAR Sensor Assembly Replacement, Remove the LiDAR sensor assembly: passo 7, imagem 2 %32 iPad Pro 11" LiDAR Sensor Assembly Replacement, Remove the LiDAR sensor assembly: passo 7, imagem 3 %32
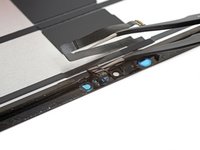
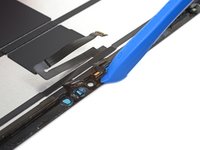
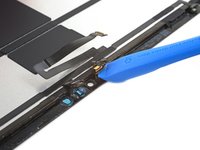
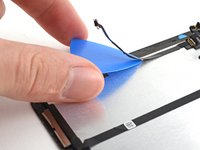
    • Slide an opening pick under the LiDAR sensor assembly cable to separate it from the screen.

  8. iPad Pro 11" LiDAR Sensor Assembly Replacement: passo 8, imagem 1 %32 iPad Pro 11" LiDAR Sensor Assembly Replacement: passo 8, imagem 2 %32 iPad Pro 11" LiDAR Sensor Assembly Replacement: passo 8, imagem 3 %32
    • Continue sliding your opening pick under the LiDAR sensor assembly until it's completely separated from the screen.

    • Remove the LiDAR sensor assembly.

  9. iPad Pro 11" LiDAR Sensor Assembly Replacement: passo 9, imagem 1 %32
    Ferramenta utilizada neste passo:
    Tesa 61395 Tape
    $5.99
    • During reassembly, you'll have to perform the following:

    • Align the LiDAR sensor assembly on your replacement screen.

    • Use Tesa tape, or similar double-sided tape, to secure the cables to the screen.

    • Use E6000 adhesive, or similar adhesive, to secure the sensors to their cutouts on the screen.

    • Only apply adhesive to the edges of the sensors. Placing adhesive on the front will break them.

Conclusão

To reassemble your device, follow these instructions in reverse order.

Chayton Ritter

Membro desde: 08/21/20

22.506 Reputação

Autoria de 105 guias

Equipe

Guide Team Membro de Guide Team

Staff

Membros da 9

Autoria de 11.370 guias

0 comentários

Adicione um comentário

Exibir estatísticas:

Últimas 24 horas: 0

Últimos 7 dias: 7

Últimos 30 dias: 15

Duração total: 33