Ir para o conteúdo principal

Esta versão pode conter edições incorretas. Mude para o último instantâneo verificado.

Pré-requisito somente
Este guia destina-se apenas a ser usado como pré-requisito para outros guias. É incompleto por si só.

O que você precisa

  1. Este passo não foi traduzido. Ajude a traduzi-lo

    : passo 1, imagem 1 %32
    • Strong adhesive holds the screen in place. In order to separate it, you'll first need to heat and soften the adhesive using an iOpener, hair dryer, or heat gun.

    • You may need to reapply heat repeatedly throughout this process to prevent the adhesive from cooling and hardening.

    • Prepare an iOpener and place it on the bottom edge of the iPad's screen for about two minutes.

  2. Este passo não foi traduzido. Ajude a traduzi-lo

    : passo 2, imagem 1 %32
    Ferramenta utilizada nesse passo:
    Anti-Clamp
    $24.95
    Comprar
    • If your iPad's screen is badly cracked, wear skin and eye protection. Cover the screen with a smooth layer of clear packing tape to contain glass shards and help the suction cup adhere. Alternatively, use a strong piece of tape (such as duct tape) and fold it into a handle.

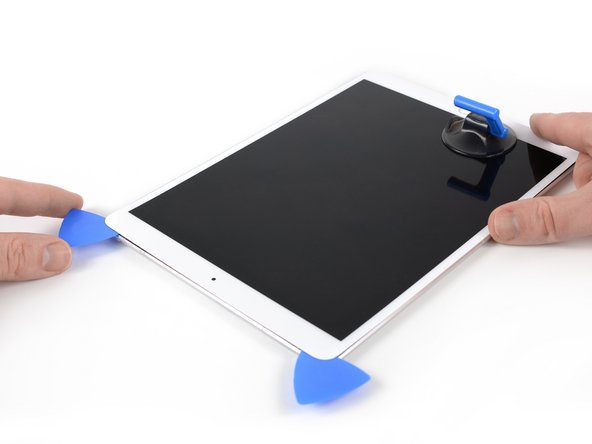
    • Place a suction cup next to the iPad's home button and press down to create a seal.

    • To get the most leverage, place the suction cup as close to the edge as possible without going past the edge of the display.

    • If you want to use the Anti-Clamp, a tool we designed to make the opening procedure easier, follow this guide.

    • Firmly pull up on the suction cup to create a small gap between the front panel and the rear case.

    • Don't pull too hard, or you may shatter the glass. If necessary, apply more heat to further soften the adhesive.

    • Once you've opened a sufficient gap, insert an opening pick into the gap.

  3. Este passo não foi traduzido. Ajude a traduzi-lo

    : passo 3, imagem 1 %32 : passo 3, imagem 2 %32
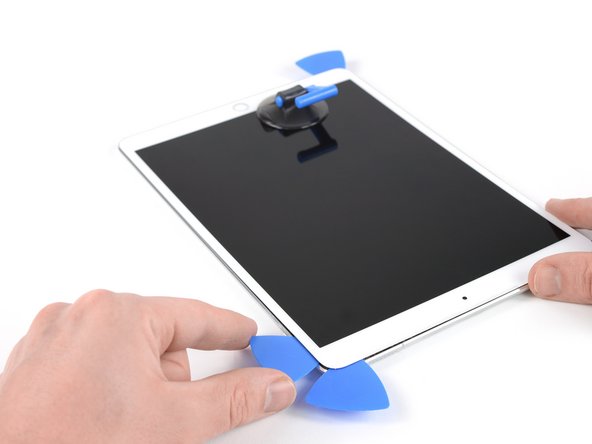
    • Slice through the adhesive under the screen by sliding the pick along the edge of the display, towards the bottom left corner.

    • Leave the pick in place temporarily to prevent the adhesive from re-sealing.

  4. Este passo não foi traduzido. Ajude a traduzi-lo

    : passo 4, imagem 1 %32 : passo 4, imagem 2 %32 : passo 4, imagem 3 %32
    • Apply heat to the left edge of the iPad for about two minutes, or until it's slightly too hot to touch comfortably.

    • If necessary, re-heat your iOpener for a few seconds or until it's a bit too hot to touch. Be careful not to overheat the iOpener, or it may burst.

    • Insert a second opening pick at the bottom left corner of the iPad.

    • Slide the second opening pick along the left side of the display to separate the adhesive underneath.

    • Leave the opening pick inserted near the top left corner of the iPad to prevent the adhesive from re-sealing.

  5. Este passo não foi traduzido. Ajude a traduzi-lo

    : passo 5, imagem 1 %32
    • Apply heat to the top edge of the iPad for about two minutes, or until it's slightly too hot to touch comfortably.

  6. Este passo não foi traduzido. Ajude a traduzi-lo

    : passo 6, imagem 1 %32 : passo 6, imagem 2 %32 : passo 6, imagem 3 %32
    • Insert a third opening pick at the top left corner of the iPad.

    • Use the opening pick to cut the adhesive under the top edge of the iPad by sliding it to the top right corner.

    • The front-facing camera is located right in the center of the iPad's top edge and can be damaged if the pick is inserted too far. Only insert the tip of the opening pick when cutting near the camera.

  7. Este passo não foi traduzido. Ajude a traduzi-lo

    : passo 7, imagem 1 %32 : passo 7, imagem 2 %32 : passo 7, imagem 3 %32
    • Apply heat to the final, right edge of the iPad for about two minutes, or until it's slightly too hot to touch comfortably.

    • Insert a fourth opening pick at the top right corner of the iPad.

    • Slide the opening pick down to the bottom right corner to cut the adhesive.

    • Slide the opening pick around the bottom right corner—pausing to apply more heat if needed—and cut the remaining adhesive on the bottom edge, but stop before you reach the home button.

  8. Este passo não foi traduzido. Ajude a traduzi-lo

    : passo 8, imagem 1 %32 : passo 8, imagem 2 %32
    • Insert a fifth opening pick at the top of the iPad near (but not directly on) the front-facing camera.

    • Gently twist the pick to separate the display assembly from the iPad.

    • Don't try to remove the display all the way yet! It is still connected to the iPad's motherboard.

    • If needed, apply more heat and/or cut any remaining adhesive that prevents the display from separating.

  9. Este passo não foi traduzido. Ajude a traduzi-lo

    : passo 9, imagem 1 %32 : passo 9, imagem 2 %32 : passo 9, imagem 3 %32
    • Lift the display assembly from its top edge and carefully slide it up (towards the front-facing camera and headphone jack), until the screw that secures the battery power connector is revealed at the bottom.

    • Don't lift the display more than 70° or you may damage the attached ribbon cables.

  10. Este passo não foi traduzido. Ajude a traduzi-lo

    : passo 10, imagem 1 %32 : passo 10, imagem 2 %32
    Ferramenta utilizada nesse passo:
    Magnetic Project Mat
    $19.95
    Comprar
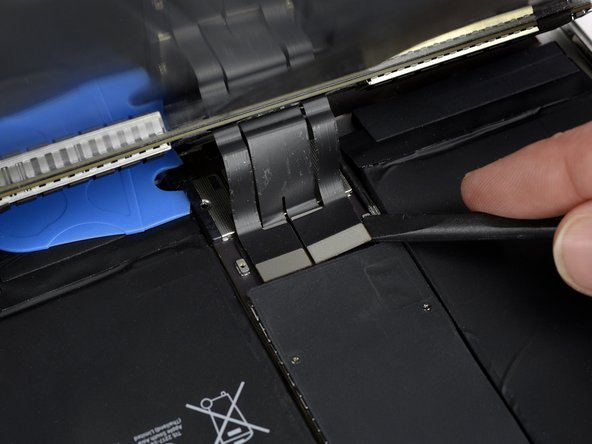
    • Remove the 1.9 mm Phillips screw that secures the battery power connector.

    • Throughout this repair, keep track of each screw and make sure it goes back exactly where it came from to avoid damaging your device.

  11. Este passo não foi traduzido. Ajude a traduzi-lo

    : passo 11, imagem 1 %32 : passo 11, imagem 2 %32 : passo 11, imagem 3 %32
    • These photos show what the battery connector looks like underneath the logic board. Use these photos as a reference while you safely disconnect the battery.

    • Notice that the battery connector has cantilever springs on the logic board that press against the battery contact pads. Since both the logic board and battery are glued down, you'll need to slide something thin and flexible between the contact points to disconnect the battery.

  12. Este passo não foi traduzido. Ajude a traduzi-lo

    : passo 12, imagem 1 %32
    • Be careful when you isolate the battery using a battery blocker. The battery contacts are easily bent or broken, resulting in irreversible damage.

    • To disconnect the battery, slide one prong of a battery blocker or the tip of an opening pick under the battery power connector to ensure the power circuit is interrupted.

    • Don't push the battery blocker underneath the connector with excessive force. If you're having trouble fitting the battery blocker underneath the logic board, you can try using a playing card to disconnect the battery instead.

    • The battery blocker or playing card ideally should slide under the logic board without encountering any blockages.

    • Leave the battery blocker in place as you work.

  13. Este passo não foi traduzido. Ajude a traduzi-lo

    : passo 13, imagem 1 %32 : passo 13, imagem 2 %32 : passo 13, imagem 3 %32
    • Slowly lift the display from its top edge, being careful not to strain the attached ribbon cables.

    • Remove the two 1.3 mm Phillips screws securing the display connector cover bracket.

    • You may need to angle the driver slightly in order to avoid straining the ribbon cables.

    • Remove the display connector cover bracket.

  14. Este passo não foi traduzido. Ajude a traduzi-lo

    : passo 14, imagem 1 %32 : passo 14, imagem 2 %32 : passo 14, imagem 3 %32
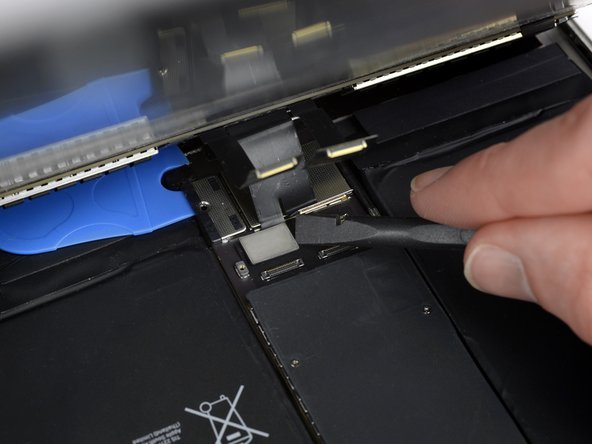
    • Use a spudger to disconnect the two visible display flex connectors by gently prying them straight up from their sockets.

    • To re-attach press connectors like this one, carefully align and press down on one side until it clicks into place, then repeat on the other side. Do not press down on the middle. If the connector is misaligned, the pins can bend, causing permanent damage.

  15. Este passo não foi traduzido. Ajude a traduzi-lo

    : passo 15, imagem 1 %32 : passo 15, imagem 2 %32 : passo 15, imagem 3 %32
    • Underneath, you'll find two additional display cable connectors.

    • Use your spudger to gently pry them up and disconnect them.

  16. Este passo não foi traduzido. Ajude a traduzi-lo

    : passo 16, imagem 1 %32
    • Remove the display assembly.

    • During reassembly, before installing a display, remove any remaining adhesive from the iPad, and clean the glued areas with high concentration isopropyl alcohol (90% or greater) and a lint-free cloth. This helps prep the iPad for fresh adhesive and ensures that it will bond properly.

    • If you plan to reinstall your existing display, remove any remaining adhesive from the back and clean the adhered areas with isopropyl alcohol.

    • Test your iPad's functions and install pre-cut adhesive strips to the back of the display using our display adhesive application guide before sealing it up.

Linha de Chegada

Dominik Schnabelrauch

Membro desde: 11/23/16

203.329 Reputação

Autoria de 682 guias

Equipe

iFixit Membro de iFixit

Staff

Membros da 135

Autoria de 16.817 guias

0 comentários

Adicione um comentário

Exibir estatísticas:

Últimas 24 horas: 0

Últimos 7 dias: 1

Últimos 30 dias: 1

Duração total: 438