Introdução
Use this guide to replace adhesive strips and re-seal your iPad 4 after a repair.
Only for use with EXISTING front panel assemblies.
O que você precisa
-
-
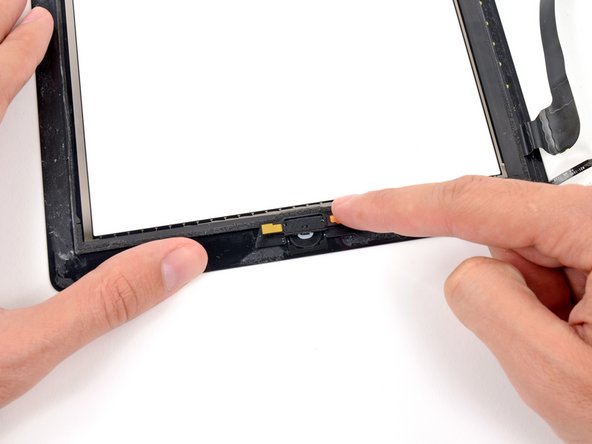
Remove the two 2.1 mm Phillips #00 Phillips screws securing the home button control board to the home button mounting bracket.
-
-
-
-
In the following steps, you will be placing the remaining pieces of adhesive on the front panel.
-
Do not peel the clear backing off the strips just yet.
-
Place the bridge shaped adhesive strip between the top edge of the inner frame of the front panel and the camera mounting bracket.
-
Smooth the strip down from the center out, taking care to not trap any air bubbles between the strip and the front panel.
-
-
-
Use a pair of tweezers to peel the clear backing up off the adhesive strip directly underneath the home button ribbon cable.
-
Lay the home button ribbon cable down on the adhesive strip and smooth the cable down from the center out, taking care to not trap any air bubbles between the strip and the front panel.
-
-
-
Use a dry microfiber cloth to clean the LCD and inside of the front panel glass. You may want to use canned air or an air compressor to blow away and dust.
-
Use a pair of tweezers to peel the clear backing up off each adhesive strip.
Just anted to remind everyone to connect all your cables BEFORE sticking the screen down!!
…before attaching the LCD, in fact.
To go a step further in caution, leave the backing on the adhesive strips, attach all the cables (and replace the tape over them if you like), making sure all of the motherboard screws are in place. Then lay the LCD on top (without screwing it down), lay the glass on top of that, and TEST. Make sure you have full LCD and digitizer function. If not, do a hard reset and test again. If still not, dismantle everything and re-check the cables—they should be fully inserted (usually the white line should not show at all), with their latches down and no sharp crimps. It’s surprising how small a change in digitizer insertion can make a black screen suddenly function just fine.
-


To reassemble your device, follow these instructions in reverse order.
To reassemble your device, follow these instructions in reverse order.
Cancelar: não concluí este guia.
29 outras pessoas executaram este guia.

Um comentário
Right, Left…nothing straight-forward about this procedure, it’s moderately difficult simply due to the shear number of TLDR instructions and steps with no precise instructions on which side of the adhesive faces up or down. Clear backing? the strips that arrived for my repair were all stuck on one clear backing sheet with white “backing” and I just had to slog through it. Not an easy job. I did use the sticky clear backing sheet to pick up all the dust motes off the glass surfaces before I reassembled and that was a plus.
I have just replaced the adhesive on an iPad 4 and did not need to remove and replace the home button. There seemed no reason to remove the button because the adhesive strips did not encroach on the button mount. Removing adhesive is aided by rubbing it with iso propyl alcohol (rubbing alcohol) after striping back the plastic film that covers it. It would be nice if the adhesive would come away with the plastic film but this does not happen even with gentle heat. If you use shart instruments to remove the adhesive its very easy to damage the underlying paint.
geoffrey - Responder