Ir para o conteúdo principal

iPad 3 4G Front Panel Assembly Replacement

Guia arquivado
Este guia é mantido exclusivamente para fins históricos. Use a versão atualizada do guia para executar o reparo.
Pré-requisito somente
Este guia destina-se apenas a ser usado como pré-requisito para outros guias. É incompleto por si só.

O que você precisa

  1. iPad 3 4G Front Panel Assembly Replacement, Front Panel Assembly: passo 1, imagem 1 %32
    • In the following steps, you will use the iSesamo tool to detach the adhesive holding the front glass to the aluminum frame of the iPad 3.

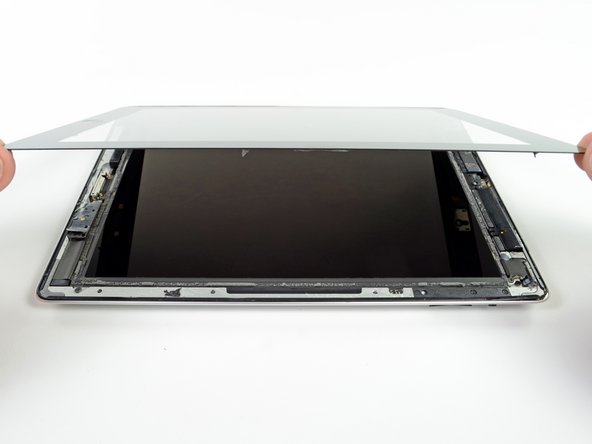
    • While using the iSesamo, do not insert the tool more than ~0.5 inches, i.e. past the corners of the wedge.

    • It is very important that you work slowly and carefully, making sure that the iSesamo does not slip and damage either your hand or the iPad 3.

  2. iPad 3 4G Front Panel Assembly Replacement: passo 2, imagem 1 %32 iPad 3 4G Front Panel Assembly Replacement: passo 2, imagem 2 %32 iPad 3 4G Front Panel Assembly Replacement: passo 2, imagem 3 %32
    • There is a small gap in the iPad's adhesive ring in the upper right corner of the iPad, approximately 0.75 inches (~2 cm) from the top of the iPad.

    • Exploiting the gap in the adhesive, carefully insert the tip of the iSesamo in between the front glass and the aluminum frame.

    • Carefully push the iSesamo further into the iPad, stopping when the tool is approximately 3/8" (1 cm) underneath the front glass.

  3. iPad 3 4G Front Panel Assembly Replacement: passo 3, imagem 1 %32 iPad 3 4G Front Panel Assembly Replacement: passo 3, imagem 2 %32 iPad 3 4G Front Panel Assembly Replacement: passo 3, imagem 3 %32
    • Holding the tool firmly, slide the iSesamo down the right edge of the iPad.

    • The adhesive is very strong. It will require a fair amount of force to separate the front glass. Work slowly and carefully, making sure to not let the iSesamo slip.

    • Continue sliding the iSesamo along the entire right edge of the iPad, releasing the adhesive all the way to the bottom right corner.

  4. iPad 3 4G Front Panel Assembly Replacement: passo 4, imagem 1 %32 iPad 3 4G Front Panel Assembly Replacement: passo 4, imagem 2 %32 iPad 3 4G Front Panel Assembly Replacement: passo 4, imagem 3 %32
    • Without removing the iSesamo, rotate it around the bottom right corner of the iPad.

    • Maintaining the iSesamo at the same penetration depth, carefully slide the iSesamo along the bottom edge of the iPad, stopping just before the home button.

  5. iPad 3 4G Front Panel Assembly Replacement: passo 5, imagem 1 %32 iPad 3 4G Front Panel Assembly Replacement: passo 5, imagem 2 %32 iPad 3 4G Front Panel Assembly Replacement: passo 5, imagem 3 %32
    • When you reach the right side of the home button, pull the iSesamo out until only ~0.5 cm (3/16") remains inside the iPad.

    • Slide the iSesamo along the bottom edge underneath the home button.

    • Once the adhesive beneath the home button has been released, re-insert the iSesamo.

  6. iPad 3 4G Front Panel Assembly Replacement: passo 6, imagem 1 %32 iPad 3 4G Front Panel Assembly Replacement: passo 6, imagem 2 %32 iPad 3 4G Front Panel Assembly Replacement: passo 6, imagem 3 %32
    • Continue sliding the iSesamo along the left half of the bottom edge of the iPad, releasing the adhesive all the way to the corner.

  7. iPad 3 4G Front Panel Assembly Replacement: passo 7, imagem 1 %32 iPad 3 4G Front Panel Assembly Replacement: passo 7, imagem 2 %32
    • Without removing the iSesamo, rotate it around the bottom left corner of the iPad.

    • Be very careful that the iSesamo does not slip as you move it around the corner. The touchscreen ribbon cable is located approximately 2.5 cm (~1") from the bottom of the iPad. If the iSesamo slips, it will tear the ribbon cable

    • Begin sliding the iSesamo up along the left edge of the iPad, stopping just before the ribbon cable, approximately 2.5 cm from the bottom of the iPad.

    • Remove the iSesamo from the iPad.

  8. iPad 3 4G Front Panel Assembly Replacement: passo 8, imagem 1 %32 iPad 3 4G Front Panel Assembly Replacement: passo 8, imagem 2 %32
    • In the same manner as described above, insert the iSesamo into the upper right corner of the iPad 3.

    • The adhesive along the top edge of the iPad is much thicker than along the other edges. Removing the adhesive along this edge requires inserting the iSesamo to a depth of 1.5 cm (~5/16").

  9. iPad 3 4G Front Panel Assembly Replacement: passo 9, imagem 1 %32 iPad 3 4G Front Panel Assembly Replacement: passo 9, imagem 2 %32 iPad 3 4G Front Panel Assembly Replacement: passo 9, imagem 3 %32
    • Slide the iSesamo along the top edge of the iPad, stopping just before the camera.

    • The adhesive is very strong. Sliding the iSesamo will take a fair amount of force. Work slowly and carefully, making sure that the iSesamo does not slip.

  10. iPad 3 4G Front Panel Assembly Replacement: passo 10, imagem 1 %32 iPad 3 4G Front Panel Assembly Replacement: passo 10, imagem 2 %32 iPad 3 4G Front Panel Assembly Replacement: passo 10, imagem 3 %32
    • To remove the adhesive above the camera fixture, pull the iSesamo out of the iPad until only 2 mm (~1/8") is still inside the iPad.

    • Slide the tip of the iSesamo along the length of the camera fixture.

  11. iPad 3 4G Front Panel Assembly Replacement: passo 11, imagem 1 %32 iPad 3 4G Front Panel Assembly Replacement: passo 11, imagem 2 %32
    • Once the tip of the iSesamo has cleared the camera fixture, re-insert the iSesamo to its proper depth of 1.5 cm.

  12. iPad 3 4G Front Panel Assembly Replacement: passo 12, imagem 1 %32 iPad 3 4G Front Panel Assembly Replacement: passo 12, imagem 2 %32
    • Continue sliding the iSesamo along the top edge of the iPad, releasing the adhesive all the way to the corner.

    • Be careful as you slide the iSesamo along the edge. The adhesive is very strong and may require considerable force. Although it is not sharp, the iSesamo is a thin metal blade and it may cut you if it slips.

  13. iPad 3 4G Front Panel Assembly Replacement: passo 13, imagem 1 %32 iPad 3 4G Front Panel Assembly Replacement: passo 13, imagem 2 %32 iPad 3 4G Front Panel Assembly Replacement: passo 13, imagem 3 %32
    • Without removing the iSesamo, rotate it around the top left corner of the iPad.

    • Begin sliding the iSesamo down the left edge of the iPad, releasing the adhesive as you go.

  14. iPad 3 4G Front Panel Assembly Replacement: passo 14, imagem 1 %32 iPad 3 4G Front Panel Assembly Replacement: passo 14, imagem 2 %32 iPad 3 4G Front Panel Assembly Replacement: passo 14, imagem 3 %32
    • Slide the iSesamo tool down the left edge of the iPad, stopping ~4 cm (1.5") from the bottom.

    • Do not slide the iSesamo along the entire left edge of the iPad. The touchscreen ribbon cable is approximately 4 cm (~1.5") from the bottom of the iPad. Sliding the iSesamo past the ribbon cable will destroy it.

    • Remove the iSesamo from the iPad.

  15. iPad 3 4G Front Panel Assembly Replacement: passo 15, imagem 1 %32 iPad 3 4G Front Panel Assembly Replacement: passo 15, imagem 2 %32
    • Insert the iSesamo into the right edge of the iPad, near the top corner.

    • Gently twist the iSesamo, loosening any adhesive that may still be holding the front glass to the aluminum frame.

    • There may still be some adhesive holding the front glass to the aluminum frame, causing the iSesamo to be unable to move. Do not force the iSesamo; doing so risks cracking the front panel. If this is the case, repeat the previous process of sliding the iSesamo along the right side of the iPad, releasing the adhesive.

  16. iPad 3 4G Front Panel Assembly Replacement: passo 16, imagem 1 %32 iPad 3 4G Front Panel Assembly Replacement: passo 16, imagem 2 %32
    • In the same manner described above, insert the iSesamo into the top left corner of the iPad.

    • Twist the iSesamo gently to release the remaining adhesive.

  17. iPad 3 4G Front Panel Assembly Replacement: passo 17, imagem 1 %32 iPad 3 4G Front Panel Assembly Replacement: passo 17, imagem 2 %32
    • Insert the iSesamo near the bottom right corner of the iPad.

    • Gently twist the iSesamo to release any remaining adhesive.

  18. iPad 3 4G Front Panel Assembly Replacement: passo 18, imagem 1 %32 iPad 3 4G Front Panel Assembly Replacement: passo 18, imagem 2 %32 iPad 3 4G Front Panel Assembly Replacement: passo 18, imagem 3 %32
    • Holding the front panel from top- and bottom-right corners, gently lift the front panel, rotating it around the left edge.

    • If there is still adhesive holding the front panel to the aluminum frame, repeat the previous steps—sliding the iSesamo along the edges of the iPad and releasing the adhesive.

    • Rotate the display all the way over, laying the front panel on the table beside the iPad.

    • Be careful to not bend or tear the touchscreen ribbon cable.

  19. iPad 3 4G Front Panel Assembly Replacement: passo 19, imagem 1 %32
    • Remove the four 2 mm Phillips #0 screws securing the LCD to the aluminum frame.

  20. iPad 3 4G Front Panel Assembly Replacement: passo 20, imagem 1 %32 iPad 3 4G Front Panel Assembly Replacement: passo 20, imagem 2 %32
    • Using the flat end of a spudger, lift the right edge of the LCD out of the iPad.

    • Rotate the LCD along its left edge and lay it down on top of the front panel.

    • Be careful as you move the LCD. The ribbon cable is fragile and may break if it is flexed too much.

Conclusão

To reassemble your device, follow these instructions in reverse order.

Uma outra pessoa concluiu este guia.

Brett Hartt

Membro desde: 04/12/10

127.876 Reputação

Autoria de 143 guias

Equipe

iFixit Membro de iFixit

Staff

Membros da 135

Autoria de 16.731 guias

0 comentários

Adicione um comentário

Exibir estatísticas:

Últimas 24 horas: 0

Últimos 7 dias: 0

Últimos 30 dias: 0

Duração total: 346