Esta versão pode conter edições incorretas. Mude para o último instantâneo verificado.
O que você precisa
-
-
Com a dobradiça podendo se mover livremente, o iMac fica instável, o que torna o trabalho difícil. Os reparos podem ser executados com o iMac deitado, mas ficam mais rápidos e fáceis se você usar um suporte de reparos para iMac.
-
Se estiver usando o suporte de reparo de papelão da iFixit, siga estas instruções de montagemestas instruções de montagem para instalá-lo.
-
-
-
Coloque o iMac numa mesa com a tela virada para cima.
-
Começando pelo canto direito superior do iMac, introduza um cartão de plástico por entre a tela e a moldura.
-
-
-
Com os cartões introduzidos próximo aos cantos, como mostra a figura, vire gentilmente os cartões para aumentar o vão entre a tela e a estrutura.
-
Se em algumas partes o adesivo ainda estiver colando e não puder ser separado, pare de fazer movimentos de vai-e-vem e use um dos cartões para cortar o adesivo nesta área.
-
Comece erguendo a parte superior da tela para fora da moldura.
-
-
-
-
Se houver um fio ou cabo debaixo da fita adesiva, remova sempre primeiro a fita.
-
Se o cabo estiver colado no chassi, use uma bolsa térmica iOpener ou um secador de cabelos para amolecer primeiro o adesivo. Você pode em seguida passar uma palheta de abertura por debaixo do cabo para soltá-lo. Nunca puxe diretamente pelos sensíveis conectores.
-
Passe uma palheta de abertura por debaixo dos pedaços de espuma para separá-los da tela e remova-os gentilmente. Pode ser que você precise de uma fita dupla-face para fixá-los na tela nova.
-
-
Este passo não foi traduzido. Ajude a traduzi-lo
-
Unplug the left speaker cable by pulling it straight up out of its socket on the logic board.
-
De-route the cable from the gap between the hard drive and logic board.
-
-
Este passo não foi traduzido. Ajude a traduzi-lo
-
Use a spudger to disconnect the power button connector from its socket on the logic board.
-
-
Este passo não foi traduzido. Ajude a traduzi-lo
-
Lift the left speaker straight up, until the power button cable is exposed (about 0.5 inches).
-
-
Este passo não foi traduzido. Ajude a traduzi-lo
-
Gently de-route the power button cable from its groove in the left speaker.
-
-
Este passo não foi traduzido. Ajude a traduzi-lo
-
Lift the left speaker straight up and remove it from the iMac.
-
Push from the connector end as you pull from the speaker end to thread the cable under the hard drive's right bracket.
-
-
Este passo não foi traduzido. Ajude a traduzi-lo
-
Pull straight up on the SATA data/power cable to disconnect it from the drive.
-
-
Este passo não foi traduzido. Ajude a traduzi-lo
-
Remove two 7.3 mm T10 screws securing the left hard drive bracket to the rear case.
-
-
Este passo não foi traduzido. Ajude a traduzi-lo
-
Grab the hard drive and left hard drive bracket together.
-
Tilt the left side up away from the rear case, and slide the assembly to the left.
-
Remove the hard drive and left hard drive bracket from the iMac.
-
-
Este passo não foi traduzido. Ajude a traduzi-lo
-
Disconnect the power supply control cable from the power supply.
-
-
Este passo não foi traduzido. Ajude a traduzi-lo
-
Remove the following four screws securing the power supply to the rear case (size T8 or T10 depending on the exact model):
-
Two 23.7 mm Torx screws
-
Two 7.3 mm Torx screws
-
-
Este passo não foi traduzido. Ajude a traduzi-lo
-
Move the power supply board towards the left edge of the case and up to free it from the notch in the logic board.
-
-
Este passo não foi traduzido. Ajude a traduzi-lo
-
Depress the tab on the DC power cable connector, then pull it straight out of its socket on the back of the logic board.
-
-
Este passo não foi traduzido. Ajude a traduzi-lo
-
Flip the top of the power supply towards you, like opening a mailbox, to reveal the AC inlet cable connector.
-
Disconnect the AC inlet cable connector.
-
-
Este passo não foi traduzido. Ajude a traduzi-lo
-
Gently rock the right speaker slightly to the right, to allow access to its cable's connection on the logic board.
-
-
Este passo não foi traduzido. Ajude a traduzi-lo
-
Use a spudger to loosen the right speaker cable's connector from its socket on the logic board.
-
Pull the connector to the right to remove it from its socket.
-
-
Este passo não foi traduzido. Ajude a traduzi-lo
-
Lift the speaker straight up and remove it from the iMac.
-
-
Este passo não foi traduzido. Ajude a traduzi-lo
-
Use the tip of a spudger to disconnect the fan cable's connector from its socket on the logic board.
-
-
Este passo não foi traduzido. Ajude a traduzi-lo
-
Peel the black tape connecting the fan to the exhaust duct back slightly.
-
Leave the tape in place on the exhaust duct—you only need to expose the joint to free the fan.
-
-
Este passo não foi traduzido. Ajude a traduzi-lo
-
Remove three 12.4 mm T10 screws securing the fan to the rear case.
-
-
Este passo não foi traduzido. Ajude a traduzi-lo
-
Use the flat end of a spudger to disconnect each of the four antenna connectors from the AirPort/Bluetooth card.
-
Leftmost
-
Top
-
Upper right
-
Lower right
-
-
Este passo não foi traduzido. Ajude a traduzi-lo
-
Flip up the metal retaining bracket on the iSight camera cable.
-
Pull the camera cable connector straight out of its socket, toward the top of the iMac.
-
-
Este passo não foi traduzido. Ajude a traduzi-lo
-
Use the flat end of a spudger to disconnect the headphone jack cable connector from its socket on the logic board.
-
Gently push the cable out of the way.
-
-
Este passo não foi traduzido. Ajude a traduzi-lo
-
Remove the following screws from the front of the logic board:
-
Two 23.7 mm T10 screws
-
Four 7.4 mm T10 screws
-
One 20.8 mm T25 spacer screw
-
One captive T10 screw
-
-
Este passo não foi traduzido. Ajude a traduzi-lo
-
Pull the cable and connector through the right hard drive bracket. Move the cable to the right side of the iMac, out of the way of the exhaust port.
-
-
Este passo não foi traduzido. Ajude a traduzi-lo
-
Remove two 5.7 mm T10 screws from the top of the heat sink exhaust duct.
-
-
Este passo não foi traduzido. Ajude a traduzi-lo
-
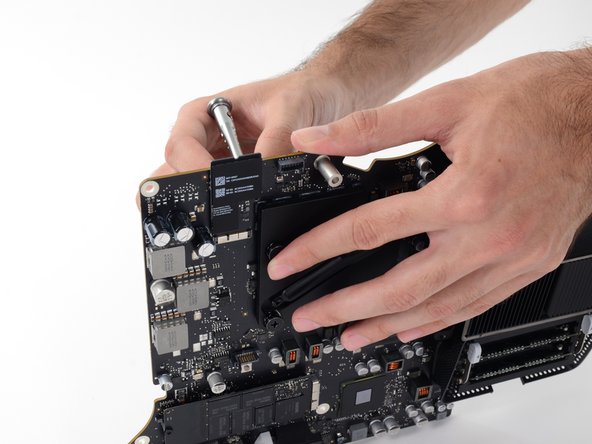
Tilt the logic board slightly forward.
-
Lift the logic board straight up and out of the iMac. Be careful not to snag on any of the screw posts attached to the inside of the rear case.
-
-
Este passo não foi traduzido. Ajude a traduzi-lo
-
When reassembling your iMac, be very careful to align the exterior I/O ports correctly. The logic board can sit crooked even when secured with all its screws.
-
You can use a USB flashdrive or ethernet cable to ensure the logic board is seated correctly while you screw it in.
-
-
Este passo não foi traduzido. Ajude a traduzi-lo
-
Remove the four 7.5 mm T8 screws from behind the GPU on the logic board.
-
-
Este passo não foi traduzido. Ajude a traduzi-lo
-
Remove four black stickers from the back of the CPU heat sink.
-
-
Este passo não foi traduzido. Ajude a traduzi-lo
-
Remove four 12.3 mm T10 screws from the back of the CPU heat sink.
-
-
Este passo não foi traduzido. Ajude a traduzi-lo
-
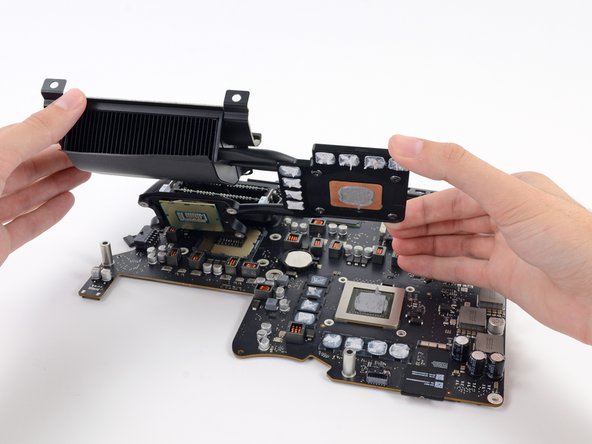
Remove the spring plate from behind the CPU heat sink.
-
Lift and remove the backing plate from behind the CPU heat sink. The backing plate has two posts that fit into alignment holes in the logic board.
-
-
Este passo não foi traduzido. Ajude a traduzi-lo
-
Insert the flat end of a spudger between the CPU and heat sink.
-
Gently pry the CPU up by slightly twisting the spudger.
-
Remove the CPU from the heat sink. Be careful not to touch the contacts.
-
Install your CPU into its socket on the board, not on the heat sink. Check the orientation and make sure it lines up correctly in the socket. Follow the instructions specific to your CPU type to apply fresh thermal paste to the surface of your CPU. Then, reinstall the heat sink over the top.
-


Cancelar: não concluí este guia.
9 outras pessoas executaram este guia.
