Esta versão pode conter edições incorretas. Mude para o último instantâneo verificado.
O que você precisa
-
Este passo não foi traduzido. Ajude a traduzi-lo
-
Loosen the two Phillips screws securing the access door to your iMac.
-
Remove the access door.
-
-
Este passo não foi traduzido. Ajude a traduzi-lo
-
Remove the following screws along the lower edge of your iMac:
-
Three 6 mm T8 Torx screws
-
One 8 mm T8 Torx screw
-
-
Este passo não foi traduzido. Ajude a traduzi-lo
-
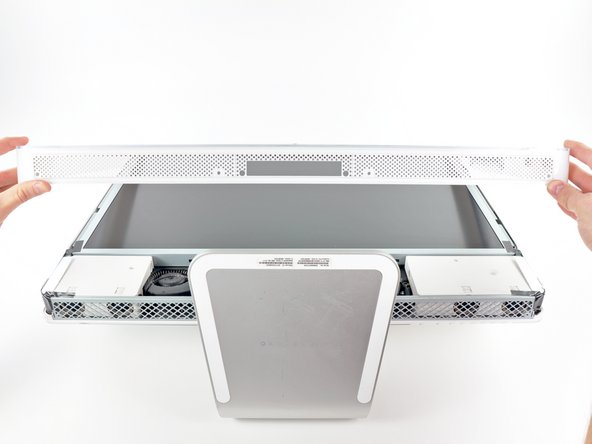
To lift the front bezel off the iMac, simultaneously:
-
Use your thumbs to press in the RAM arms and hold the iMac down.
-
Use your index fingers to pull the small bridge of material on the front bezel toward yourself.
-
Pull the front bezel up with your index fingers.
-
Once the small bridge of material has cleared the RAM arms, lift the front bezel by its lower edge just enough to clear the bottom edge of the rear case.
-
-
-
Este passo não foi traduzido. Ajude a traduzi-lo
-
Lift the front bezel off the rear case and rotate it away from the bottom edge of the iMac, minding the camera and microphone cables still attached to its upper edge.
-
-
Este passo não foi traduzido. Ajude a traduzi-lo
-
Disconnect the microphone cable.
-
Disconnect the camera cable by pulling its connector away from the socket on the camera board.
-
-
Este passo não foi traduzido. Ajude a traduzi-lo
-
Use the tip of a spudger to pry the PRAM battery out of its socket on the logic board.
-
Remove the PRAM battery.
-
Cancelar: não concluí este guia.
6 outras pessoas executaram este guia.
Um comentário
what should i do if the mac cant switch on or no light afther changing the pram battery?


