Ir para o conteúdo principal

iMac Intel 21.5" Retina 4K Display 2019 Display Replacement

O que você precisa

  1. iMac Intel 21.5" Retina 4K Display 2019 Display Replacement, Install the iMac service wedge: passo 1, imagem 1 %32
    Ferramenta utilizada nesse passo:
    iMac Intel 21.5" Cardboard Service Wedge
    $4.99
    Comprar
    • With the hinge free to move, the iMac will be unbalanced and hard to work on. Place an iMac service wedge, in the stand to stabilize the iMac.

    • If you are using the iFixit cardboard service wedge, follow these assembly directions to put it together.

    • Before beginning any work on your iMac: Unplug the computer and press and hold the power button for ten seconds to discharge the power supply's capacitors.

    • Be very careful not to touch the capacitor leads or any exposed solder joints on the back of the power supply. Only handle the board by the edges.

    Maybe your directions should suggest fixers to buy RAM cards in pairs. I wanted 32 Gig of RAM, and I bought and installed one 32 G RAM and while it seems fine, one source told me it would be 5-10% faster if I had put in two 16 RAM cards. Is that accurate?

    BRUCE CLARKE - Responder

    it would at least be that much faster, in theory some applications should run twice as fast

    blakebest -

  2. iMac Intel 21.5" Retina 4K Display 2019 Display Replacement, Insert the opening tool: passo 2, imagem 1 %32 iMac Intel 21.5" Retina 4K Display 2019 Display Replacement, Insert the opening tool: passo 2, imagem 2 %32
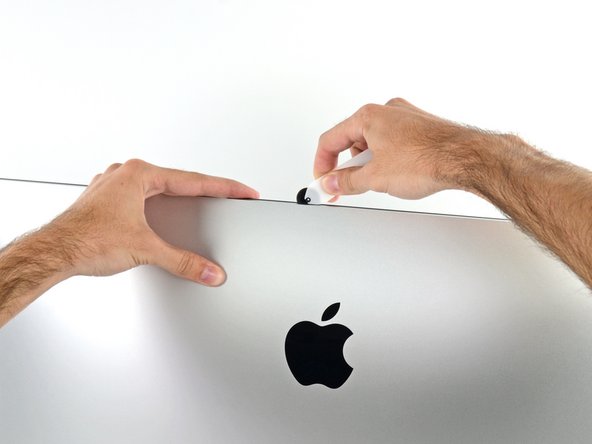
    • Starting on the left side of the display, near the power button, insert the iMac Opening Tool into the gap between the glass panel and the rear enclosure.

    • The hub on the iMac Opening Tool will keep you from pushing the wheel in too far. If using a different tool, insert no more than 3/8" into the display. Otherwise, you risk severing antenna cables and causing serious damage.

  3. iMac Intel 21.5" Retina 4K Display 2019 Display Replacement, Slice through the display adhesive: passo 3, imagem 1 %32 iMac Intel 21.5" Retina 4K Display 2019 Display Replacement, Slice through the display adhesive: passo 3, imagem 2 %32 iMac Intel 21.5" Retina 4K Display 2019 Display Replacement, Slice through the display adhesive: passo 3, imagem 3 %32
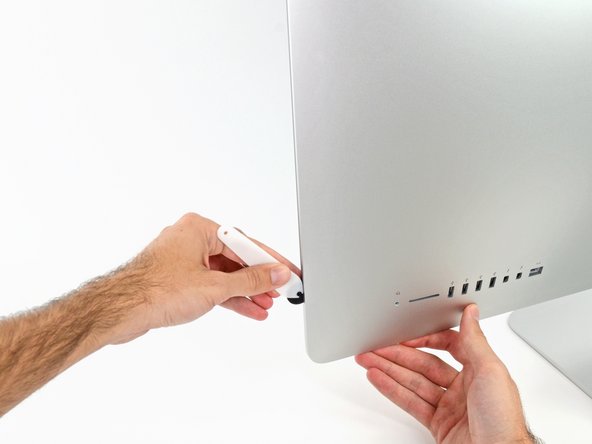
    • Use the tool like a pizza cutter—roll it along the gap, cutting the foam adhesive in between the frame and display.

    • Be sure to always push with the cutting wheel forward. If you pull, the wheel might get pulled out of the handle.

    • Run the tool up along the left side of the display.

  4. iMac Intel 21.5" Retina 4K Display 2019 Display Replacement: passo 4, imagem 1 %32 iMac Intel 21.5" Retina 4K Display 2019 Display Replacement: passo 4, imagem 2 %32 iMac Intel 21.5" Retina 4K Display 2019 Display Replacement: passo 4, imagem 3 %32
    • Continue running the tool up around the top left corner.

  5. iMac Intel 21.5" Retina 4K Display 2019 Display Replacement: passo 5, imagem 1 %32 iMac Intel 21.5" Retina 4K Display 2019 Display Replacement: passo 5, imagem 2 %32
    • Cut the adhesive along the top left of the display.

  6. iMac Intel 21.5" Retina 4K Display 2019 Display Replacement: passo 6, imagem 1 %32 iMac Intel 21.5" Retina 4K Display 2019 Display Replacement: passo 6, imagem 2 %32
    • Continue along the top of the display.

    • You may want to run the tool back and forth a few times to ensure you completely cut through the adhesive.

  7. iMac Intel 21.5" Retina 4K Display 2019 Display Replacement: passo 7, imagem 1 %32 iMac Intel 21.5" Retina 4K Display 2019 Display Replacement: passo 7, imagem 2 %32 iMac Intel 21.5" Retina 4K Display 2019 Display Replacement: passo 7, imagem 3 %32
    • Push the tool around the top right corner of the display.

  8. iMac Intel 21.5" Retina 4K Display 2019 Display Replacement: passo 8, imagem 1 %32 iMac Intel 21.5" Retina 4K Display 2019 Display Replacement: passo 8, imagem 2 %32
    • Push the tool down along the right side of the display.

  9. iMac Intel 21.5" Retina 4K Display 2019 Display Replacement: passo 9, imagem 1 %32 iMac Intel 21.5" Retina 4K Display 2019 Display Replacement: passo 9, imagem 2 %32
    • Finish pushing the opening tool to the bottom of the right side of the display.

    • At this point, you'll want to run the tool back around the entire display, to ensure you cut as much adhesive as possible.

  10. iMac Intel 21.5" Retina 4K Display 2019 Display Replacement: passo 10, imagem 1 %32 iMac Intel 21.5" Retina 4K Display 2019 Display Replacement: passo 10, imagem 2 %32 iMac Intel 21.5" Retina 4K Display 2019 Display Replacement: passo 10, imagem 3 %32
    Ferramenta utilizada nesse passo:
    Plastic Cards
    $2.99
    Comprar
    • While the opening tool cut most of the adhesive, the display will still be slightly adhered to the case. A plastic card will be necessary to free up the last of this adhesive.

    • Set the iMac face-up on a table.

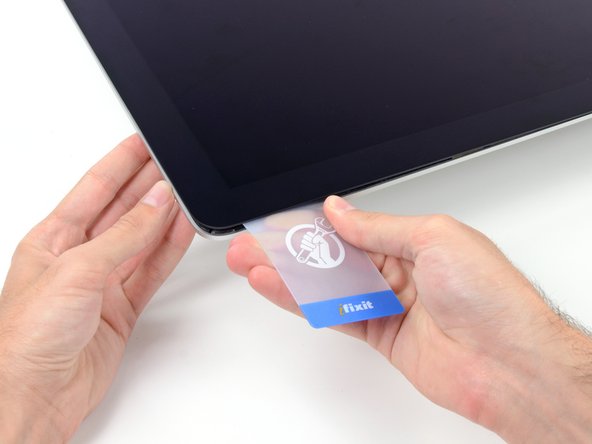
    • Starting from the top right corner of the iMac, wedge a plastic card between the display and frame.

    • Be careful not to insert the plastic card more than 3/8", or you may damage internal components.

    9.5mm in the rest of the world

    Tal Glazer - Responder

  11. iMac Intel 21.5" Retina 4K Display 2019 Display Replacement: passo 11, imagem 1 %32 iMac Intel 21.5" Retina 4K Display 2019 Display Replacement: passo 11, imagem 2 %32
    • Gently twist the plastic card sideways to create a gap between the display and frame.

    • Move slowly and be careful not to stress the display glass too much—you only need to make a gap of about 1/4".

    Which is around 6.5mm

    Tal Glazer - Responder

  12. iMac Intel 21.5" Retina 4K Display 2019 Display Replacement: passo 12, imagem 1 %32 iMac Intel 21.5" Retina 4K Display 2019 Display Replacement: passo 12, imagem 2 %32 iMac Intel 21.5" Retina 4K Display 2019 Display Replacement: passo 12, imagem 3 %32
    • Slide the card toward the center of the display to cut any of the remaining adhesive along the top right corner of the iMac.

    • Be sure to stop before the iSight camera, or you may damage it.

  13. iMac Intel 21.5" Retina 4K Display 2019 Display Replacement: passo 13, imagem 1 %32 iMac Intel 21.5" Retina 4K Display 2019 Display Replacement: passo 13, imagem 2 %32
    • Wedge the plastic card into the top right corner once again, and leave it there to prevent the adhesive from resticking.

  14. iMac Intel 21.5" Retina 4K Display 2019 Display Replacement: passo 14, imagem 1 %32 iMac Intel 21.5" Retina 4K Display 2019 Display Replacement: passo 14, imagem 2 %32 iMac Intel 21.5" Retina 4K Display 2019 Display Replacement: passo 14, imagem 3 %32
    • Insert a second plastic card into the gap between the display and frame near the top left corner of the iMac.

  15. iMac Intel 21.5" Retina 4K Display 2019 Display Replacement: passo 15, imagem 1 %32 iMac Intel 21.5" Retina 4K Display 2019 Display Replacement: passo 15, imagem 2 %32
    • Gently twist the card upward, slightly increasing the space between the display and frame.

    • As with the other side, twist slowly to allow the adhesive time to separate, and be careful not to over-stress the display glass.

  16. iMac Intel 21.5" Retina 4K Display 2019 Display Replacement: passo 16, imagem 1 %32 iMac Intel 21.5" Retina 4K Display 2019 Display Replacement: passo 16, imagem 2 %32 iMac Intel 21.5" Retina 4K Display 2019 Display Replacement: passo 16, imagem 3 %32
    • Slide the plastic card toward the center.

    • Stop sliding just before the iSight camera to avoid damaging the camera.

  17. iMac Intel 21.5" Retina 4K Display 2019 Display Replacement: passo 17, imagem 1 %32 iMac Intel 21.5" Retina 4K Display 2019 Display Replacement: passo 17, imagem 2 %32
    • Wedge the plastic card back into the top left corner.

  18. iMac Intel 21.5" Retina 4K Display 2019 Display Replacement: passo 18, imagem 1 %32 iMac Intel 21.5" Retina 4K Display 2019 Display Replacement: passo 18, imagem 2 %32 iMac Intel 21.5" Retina 4K Display 2019 Display Replacement: passo 18, imagem 3 %32
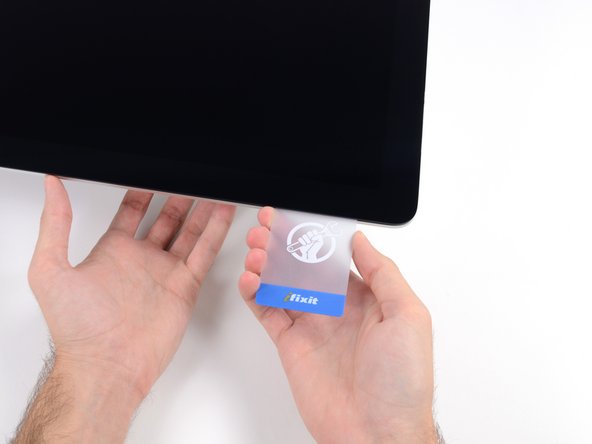
    • With both plastic cards inserted as shown near the corners, gently twist the cards sideways to increase the gap between display and case.

    • If there are any sections that seem to stick and won't separate, stop twisting and use one of the cards to cut the remaining adhesive.

    • Begin to lift the top of the display up from the frame.

    • Only lift the display a few inches—the display data and power cables are still connected to the logic board.

    Ich habe den unteren Klebestreifen gar nicht gelöst! --> Monitor (Glasscheibe) nach vorne auf ein dickes Kissen gelegt - so dass das Glas nur ca. 80° Winkel nach vorne zu liegen kommt und dann habe ich die Festplatte getauscht! So konnte ich die untere Klebeleiste wieder verwenden und hatte genügend Platz um die senkrechten und oberen Leisten zu verkleben!
    Tip: Klebestreifen zuerst auf dem Alugehäuse befestigen......

    Fridtjof Schüssler - Responder

  19. iMac Intel 21.5" Retina 4K Display 2019 Display Replacement, Display Assembly Cables: passo 19, imagem 1 %32 iMac Intel 21.5" Retina 4K Display 2019 Display Replacement, Display Assembly Cables: passo 19, imagem 2 %32
    • Lift the display up enough to have easy access to the connector, but not so much that you stretch the cables and stress their connections (about 8").

    • Hold the display with one hand while using your other hand to unplug the display power cable.

    It was difficult to remove this connection. I ended up having to gently pull-up vertically a little on the wire side to unsnap it about 1mm and then horizontally wiggle it out.

    delacrj2 - Responder

    I had a difficult time removing this connection. I had to lift the wire-side about 1mm before it unsnapped and then carefully wiggle it out horizontally.

    delacrj2 - Responder

    Can this cable be replaced? I am worried mine is damaged. I have no display after the screen fell and stressed the display flex cables following an SSD upgrade.

    Jeremy Brainard - Responder

    This step should be done with extreme caution and care, as this step 19 is not described in great detail (sorry, author).

    The first (most outward) cable will slide out by gently pulling it by its tabs. The second (inner) cable is more tricky, as the locking lever must be moved backward first, before gently pulling backward on the cable connector. The angled tweezers are useful here, to help lift that locking lever, because fingers are too big for this.

    Ernst - Responder

    be VERY careful and SLOW...take your time. These displays crack VERY easily when removing and they'll spider web on you. I've done probably 20 or so of these and cracked 3 being super careful.....ugh.

    Faslane - Responder

    I found the best way to unplug this display power cable was to use my right hand, and the fingernails of my index finger and thumb to grab the ends of the tabs on either side of the connector, squeeze, and pull the connector out gently.

    Phil McInnis - Responder

    i think the cable nearest the case edge is held in by friction and can be gently pulled, maybe with fingernails or a spudger. The next cable is held by a wire lever clip as described above it unlocks so the cable can be removed. These cables are also fiddly to re-insert, I didn't get one of them home and had no display after power-up, so at the end, don't re-seal the screen until tested.

    Peter Taffs - Responder

  20. iMac Intel 21.5" Retina 4K Display 2019 Display Replacement: passo 20, imagem 1 %32 iMac Intel 21.5" Retina 4K Display 2019 Display Replacement: passo 20, imagem 2 %32 iMac Intel 21.5" Retina 4K Display 2019 Display Replacement: passo 20, imagem 3 %32
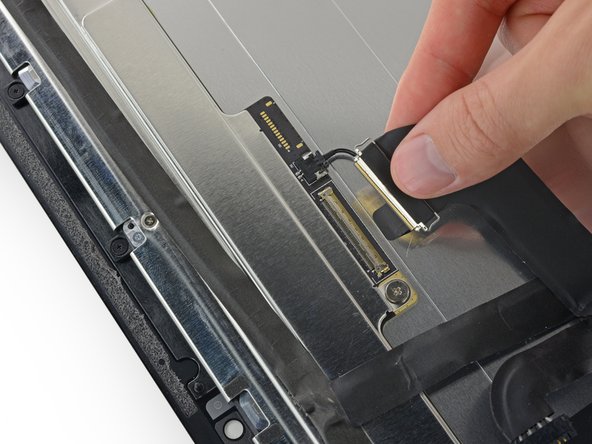
    • Continuing to support the display with one hand, flip up the metal retaining bracket on the display data cable.

    • Carefully pull the display data cable from its socket on the logic board.

    • Be sure to pull the display data cable connector straight out of its socket, keeping it parallel to the motherboard, to avoid damaging it.

    Cannot seem to find a replacement cable for this, as I suspect mine is damaged. Can’t even find a part number. Anyone know what it might be?

    Jeremy Brainard - Responder

    https://www.amazon.com/gp/product/B08TTL...

    That's the part I ordered for mine and it seems to work ok. I did make a point of contacting the seller and advising them of my requirement and they ensured I got the right part and it matches the description of the link. Bear in mind I bear no responsibility if yours does not work since I am just sharing what I did and what I ordered. Thanks.

    Jim Stanford -

    I also need that cable.

    cameronjpu - Responder

    It's a little difficult to tell... but looking at the connection to the logic board on the video data cable, are the pins faced up or down?

    On the display, same question since it appears you have to "twist" the cable during the reconnection step.

    Jim Stanford - Responder

    For this particular cable, take a good look before pulling on anything. Plug is locked on its socket with a bracket. You can lift this bracket by holding the small, flat black plastic handle that is attached to it. If you're struggling to grab it, use the end of the pizza roller handle to lift it, or the tweezers. Cable then comes off by pulling parallel to the main board.

    Froggy Manny - Responder

    How can I tell if either of this cable is bad? My iMac display won't turn on after reconnecting it. I'm using an external display and everything is working except for the iMac display. If I go to settings - display the built-in display is recognize. But again nothing shows up in the screen - not even the apple logo when turning it on.

    Carlos Sosa - Responder

  21. iMac Intel 21.5" Retina 4K Display 2019 Display Replacement, Separate the display: passo 21, imagem 1 %32 iMac Intel 21.5" Retina 4K Display 2019 Display Replacement, Separate the display: passo 21, imagem 2 %32
    • Lift the display up to a near-vertical position.

    • At this point there is still a strip of adhesive along the bottom of the display that will hold the display to the frame like a hinge. You can loosen this adhesive by working the display up and down a few times.

    I was fretting that i would break my screen, it's really hard to see what is holding the screen in place and i was ready for it to snap the last 1/2 inch or 12mm of the glass I worked slowly and as you say, keep lifting and working it gently until you can see and cut the remaining adhesive.

    Peter Taffs - Responder

  22. iMac Intel 21.5" Retina 4K Display 2019 Display Replacement: passo 22, imagem 1 %32 iMac Intel 21.5" Retina 4K Display 2019 Display Replacement: passo 22, imagem 2 %32 iMac Intel 21.5" Retina 4K Display 2019 Display Replacement: passo 22, imagem 3 %32
    Ferramenta utilizada nesse passo:
    Plastic Cards
    $2.99
    Comprar
    • If necessary, a plastic card can be used to cut any remaining sections of the bottom adhesive strip.

    The bottom adhesive strips have small tags at a 90 degree angle that can be used as handles to strip them out at this point. https://d3nevzfk7ii3be.cloudfront.net/ig...

    Dom - Responder

  23. iMac Intel 21.5" Retina 4K Display 2019 Display Replacement: passo 23, imagem 1 %32 iMac Intel 21.5" Retina 4K Display 2019 Display Replacement: passo 23, imagem 2 %32 iMac Intel 21.5" Retina 4K Display 2019 Display Replacement: passo 23, imagem 3 %32
    • Lift the display up from the frame and remove it from the iMac.

    • It may be necessary to slowly lift from one side to peel against the remaining adhesive.

    • Be very careful handling the display—it's big, heavy, and made of glass.

    • After the adhesive is cut, it cannot be used to re-seal the display in place. Follow this guide to replace the adhesive strips that secure the display to the rear enclosure.

  24. iMac Intel 21.5" Retina 4K Display 2019 Display Replacement, Display: passo 24, imagem 1 %32 iMac Intel 21.5" Retina 4K Display 2019 Display Replacement, Display: passo 24, imagem 2 %32
    • Gently set the display face-down on a sturdy, flat surface. It may be helpful to put it on a towel or cloth to protect it from dirt or debris that can scratch the front glass.

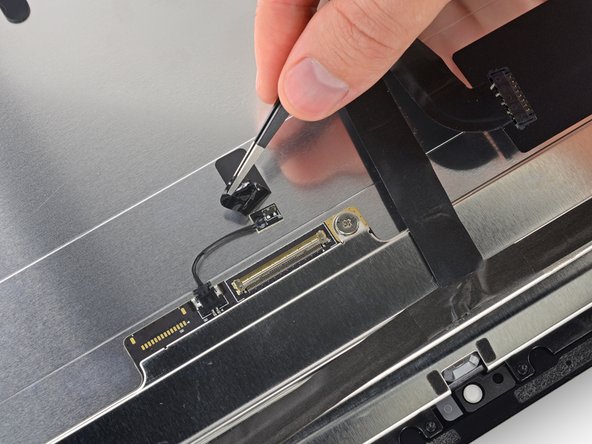
    • Use your fingernail or the pointed tip of a spudger to flip up the retaining flap on the display data connector.

  25. iMac Intel 21.5" Retina 4K Display 2019 Display Replacement: passo 25, imagem 1 %32 iMac Intel 21.5" Retina 4K Display 2019 Display Replacement: passo 25, imagem 2 %32
    • Pull the display data cable connector straight out of its socket on the back of the display.

  26. iMac Intel 21.5" Retina 4K Display 2019 Display Replacement: passo 26, imagem 1 %32
    • Use an iOpener near the top edge of the display assembly to heat and soften the adhesive on the piece of tape holding the thermal sensor in place.

    • Instructions on how to properly heat and use the iOpener can be found here.

  27. iMac Intel 21.5" Retina 4K Display 2019 Display Replacement: passo 27, imagem 1 %32 iMac Intel 21.5" Retina 4K Display 2019 Display Replacement: passo 27, imagem 2 %32
    • Peel up the piece of tape securing the thermal sensor to the back of the display assembly.

    • Depending on your iMac model, the thermal sensor may be positioned slightly differently.

  28. iMac Intel 21.5" Retina 4K Display 2019 Display Replacement: passo 28, imagem 1 %32 iMac Intel 21.5" Retina 4K Display 2019 Display Replacement: passo 28, imagem 2 %32
    • Use an opening pick to break up the adhesive holding the thermal sensor to the back of the iMac display.

  29. iMac Intel 21.5" Retina 4K Display 2019 Display Replacement: passo 29, imagem 1 %32 iMac Intel 21.5" Retina 4K Display 2019 Display Replacement: passo 29, imagem 2 %32
    • Disconnect the thermal sensor from its socket on the back of the display.

    • Remove the thermal sensor and transfer it to your new display assembly.

Conclusão

Compare your new replacement part to the original part—you may need to transfer remaining components or remove adhesive backings from the new part before installing.

To reassemble your device, follow the above steps in reverse order.

Take your e-waste to an R2 or e-Stewards certified recycler.

Repair didn’t go as planned? Check out our Answers community for troubleshooting help.

4 outras pessoas executaram este guia.

Adam O'Camb

Membro desde: 04/11/15

196.299 Reputação

Autoria de 416 guias

2 comentários

What is the part number of a replacement screen?

Dominik Hoffmann - Responder

Follow-up question: Which prior models does the 2019 21.5" iMac share its screen with?

Dominik Hoffmann - Responder

Adicione um comentário

Exibir estatísticas:

Últimas 24 horas: 16

Últimos 7 dias: 56

Últimos 30 dias: 200

Duração total: 6,765