Ir para o conteúdo principal

iMac Intel 21.5" Retina 4K Display (2017) Adhesive Strips Replacement

O que você precisa

  1. iMac Intel 21.5" Retina 4K Display (2017) Adhesive Strips Replacement, Install an iMac service wedge: passo 1, imagem 1 %32
    Ferramenta utilizada nesse passo:
    iMac Intel 21.5" Cardboard Service Wedge
    $4.99
    Comprar
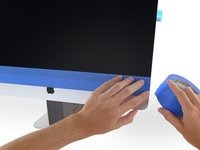
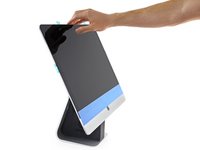
    • With the hinge free to move, the iMac will be unbalanced and hard to work on. Place an iMac service wedge in the stand to stabilize the iMac.

    • If you're using the iFixit cardboard service wedge, follow these assembly directions to put it together.

    • If you don't have an iMac service wedge, work very carefully—the display can easily fall out and break if the iMac moves unexpectedly.

  2. iMac Intel 21.5" Retina 4K Display (2017) Adhesive Strips Replacement, Remove the old adhesive: passo 2, imagem 1 %32 iMac Intel 21.5" Retina 4K Display (2017) Adhesive Strips Replacement, Remove the old adhesive: passo 2, imagem 2 %32
    • Before you install new adhesive strips, remove all of the old adhesive from the perimeter of the rear enclosure.

    • If you are re-using your existing display, you must also remove the old adhesive from the back of the display.

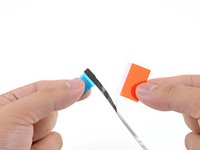
    • Peel off the old strips of adhesive using tweezers or your fingers. Start at the bottom and peel upward towards the top of the device.

    • After all the old adhesive is removed, carefully clean off the adhesive residue with high-concentration isopropyl alcohol (90% or greater) and a lint-free cloth. Wipe in one direction, not back and forth.

    • Don't skip this step, or your new adhesive strips may not bond properly, and the display may fall out of your iMac.

  3. iMac Intel 21.5" Retina 4K Display (2017) Adhesive Strips Replacement: passo 3, imagem 1 %32 iMac Intel 21.5" Retina 4K Display (2017) Adhesive Strips Replacement: passo 3, imagem 2 %32
    • Your adhesive strips should have a microphone notch pre-cut in the strip labeled 4R.

    • If your 4R strip does not contain a notch, follow this guide instead.

  4. iMac Intel 21.5" Retina 4K Display (2017) Adhesive Strips Replacement: passo 4, imagem 1 %32 iMac Intel 21.5" Retina 4K Display (2017) Adhesive Strips Replacement: passo 4, imagem 2 %32
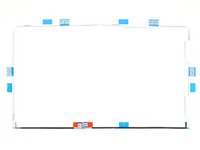
    • Lay out the adhesives strips beforehand so you won't accidentally install a strip in the wrong place:

    • Strip 01 on the top left

    • Strip 02 on the top right

    • Strip 03 on the right vertical

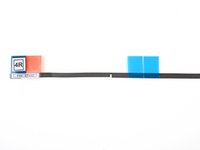
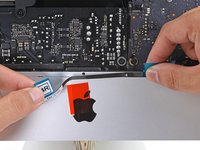
    • Strip 4R on the bottom right, dark side facing up

    • Strip 4L on the bottom left, dark side facing up

    • Strip 05 on the left vertical

  5. iMac Intel 21.5" Retina 4K Display (2017) Adhesive Strips Replacement, Remove the backing from the first adhesive strip: passo 5, imagem 1 %32 iMac Intel 21.5" Retina 4K Display (2017) Adhesive Strips Replacement, Remove the backing from the first adhesive strip: passo 5, imagem 2 %32 iMac Intel 21.5" Retina 4K Display (2017) Adhesive Strips Replacement, Remove the backing from the first adhesive strip: passo 5, imagem 3 %32
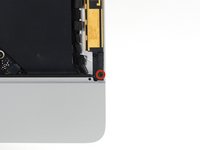
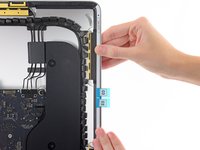
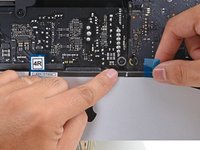
    • Start with strip 03, which goes on the right vertical side of the rear enclosure.

    • Before you peel off any backing, line the adhesive strip up along the frame of the iMac to get an idea of where it goes.

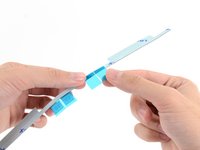
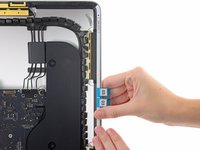
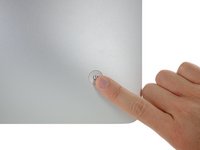
    • Grasp the blue tab and peel the short piece of backing off the back of the strip to expose a section of adhesive to attach to the enclosure.

  6. iMac Intel 21.5" Retina 4K Display (2017) Adhesive Strips Replacement, Apply the first adhesive strip: passo 6, imagem 1 %32 iMac Intel 21.5" Retina 4K Display (2017) Adhesive Strips Replacement, Apply the first adhesive strip: passo 6, imagem 2 %32
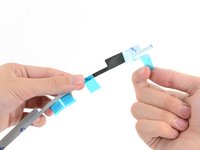
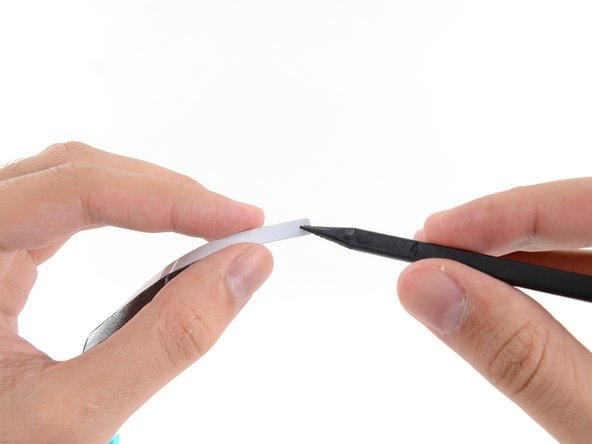
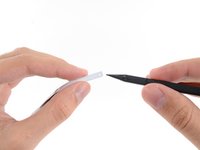
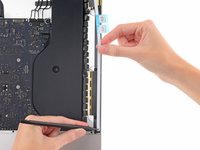
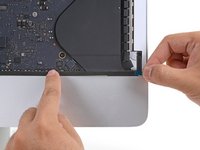
    • Insert the tip of a spudger into the hole at the end of the strip where you just removed one layer of backing. Insert the spudger from the side that still has a layer of white backing on it.

  7. iMac Intel 21.5" Retina 4K Display (2017) Adhesive Strips Replacement: passo 7, imagem 1 %32 iMac Intel 21.5" Retina 4K Display (2017) Adhesive Strips Replacement: passo 7, imagem 2 %32 iMac Intel 21.5" Retina 4K Display (2017) Adhesive Strips Replacement: passo 7, imagem 3 %32
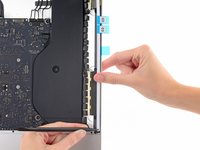
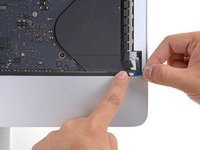
    • With the spudger still poking through the hole in the adhesive strip, push the spudger tip into the corresponding hole in the frame of the iMac.

    • Using the hole and spudger to anchor the position of the adhesive strip, line the strip up against the right edge, gently pulling up against the spudger to ensure the strip is taut, and stick it onto the frame.

  8. iMac Intel 21.5" Retina 4K Display (2017) Adhesive Strips Replacement: passo 8, imagem 1 %32 iMac Intel 21.5" Retina 4K Display (2017) Adhesive Strips Replacement: passo 8, imagem 2 %32
    • Once you've aligned the bottom half of the adhesive strip, peel the longer piece of backing out from behind the strip.

    • If the bottom half isn't aligned properly, you can carefully peel it up and re-stick it before peeling off the lower backing strip. Be sure to use the spudger tip to anchor the top.

  9. iMac Intel 21.5" Retina 4K Display (2017) Adhesive Strips Replacement: passo 9, imagem 1 %32 iMac Intel 21.5" Retina 4K Display (2017) Adhesive Strips Replacement: passo 9, imagem 2 %32
    • Align the upper half of the strip with the right edge of the rear enclosure, and stick it down.

  10. iMac Intel 21.5" Retina 4K Display (2017) Adhesive Strips Replacement: passo 10, imagem 1 %32 iMac Intel 21.5" Retina 4K Display (2017) Adhesive Strips Replacement: passo 10, imagem 2 %32
    • Use your finger to smooth out the strip. Make sure it is neatly aligned with the right side of the frame and that it sits flat.

    • Do not peel off the front adhesive backing yet.

  11. iMac Intel 21.5" Retina 4K Display (2017) Adhesive Strips Replacement, Apply the remaining adhesive strips: passo 11, imagem 1 %32
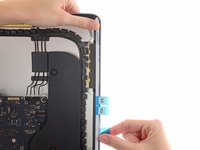
    • Work your way counter-clockwise around the perimeter of the iMac, adding three more adhesive strips in the same manner:

    • Strip 02 on the top right

    • Strip 01 on the top left

    • Strip 05 on the left vertical

  12. iMac Intel 21.5" Retina 4K Display (2017) Adhesive Strips Replacement, Install the bottom adhesives: passo 12, imagem 1 %32 iMac Intel 21.5" Retina 4K Display (2017) Adhesive Strips Replacement, Install the bottom adhesives: passo 12, imagem 2 %32 iMac Intel 21.5" Retina 4K Display (2017) Adhesive Strips Replacement, Install the bottom adhesives: passo 12, imagem 3 %32
    • The next few steps will show you how to install the bottom right adhesive strip (strip 4R), which includes a notch that must be aligned with the microphone.

    • Read through this step and the next four steps before you attempt the procedure.

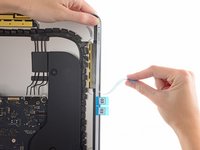
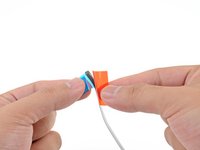
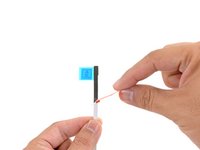
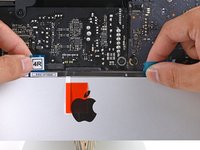
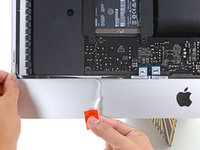
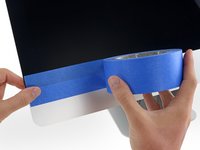
    • Grasp the red pull tab on strip 4R and pull to separate about 2 inches (5 cm) of white backing from the strip.

  13. iMac Intel 21.5" Retina 4K Display (2017) Adhesive Strips Replacement: passo 13, imagem 1 %32 iMac Intel 21.5" Retina 4K Display (2017) Adhesive Strips Replacement: passo 13, imagem 2 %32 iMac Intel 21.5" Retina 4K Display (2017) Adhesive Strips Replacement: passo 13, imagem 3 %32
    • Fold the loose white backing to a right angle and pinch the crease with your fingers.

    • This exposes 2 inches of adhesive while folding the red tab out of the way.

  14. iMac Intel 21.5" Retina 4K Display (2017) Adhesive Strips Replacement: passo 14, imagem 1 %32 iMac Intel 21.5" Retina 4K Display (2017) Adhesive Strips Replacement: passo 14, imagem 2 %32 iMac Intel 21.5" Retina 4K Display (2017) Adhesive Strips Replacement: passo 14, imagem 3 %32
    • The microphone hole is the center hole flanked by two larger holes.

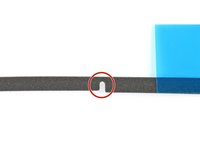
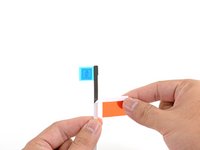
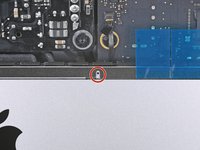
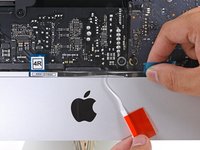
    • Align the adhesive strip to the bottom edge by positioning the microphone notch over the microphone hole.

    • If your iMac does not have a microphone hole, align the right end of the strip such that the L-bend sits next to the right vertical adhesive. The L-bend should not overlap the right vertical adhesive.

    • The adhesive tears easily. Be careful not to pull on the strip with too much force.

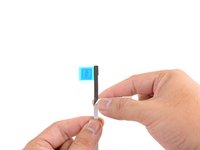
    • Once you have aligned the strip, carefully set the left exposed edge onto the iMac to secure the alignment.

  15. iMac Intel 21.5" Retina 4K Display (2017) Adhesive Strips Replacement: passo 15, imagem 1 %32 iMac Intel 21.5" Retina 4K Display (2017) Adhesive Strips Replacement: passo 15, imagem 2 %32 iMac Intel 21.5" Retina 4K Display (2017) Adhesive Strips Replacement: passo 15, imagem 3 %32
    • Peel away the white backing behind the strip to expose the remaining adhesive.

  16. iMac Intel 21.5" Retina 4K Display (2017) Adhesive Strips Replacement: passo 16, imagem 1 %32 iMac Intel 21.5" Retina 4K Display (2017) Adhesive Strips Replacement: passo 16, imagem 2 %32 iMac Intel 21.5" Retina 4K Display (2017) Adhesive Strips Replacement: passo 16, imagem 3 %32
    • Run your finger from left to right along the length of the adhesive strip to ensure it is straight and unwrinkled, pressing down as you go to adhere the strip to the iMac.

  17. iMac Intel 21.5" Retina 4K Display (2017) Adhesive Strips Replacement: passo 17, imagem 1 %32 iMac Intel 21.5" Retina 4K Display (2017) Adhesive Strips Replacement: passo 17, imagem 2 %32 iMac Intel 21.5" Retina 4K Display (2017) Adhesive Strips Replacement: passo 17, imagem 3 %32
    • Repeat the previous steps for the 4L adhesive strip, placing it along the bottom left edge of the iMac.

    • The 4L strip should be positioned such that the L-bend sits next to the left vertical adhesive. The L-bend should not overlap the left vertical adhesive.

  18. iMac Intel 21.5" Retina 4K Display (2017) Adhesive Strips Replacement, Install the display: passo 18, imagem 1 %32 iMac Intel 21.5" Retina 4K Display (2017) Adhesive Strips Replacement, Install the display: passo 18, imagem 2 %32
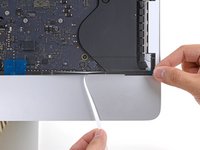
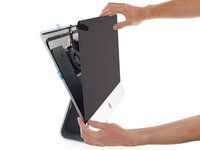
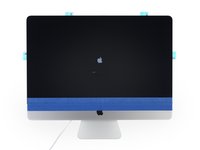
    • Gently set the display in place over the iMac and align it carefully.

  19. iMac Intel 21.5" Retina 4K Display (2017) Adhesive Strips Replacement: passo 19, imagem 1 %32 iMac Intel 21.5" Retina 4K Display (2017) Adhesive Strips Replacement: passo 19, imagem 2 %32
    • Use painter's tape or masking tape to temporarily secure the bottom edge of the display to the iMac's enclosure.

    • The tape preserves the display's alignment, and allows you to safely swing the top edge of the display open to access the display cables.

    • Don't wrap the tape around the back of the iMac, or you may shatter the screen when you connect the cables.

  20. iMac Intel 21.5" Retina 4K Display (2017) Adhesive Strips Replacement, Test the display: passo 20, imagem 1 %32 iMac Intel 21.5" Retina 4K Display (2017) Adhesive Strips Replacement, Test the display: passo 20, imagem 2 %32
    • At this point it's a good idea to test your repair, in order to make sure your iMac works properly before you seal it back up. Follow the next three steps to temporarily reconnect the display cables and boot up your iMac prior to pulling the protective film off the adhesive strips.

    • If you've already verified that your iMac is working correctly and are ready to seal it up, skip the next step.

    • Insert the display power cable into its socket on the logic board.

  21. iMac Intel 21.5" Retina 4K Display (2017) Adhesive Strips Replacement: passo 21, imagem 1 %32 iMac Intel 21.5" Retina 4K Display (2017) Adhesive Strips Replacement: passo 21, imagem 2 %32 iMac Intel 21.5" Retina 4K Display (2017) Adhesive Strips Replacement: passo 21, imagem 3 %32
    • Use a pair of tweezers or your other hand to gently insert the display data cable connector into its socket on the logic board.

    • Be sure to press it straight into the socket, and insert it completely.

    • Secure the metal retaining bracket on the display data cable downwards towards the logic board.

  22. iMac Intel 21.5" Retina 4K Display (2017) Adhesive Strips Replacement: passo 22, imagem 1 %32 iMac Intel 21.5" Retina 4K Display (2017) Adhesive Strips Replacement: passo 22, imagem 2 %32
    • Set the display back on the iMac's rear enclosure.

    • At this time, plug in your iMac, power it on, and test your repair before moving on to actually sealing up the computer. Be sure to check for full functionality of any hardware you removed or disconnected.

    • When you are finished, shut the iMac down and unplug the power cord before you continue.

  23. iMac Intel 21.5" Retina 4K Display (2017) Adhesive Strips Replacement, Seal the iMac: passo 23, imagem 1 %32 iMac Intel 21.5" Retina 4K Display (2017) Adhesive Strips Replacement, Seal the iMac: passo 23, imagem 2 %32 iMac Intel 21.5" Retina 4K Display (2017) Adhesive Strips Replacement, Seal the iMac: passo 23, imagem 3 %32
    • Verify that your iMac is turned off and unplugged from power before you continue.

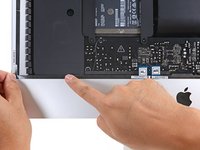
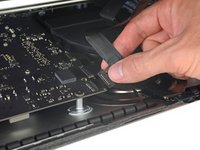
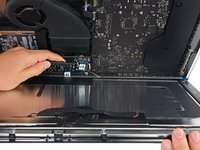
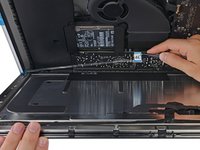
    • After confirming that your iMac functions properly, disconnect the display cables and carefully lean the display forward.

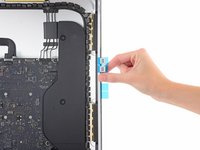
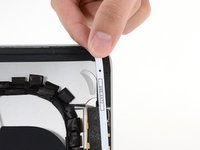
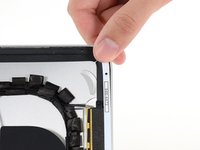
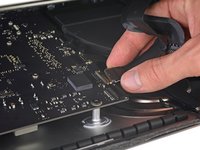
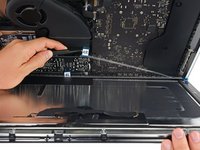
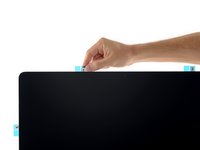
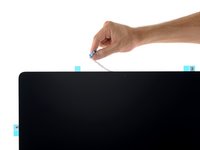
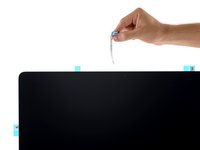
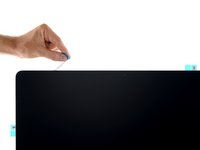
    • Remove the film from the two bottom strips by reaching in from above with a pair of tweezers and pulling the blue tabs straight up from the bottom edge of the display.

  24. iMac Intel 21.5" Retina 4K Display (2017) Adhesive Strips Replacement, Reconnect the display cables: passo 24, imagem 1 %32 iMac Intel 21.5" Retina 4K Display (2017) Adhesive Strips Replacement, Reconnect the display cables: passo 24, imagem 2 %32 iMac Intel 21.5" Retina 4K Display (2017) Adhesive Strips Replacement, Reconnect the display cables: passo 24, imagem 3 %32
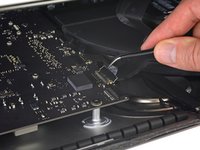
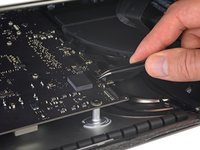
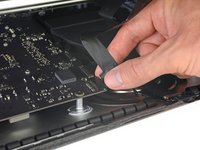
    • Reconnect the display power and data cables for the final time.
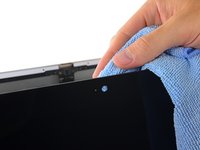
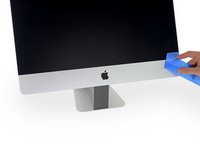
    • Remember to secure the metal retaining bracket on the display data cable.

  25. iMac Intel 21.5" Retina 4K Display (2017) Adhesive Strips Replacement, Remove the remaining adhesive backing: passo 25, imagem 1 %32 iMac Intel 21.5" Retina 4K Display (2017) Adhesive Strips Replacement, Remove the remaining adhesive backing: passo 25, imagem 2 %32 iMac Intel 21.5" Retina 4K Display (2017) Adhesive Strips Replacement, Remove the remaining adhesive backing: passo 25, imagem 3 %32
    Ferramenta utilizada nesse passo:
    Microfiber Cleaning Cloths
    $3.99
    Comprar
    • Check the glass directly in front of the webcam for dust and other contaminants. If necessary, wipe it down with a microfiber cloth before you seal up the display.

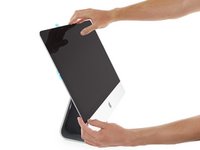
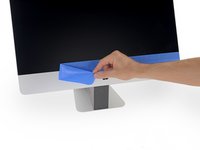
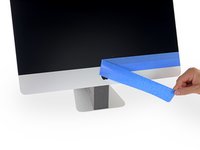
    • Steady the display with one hand as you remove the protective film in the following steps, or rest it lightly against the iMac's enclosure.

  26. iMac Intel 21.5" Retina 4K Display (2017) Adhesive Strips Replacement: passo 26, imagem 1 %32 iMac Intel 21.5" Retina 4K Display (2017) Adhesive Strips Replacement: passo 26, imagem 2 %32 iMac Intel 21.5" Retina 4K Display (2017) Adhesive Strips Replacement: passo 26, imagem 3 %32
    • Remove the protective film from strip 01 by pulling its tab straight up.

  27. iMac Intel 21.5" Retina 4K Display (2017) Adhesive Strips Replacement: passo 27, imagem 1 %32 iMac Intel 21.5" Retina 4K Display (2017) Adhesive Strips Replacement: passo 27, imagem 2 %32
    • Remove the other side of the protective film from strip 01.

  28. iMac Intel 21.5" Retina 4K Display (2017) Adhesive Strips Replacement: passo 28, imagem 1 %32
    • Repeat the previous steps to remove the protective films from all the remaining adhesive strips.

  29. iMac Intel 21.5" Retina 4K Display (2017) Adhesive Strips Replacement: passo 29, imagem 1 %32 iMac Intel 21.5" Retina 4K Display (2017) Adhesive Strips Replacement: passo 29, imagem 2 %32 iMac Intel 21.5" Retina 4K Display (2017) Adhesive Strips Replacement: passo 29, imagem 3 %32
    • To ensure a strong bond, carefully tip the iMac flat on its back (with the screen facing straight up) and press carefully but firmly around all four edges of the display.

    • Remove the tape securing the display to the rear enclosure.

    • Check the display after 24 hours to make sure that it isn't loose on the iMac.

Conclusão

Take your e-waste to an R2 or e-Stewards certified recycler.

Repair didn’t go as planned? Check out our Answers community for troubleshooting help.

45 outras pessoas executaram este guia.

Adam O'Camb

Membro desde: 04/11/15

194.899 Reputação

Autoria de 416 guias

9 comentários

Merci pour l’indication du micro en bas…..

Picard - Responder

Sorry ifixit but you made a big mistake! if you install the stripes like you the microphone quality will be very bad because the mic must be covered AROUND the holes. otherwise the mic is not shield from the inside and your voice is bad!

Simon - Responder

HI,

How did you solve it?

Rafael -

I have spotlights bleeding from the bottom of the screen after opening. Could this be a tape issue on the screen itself?

Adam Dziuba - Responder

Correction it’s a stage light issue for the post above. Any recs?

Adam Dziuba - Responder

Adicione um comentário

Exibir estatísticas:

Últimas 24 horas: 7

Últimos 7 dias: 47

Últimos 30 dias: 223

Duração total: 25,069