Esta versão pode conter edições incorretas. Mude para o último instantâneo verificado.
O que você precisa
-
Este passo não foi traduzido. Ajude a traduzi-lo
-
Stick a suction cup near each of the two top corners of the glass panel.
-
If your suction cups refuse to stick, try cleaning both the glass panel and the suction cup with a mild solvent.
-
-
Este passo não foi traduzido. Ajude a traduzi-lo
-
Gently lift the glass panel perpendicular to the face of the LCD enough to clear the steel mounting pins attached along the underside of the top edge of the glass panel.
-
Pull the glass panel away from the lower edge of the iMac and carefully set it aside.
-
-
Este passo não foi traduzido. Ajude a traduzi-lo
-
Remove the eight 8 mm T10 Torx screws securing the display to the outer case.
-
-
Este passo não foi traduzido. Ajude a traduzi-lo
-
Slightly lift the top edge of the display out of the outer case.
-
-
Este passo não foi traduzido. Ajude a traduzi-lo
-
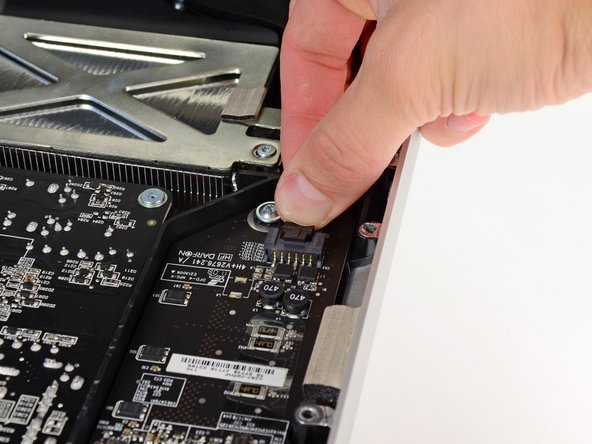
Pull the vertical sync cable connector out of its socket on the LED driver board near the top left corner of your iMac.
-
-
Este passo não foi traduzido. Ajude a traduzi-lo
-
Rotate the display out of the outer case enough to disconnect the LED backlight power cable from the LED driver board.
-
-
-
Este passo não foi traduzido. Ajude a traduzi-lo
-
Grab the plastic pull tab secured to the display data cable lock and rotate it towards upwards.
-
Pull the display data cable straight out of its socket on the logic board.
-
-
Este passo não foi traduzido. Ajude a traduzi-lo
-
Disconnect the LCD thermal sensor cable connector from its socket on the logic board.
-
-
Este passo não foi traduzido. Ajude a traduzi-lo
-
Carefully pull the display toward the top edge of your iMac and lift it out of the outer case, minding any cables that may get caught.
-
-
Este passo não foi traduzido. Ajude a traduzi-lo
-
Remove the following four screws:
-
One 9.3 mm T10 Torx screw with a large head
-
Three 9.3 mm T10 Torx screws with a normal sized head
-
-
Este passo não foi traduzido. Ajude a traduzi-lo
-
Pull the optical drive thermal sensor connector straight up from its socket on the logic board. Pull parallel to the board.
-
-
Este passo não foi traduzido. Ajude a traduzi-lo
-
Lift the inner edge of the optical drive and maneuver its connector past the GPU frame attached to the logic board.
-
Carefully pull the optical drive off its mounting pins on the right side of the outer case to gain clearance for disconnecting the optical drive cable.
-
Allow the optical drive to hang down as you de-route the optical drive thermal sensor connector from behind the GPU heat sink.
-
-
Este passo não foi traduzido. Ajude a traduzi-lo
-
Disconnect the optical drive cable by pulling its connector away from the optical drive.
-
Remove the optical drive from the iMac.
-
-
Este passo não foi traduzido. Ajude a traduzi-lo
-
Peel back the portion of aluminum tape highlighted in red, leaving the rest attached to the black plastic optical drive bracket.
-
-
Este passo não foi traduzido. Ajude a traduzi-lo
-
Remove the two T10 Torx screws from both sides of the optical drive (four screws total).
-
-
Este passo não foi traduzido. Ajude a traduzi-lo
-
Rotate the optical drive bracket slightly away from the optical drive.
-
Pull the optical drive bracket away from the open end of the optical drive, minding any tabs that may get caught.
-
-
Este passo não foi traduzido. Ajude a traduzi-lo
-
Use the tip of a spudger to peel back the piece of foam tape covering the optical drive thermal sensor.
-
Use the flat end of a spudger to carefully pry the thermal sensor up off the adhesive securing it to the optical drive.
-


Cancelar: não concluí este guia.
41 outras pessoas executaram este guia.

4 comentários
Great tutorial. Now if I wish to replace the Superdrive by an SSD (the Superdrive is dead), since the SATA port of the Superdrive is 3Gb/s only, can I keep the Superdrive cable for the SSD but swap it plug to the free SATA III port on the motherboard? Or do I need a new cable?
Thanks
What kind of caddy do I need if I want to put an SSD in there? Is it 9.5mm or 12.7mm? Is any of it non-standard?
Hi! 12mm for imacs and 9 to macbooks... but 9 fits too cuz the place in imac is bigger (also 12 on macbooks not fit)