Ir para o conteúdo principal

iMac Intel 20" EMC 2133 and 2210 Optical Drive Replacement

Pré-requisito somente
Este guia destina-se apenas a ser usado como pré-requisito para outros guias. É incompleto por si só.

O que você precisa

  1. iMac Intel 20" EMC 2133 and 2210 Optical Drive Replacement, Optical Drive: passo 1, imagem 1 %32
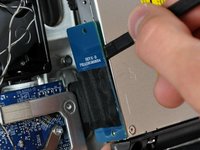
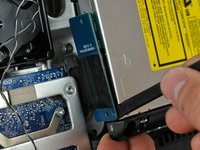
    • If necessary, remove the pieces of tape securing the hard drive/optical drive thermal sensor cables to your iMac.

  2. iMac Intel 20" EMC 2133 and 2210 Optical Drive Replacement: passo 2, imagem 1 %32
    • Disconnect the optical drive thermal sensor connector from the logic board by pulling its connector toward the top of your iMac.

    • When removing this connector, it is helpful to use your thumbnails to push the ears on either side of the connector toward the top of your iMac.

  3. iMac Intel 20" EMC 2133 and 2210 Optical Drive Replacement: passo 3, imagem 1 %32
    • Remove the two fine-thread 7 mm T10 Torx screws securing the optical drive to the rear case.

  4. iMac Intel 20" EMC 2133 and 2210 Optical Drive Replacement: passo 4, imagem 1 %32
    • Lift the free end of the optical drive slightly out of the rear case.

    • Remove the two 3.5 mm T6 Torx screws securing the optical drive connector to the optical drive.

  5. iMac Intel 20" EMC 2133 and 2210 Optical Drive Replacement: passo 5, imagem 1 %32 iMac Intel 20" EMC 2133 and 2210 Optical Drive Replacement: passo 5, imagem 2 %32
    • Insert the flat end of a spudger between the optical drive connector and the body of the optical drive.

    • Twist the spudger to separate the connector from the optical drive.

    • It may be necessary to work from alternating sides of the connector until it is disconnected.

  6. iMac Intel 20" EMC 2133 and 2210 Optical Drive Replacement: passo 6, imagem 1 %32
    • Lift the optical drive out of the rear case and pull it away from the side of the rear case to release the strip of EMI tape attached to its surface.

    • The optical drive thermal sensor is still attached to the underside of the optical drive.

Conclusão

To reassemble your device, follow these instructions in reverse order.

0 comentários

Adicione um comentário

Exibir estatísticas:

Últimas 24 horas: 0

Últimos 7 dias: 0

Últimos 30 dias: 0

Duração total: 926