Esta versão pode conter edições incorretas. Mude para o último instantâneo verificado.
O que você precisa
-
Este passo não foi traduzido. Ajude a traduzi-lo
-
Loosen the two captive Phillips screws securing the access door to the iMac.
-
Remove the access door from the iMac.
-
-
Este passo não foi traduzido. Ajude a traduzi-lo
-
Remove the following four screws:
-
Three 6 mm T8 Torx.
-
One 8 mm T8 Torx.
-
-
Este passo não foi traduzido. Ajude a traduzi-lo
-
Flip your iMac over and lay it stand-side down on a flat surface.
-
To lift the front bezel off the iMac, simultaneously:
-
Use your thumbs to press in the RAM arms and hold the iMac down.
-
Use your index fingers to pull the small bridge of material on the front bezel toward yourself.
-
Pull the Front bezel up with your index fingers.
-
Once the small bridge of material has cleared the RAM arms, lift the front bezel by its lower edge just enough to clear the bottom edge of the rear case.
-
-
Este passo não foi traduzido. Ajude a traduzi-lo
-
Insert a plastic card up into the corner of the air vent slot near the top of the rear case.
-
Push the card toward the top of the iMac to release the front bezel latch.
-
Pull the front bezel away from the rear case.
-
Repeat this process for the other side of the front bezel.
-
If the bezel refuses to release, try pressing the lower edge back onto the rear case and repeat this opening process.
-
-
-
Este passo não foi traduzido. Ajude a traduzi-lo
-
Lay your iMac stand-side down on a table.
-
Lift the front bezel from its lower edge and rotate it away from the rest of your iMac, minding the RAM arms that may get caught.
-
Lay the front bezel above the rest of the iMac.
-
-
Este passo não foi traduzido. Ajude a traduzi-lo
-
If necessary, remove the piece of kapton tape(it is ok to toss this) wrapped around the microphone and camera cables.
-
-
Este passo não foi traduzido. Ajude a traduzi-lo
-
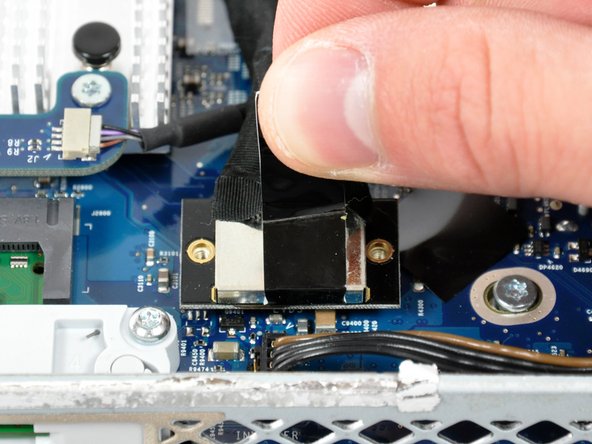
Remove the two 4.8 mm T6 Torx screws securing the display data cable to the logic board.
-
Grab the display data cable connector by its black tab and pull it straight up off the logic board.
-
-
Este passo não foi traduzido. Ajude a traduzi-lo
-
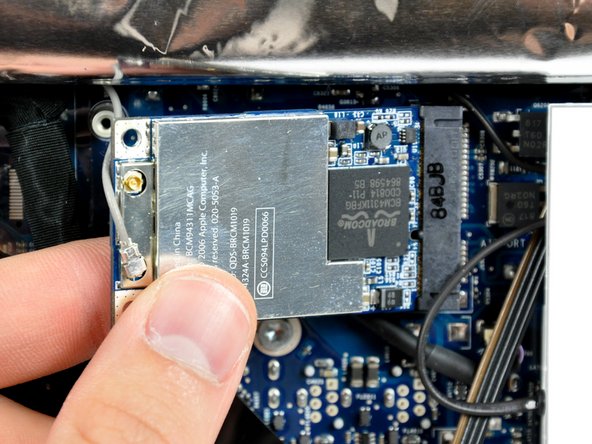
Remove the two 4.8 mm T6 Torx screws securing the AirPort Extreme card to the logic board.
-
Lift the free end slightly and pull the AirPort Extreme card straight away from its socket.
-
-
Este passo não foi traduzido. Ajude a traduzi-lo
-
Use a spudger to pry the antenna connector up off the AirPort Extreme card.
-


Cancelar: não concluí este guia.
4 outras pessoas executaram este guia.

Um comentário
My intel c2d 17" sold in europe had four T8 screws to loosen front. Not the three T6 and one T8.