Ir para o conteúdo principal

iMac G5 17" Model A1058 Upper Left Fan Replacement

O que você precisa

  1. iMac G5 17" Model A1058 Upper Left Fan Replacement, Rear Panel: passo 1, imagem 1 %32
    • Lay the iMac display-side down on a flat surface.

    • Loosen the three Phillips screws securing the rear panel to the iMac.

    • These screws are captive in the iMac. The center screw will stop turning after about 3.5 turns and the outer screws will stop turning after about 5.5 turns. Do not try to remove these screws from your iMac.

  2. iMac G5 17" Model A1058 Upper Left Fan Replacement: passo 2, imagem 1 %32 iMac G5 17" Model A1058 Upper Left Fan Replacement: passo 2, imagem 2 %32 iMac G5 17" Model A1058 Upper Left Fan Replacement: passo 2, imagem 3 %32
    • Lift the rear panel slightly from the bottom edge of the iMac.

    • Pull the rear panel toward yourself and remove it from the iMac.

  3. iMac G5 17" Model A1058 Upper Left Fan Replacement, Fan Cover: passo 3, imagem 1 %32 iMac G5 17" Model A1058 Upper Left Fan Replacement, Fan Cover: passo 3, imagem 2 %32
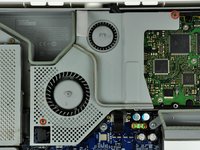
    • Remove the two Phillips screws securing the fan cover to the midplane.

    • The shouldered screw belongs in the lower left corner of the fan cover.

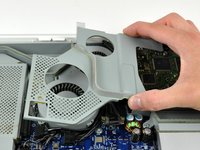
    • Lift the fan cover up off midplane.

  4. iMac G5 17" Model A1058 Upper Left Fan Replacement, Upper Left Fan: passo 4, imagem 1 %32
    • Disconnect the hard drive data cable connector from the logic board by pulling its connector straight up.

  5. iMac G5 17" Model A1058 Upper Left Fan Replacement: passo 5, imagem 1 %32
    • Disconnect the upper left fan cable connector from the logic board by pulling its connector straight up.

  6. iMac G5 17" Model A1058 Upper Left Fan Replacement: passo 6, imagem 1 %32
    • De-route the fan cable from around the edge of the logic board as necessary.

  7. iMac G5 17" Model A1058 Upper Left Fan Replacement: passo 7, imagem 1 %32 iMac G5 17" Model A1058 Upper Left Fan Replacement: passo 7, imagem 2 %32
    • Remove the two T8 Torx screws securing the upper left fan to the chassis.

    • Lift the upper left fan out of the chassis.

Conclusão

To reassemble your device, follow these instructions in reverse order.

Uma outra pessoa concluiu este guia.

0 comentários

Adicione um comentário

Exibir estatísticas:

Últimas 24 horas: 1

Últimos 7 dias: 3

Últimos 30 dias: 6

Duração total: 7,746