Esta versão pode conter edições incorretas. Mude para o último instantâneo verificado.
O que você precisa
-
Este passo não foi traduzido. Ajude a traduzi-lo
-
Lay the iMac display-side down on a flat surface.
-
Loosen the three Phillips screws securing the rear panel to the iMac.
-
-
Este passo não foi traduzido. Ajude a traduzi-lo
-
Lift the rear panel slightly from the bottom edge of the iMac.
-
Pull the rear panel toward yourself and remove it from the iMac.
-
-
Este passo não foi traduzido. Ajude a traduzi-lo
-
Remove the two Phillips screws securing the fan cover to the midplane.
-
Lift the fan cover up off midplane.
-
-
-
Este passo não foi traduzido. Ajude a traduzi-lo
-
Disconnect the hard drive thermal sensor cable from the hard drive thermal sensor.
-
-
Este passo não foi traduzido. Ajude a traduzi-lo
-
Remove the three Phillips screws securing the hard drive to the midplane.
-
Lift the hard drive from its right edge and maneuver it out of the midplane.
-
-
Este passo não foi traduzido. Ajude a traduzi-lo
-
Insert the flat end of a spudger between the SATA power cable connector and the body of the hard drive.
-
Twist the spudger counter-clockwise to slightly separate the SATA power cable connector from its socket on the hard drive.
-
Pull the SATA power cable connector away from the hard drive.
-
-
Este passo não foi traduzido. Ajude a traduzi-lo
-
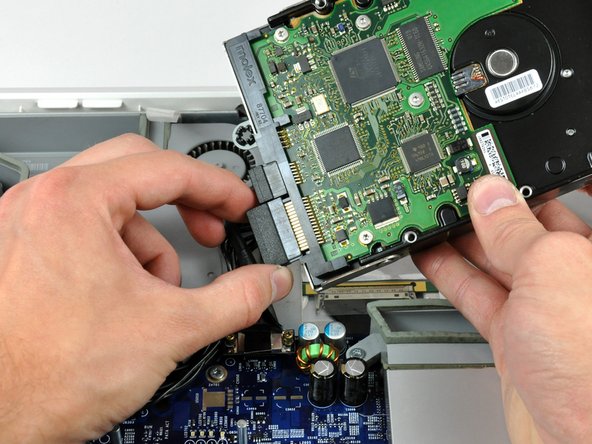
Pull the SATA data cable connector away from the hard drive.
-