Esta versão pode conter edições incorretas. Mude para o último instantâneo verificado.
O que você precisa
-
Este passo não foi traduzido. Ajude a traduzi-lo
-
Position the computer so that all three screws on the underside of the display are accessible. This may be upright or laid flat with the screen face down on a soft surface.
-
-
Este passo não foi traduzido. Ajude a traduzi-lo
-
Unscrew the three underside 1.5 mm hex screws with the tight fitting, hexagonal screw head.
-
-
Este passo não foi traduzido. Ajude a traduzi-lo
-
Separate the front panel of display from base by firmly, but carefully, applying pressure upward. As a result, the two panels should slide apart.
-
-
Este passo não foi traduzido. Ajude a traduzi-lo
-
While the cords are still connected, access the inter-workings of the display from the top.
-
The red circle indicates the LED cable.
-
The blue circle indicates the inverter cable.
-
The yellow circle indicates TMDS connector.
-
-
-
Este passo não foi traduzido. Ajude a traduzi-lo
-
Disconnect the inverter cable by grasping the chords on each side of the white connection and gently pull your hands away from each other.
-
-
Este passo não foi traduzido. Ajude a traduzi-lo
-
The next cord to unplug between the two panels of the display is the inverter cable. This will be located under the inverter closer to the bottom of the screen and will have only two cables connecting at a smaller white connection.
-
Like the inverter cable, grasp each side of the white connection and gently unplug the inverter cable.
-
-
Este passo não foi traduzido. Ajude a traduzi-lo
-
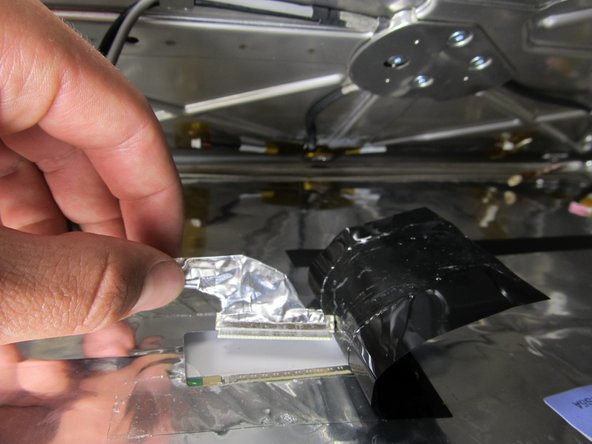
The third, and final, cable you will need to unplug is the TMDS connector. This is located under a rectangular strip of black tape that has a gray and black cord coming out of one end.
-
Peel back the black tape, starting at the end with the cords protruding out.
-
Under the black tape, you will see the gray and black cords going into a connection that looks like it is wrapped in aluminum foil. Grasp that connection and pull carefully in the downward direction toward the bottom of the display.
-
-
Este passo não foi traduzido. Ajude a traduzi-lo
-
Now that you have unplugged all of the cables, you can lay the front panel of the display face down on a soft surface.
-
Next, you will unscrew the four 5 mm T-10 screws located at the corners of the display.
-
-
Este passo não foi traduzido. Ajude a traduzi-lo
-
Once the four screws are removed, the display is ready to be removed and the inverter is accessible.
-
-
Este passo não foi traduzido. Ajude a traduzi-lo
-
Remove old display from frame and place new displace with same exact orientation as the old.
-


Cancelar: não concluí este guia.
7 outras pessoas executaram este guia.
Equipe

Cal Poly, Team 21-22, Maness Fall 2011 Membro de Cal Poly, Team 21-22, Maness Fall 2011
CPSU-MANESS-F11S21G22
Membros da 4
Autoria de 13 guias
6 comentários
The instructions say that I can buy a replacement monitor here, but I can’t find in on this site.
Note; on my iMac G4, I need to remove all screws around the bezel with the exception of the 2 Side Center screws which are holding up the backlit LEDs. Slightly different than your tutorial however this was an excellent tutorial. Just replaced the screen for my daughter all she needs to do is remember her passwords
Step 3 should have an arrow to show where to slide. The current photo is misleading.
In fact, the LCD is inside a cast frame, the cast frame is permanently attached with the transparent frame. Then the cast frame is locked to the back metal shield of the monitor with sided-“H“ hooks. The correct procedure should be: 1. unscrew three screws at the bottom of the monitor. 2. hold the transparent, slide it against the back cover upwards, ~3mm, then the LCD + transparent frame + cast frame together can be separated from the back of the monitor.
Another trick is unscrewing the center screw last, then pushing the screw back, the LCD combo will slide upwards.