Esta versão pode conter edições incorretas. Mude para o último instantâneo verificado.
O que você precisa
-
Este passo não foi traduzido. Ajude a traduzi-lo
-
Flip the phone over so that the back panel of the phone is facing up.
-
Wedge the plastic opening tool between the black outer panel and the silver side panel.
-
Push down on the plastic opening tool to separate the back panel from the rest of the phone.
-
Continue to do this around all sides of the phone until the back panel has popped all the way off.
-
-
Este passo não foi traduzido. Ajude a traduzi-lo
-
Using your fingers, slide the SIM card all the way out of the phone.
-
-
Este passo não foi traduzido. Ajude a traduzi-lo
-
Remove the yellow Kapton tape by using the tweezers to peel it up and away from the device.
-
-
Este passo não foi traduzido. Ajude a traduzi-lo
-
Using the Phillips #00 screwdriver, remove the two 3.0 mm screws located near the top of the phone, next to the rear camera.
-
-
Este passo não foi traduzido. Ajude a traduzi-lo
-
Remove the fingerprint sensor flex cable, using the plastic opening tool to lift it out.
-
-
Este passo não foi traduzido. Ajude a traduzi-lo
-
Using the tweezers, peel back the yellow Kapton tape located on the right side of the phone.
-
-
Este passo não foi traduzido. Ajude a traduzi-lo
-
Using the Phillips #00 screwdriver, remove the 15, 3.0 mm rear panel screws located around the perimeter of the phone.
-
-
Este passo não foi traduzido. Ajude a traduzi-lo
-
Flip the phone over so that the screen is facing up.
-
Wedge the plastic opening tool between the screen and the rear panel.
-
Push up on the opening tool to separate the panel from the phone.
-
Continue to do this around the entire phone until the rear panel is no longer connected to the device.
-
-
-
Este passo não foi traduzido. Ajude a traduzi-lo
-
Use the tweezers to peel off the yellow Kapton tape.
-
-
Este passo não foi traduzido. Ajude a traduzi-lo
-
Use the plastic opening tool to remove the connectors on the motherboard.
-
-
Este passo não foi traduzido. Ajude a traduzi-lo
-
Use tweezers to remove the antenna. The antenna comes up on the right side of the phone, by the battery, and is attached to the motherboard.
-
-
Este passo não foi traduzido. Ajude a traduzi-lo
-
Using the #00 Phillips screwdriver, remove the 3.0 mm screw located on the right edge of the phone, above the battery.
-
-
Este passo não foi traduzido. Ajude a traduzi-lo
-
Wedge the plastic opening tool underneath the motherboard which is located at the top of the phone.
-
Push down on the plastic opening tool, lifting the motherboard away from the phone.
-
Continue to do this around all sides of the motherboard until it is fully removed from the phone.
-
-
Este passo não foi traduzido. Ajude a traduzi-lo
-
Use tweezers to peel off the tape at the bottom of the phone.
-
-
Este passo não foi traduzido. Ajude a traduzi-lo
-
Wedge the plastic opening tool under the charging port board at the bottom of the phone.
-
Push down on the plastic opening tool so the board pulls away from the phone.
-
Continue to do this around the charging port board until it comes all the way off the phone.
-
-
Este passo não foi traduzido. Ajude a traduzi-lo
-
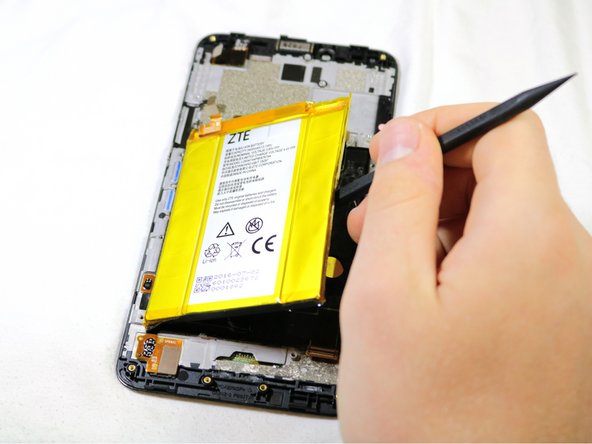
Use a heat gun to heat the adhesive under the battery.
-
Heat the battery for 1 minute then check if it is pliable. If needed, heat in intervals of 10 seconds until the battery can be removed.
-
-
Este passo não foi traduzido. Ajude a traduzi-lo
-
Use a nylon spudger to pry the battery from the phone.
-
-
Este passo não foi traduzido. Ajude a traduzi-lo
-
Disconnect the digital flex cable connector, located at the top left of the phone, using a pair of tweezers.
-
-
Este passo não foi traduzido. Ajude a traduzi-lo
-
Using your fingers peel up the LCD flex cables. These cables are black and flat.
-
-
Este passo não foi traduzido. Ajude a traduzi-lo
-
Peel the flex cables off where they are attached to the frame.
-
-
Este passo não foi traduzido. Ajude a traduzi-lo
-
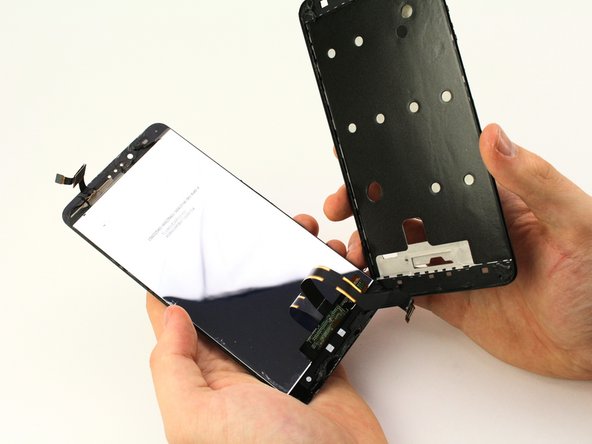
Insert a plastic opening tool between the screen and the rear case and separate it carefully, starting at the bottom.
-
-
Este passo não foi traduzido. Ajude a traduzi-lo
-
Push the digitizer flex cable through the hole in the frame to separate the LCD from the phone.
-


Cancelar: não concluí este guia.
13 outras pessoas executaram este guia.

Equipe

Cal Poly, Team S17-G3, Livingston Spring 2018 Membro de Cal Poly, Team S17-G3, Livingston Spring 2018
CPSU-LIVINGSTON-S18S17G3
Membros da 4
Autoria de 16 guias