Ir para o conteúdo principal

Xelio P1001A-BK Wi-Fi Antenna Replacement

O que você precisa

  1. Xelio P1001A-BK Wi-Fi Antenna Replacement, Back Cover: passo 1, imagem 1 %32 Xelio P1001A-BK Wi-Fi Antenna Replacement, Back Cover: passo 1, imagem 2 %32
    • Remove the two 3 mm retaining screws from the side of the tablet with a Phillips #0 screwdriver.

  2. Xelio P1001A-BK Wi-Fi Antenna Replacement: passo 2, imagem 1 %32 Xelio P1001A-BK Wi-Fi Antenna Replacement: passo 2, imagem 2 %32
    • Insert the plastic opening tool in between the shelf halves and lift the top shelf half to detach the securing tabs.

    • There are four securing tabs located on each long side.

    • Before fully separating the shell halves, observe if the speakers are separated from the shell half. If they are still in their sockets, gently pry them loose with the plastic opening tool.

  3. Xelio P1001A-BK Wi-Fi Antenna Replacement, Wi-Fi Antenna: passo 3, imagem 1 %32 Xelio P1001A-BK Wi-Fi Antenna Replacement, Wi-Fi Antenna: passo 3, imagem 2 %32
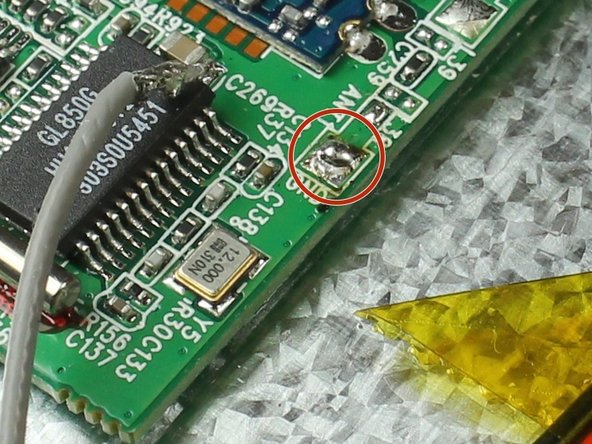
    • Desolder the connection on the motherboard.

    • Use a soldering vacuum to remove any excess solder.

  4. Xelio P1001A-BK Wi-Fi Antenna Replacement: passo 4, imagem 1 %32
    • Use wire strippers to strip off at least 2 mm of wire insulation from each wire.

  5. Xelio P1001A-BK Wi-Fi Antenna Replacement: passo 5, imagem 1 %32
    • Solder the outer wire braid shield to the ground point.

  6. Xelio P1001A-BK Wi-Fi Antenna Replacement: passo 6, imagem 1 %32
    • Solder the center conductor to the antenna point.

Conclusão

To reassemble your device, follow these instructions in reverse order.

Josh Saenz

Membro desde: 03/11/15

316 Reputação

Autoria de 3 guias

Equipe

Colorado Springs, Team 4-2, Panko Spring 2015 Membro de Colorado Springs, Team 4-2, Panko Spring 2015

UCCS-PANKO-S15S4G2

Membros da 3

Autoria de 12 guias

0 comentários

Adicione um comentário

Exibir estatísticas:

Últimas 24 horas: 0

Últimos 7 dias: 1

Últimos 30 dias: 9

Duração total: 155