Esta versão pode conter edições incorretas. Mude para o último instantâneo verificado.
O que você precisa
-
Este passo não foi traduzido. Ajude a traduzi-lo
-
Grasp the hard drive assembly and press the release button while lifting its front edge.
-
Remove the hard drive assembly from the top vent.
-
-
Este passo não foi traduzido. Ajude a traduzi-lo
-
Insert the flat end of a spudger or the edge of an Xbox 360 opening tool into the small gap at the front edge of the bottom vent.
-
Pry the front edge of the bottom vent away from the faceplate.
-
-
Este passo não foi traduzido. Ajude a traduzi-lo
-
To release the clips, work from the front edge of the bottom vent.
-
While slightly lifting the front edge of the bottom vent, use the tip of a spudger to push the clips closest to the front of the bottom vent towards the inside of the console.
-
-
Este passo não foi traduzido. Ajude a traduzi-lo
-
Repeat the same process to release the two center clips on the bottom vent.
-
-
Este passo não foi traduzido. Ajude a traduzi-lo
-
Use the tip of your spudger to release the clips on the bottom vent nearest the back of the Xbox.
-
-
Este passo não foi traduzido. Ajude a traduzi-lo
-
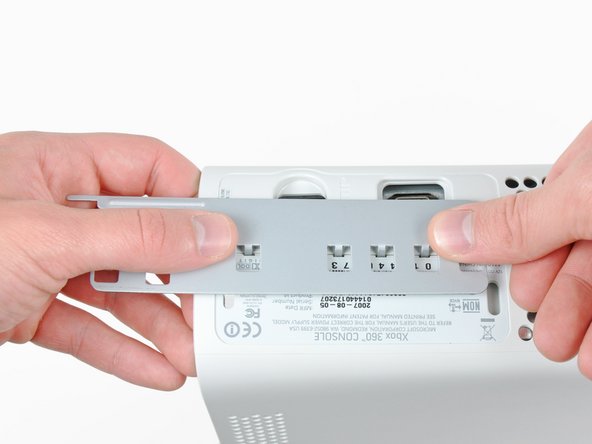
Insert the flat edge of a spudger between the faceplate and the outer casing near the power button.
-
Run your spudger along the edge of the faceplate to release the clips securing it to the front of the console.
-
-
Este passo não foi traduzido. Ajude a traduzi-lo
-
Repeat the same motions as previously mentioned to release the left side of the faceplate.
-
-
Este passo não foi traduzido. Ajude a traduzi-lo
-
Remove the faceplate from the front face of the console.
-
-
Este passo não foi traduzido. Ajude a traduzi-lo
-
The top vent is secured to the console via clips. The first two clips are located underneath the top vent closest to the faceplate, as shown in the pictures.
-
-
Este passo não foi traduzido. Ajude a traduzi-lo
-
Insert the flat end of a spudger into the small gaps previously mentioned to release the clips.
-
-
-
Este passo não foi traduzido. Ajude a traduzi-lo
-
To release the clips, work from the middle of the top vent.
-
While slightly lifting the front edge of the top vent, use the tip of a spudger to push the clips closest to the center of the top vent towards the inside of the console.
-
-
Este passo não foi traduzido. Ajude a traduzi-lo
-
Use the tip of your spudger to release the clip on the top vent nearest the back of the Xbox's upper case.
-
-
Este passo não foi traduzido. Ajude a traduzi-lo
-
Use the tip of your spudger to release the clip on the top vent nearest the back of the Xbox.
-
Remove the top vent from the 360.
-
-
Este passo não foi traduzido. Ajude a traduzi-lo
-
Stand the console vertically with the top edge facing down.
-
Carefully peel the warranty sticker off the console.
-
-
Este passo não foi traduzido. Ajude a traduzi-lo
-
Use the flat end of a spudger to release the following latches:
-
Above the front-facing USB ports.
-
Beneath the front-facing USB ports.
-
Above the Memory Unit slots.
-
-
Este passo não foi traduzido. Ajude a traduzi-lo
-
Insert the flat end of a spudger and pry upwards to release the last remaining latch located above the eject button.
-
-
Este passo não foi traduzido. Ajude a traduzi-lo
-
Slightly lift the front portion of the lower case to ensure that the latches in the front have been completely released.
-
-
Este passo não foi traduzido. Ajude a traduzi-lo
-
Press the Xbox 360 opening tool down into the clips securing the lower case to the upper case near the I/O ports.
-
While pressing down on the tool, push the lower and upper cases apart to separate the retaining clips.
-
-
Este passo não foi traduzido. Ajude a traduzi-lo
-
While pushing the upper and lower cases apart, use the tip of a spudger or the finger of an Xbox 360 opening tool to push the long clip highlighted in red toward the center of the 360.
-
The clip should release, leaving the clips near the power connector as the only thing holding the upper and lower cases together.
-
-
Este passo não foi traduzido. Ajude a traduzi-lo
-
Press the Xbox 360 opening tool down into the two remaining clips near the power connector.
-
Push the upper and lower cases apart to fully release the retaining clips.
-
-
Este passo não foi traduzido. Ajude a traduzi-lo
-
Grasp the back portion of the lower case and lift it upwards to separate it from the console.
-
-
Este passo não foi traduzido. Ajude a traduzi-lo
-
Use the tip of a spudger to release the clip securing the eject button to the metal casing.
-
Insert the flat end of a spudger between the eject button and the optical drive.
-
Pry the eject button off its retaining posts and remove it from the 360.
-
-
Este passo não foi traduzido. Ajude a traduzi-lo
-
Remove the six silver 64 mm T10 Torx screws securing the upper case to the metal casing.
-
-
Este passo não foi traduzido. Ajude a traduzi-lo
-
Lift the upper case straight up and remove it from the console.
-
-
Este passo não foi traduzido. Ajude a traduzi-lo
-
Peel the silver tape securing the optical drive to the metal casing.
-
-
Este passo não foi traduzido. Ajude a traduzi-lo
-
Slightly lift the optical drive upwards to gain clearance to disconnect the SATA and power connectors located on the backside of the optical drive.
-
-
Este passo não foi traduzido. Ajude a traduzi-lo
-
Grab the power connector by its cables and pull it straight out of its socket on the optical drive.
-
Disconnect the SATA data connector from its socket on the optical drive by pulling it straight away.
-
-
Este passo não foi traduzido. Ajude a traduzi-lo
-
Lift the optical drive assembly out of the metal casing.
-
-
Este passo não foi traduzido. Ajude a traduzi-lo
-
While pressing the optical drive cover toward the top face of the optical drive, use the flat end of a spudger to release the two retaining clips on the underside of the cover.
-


Cancelar: não concluí este guia.
236 outras pessoas executaram este guia.

24 comentários
who knows xbox360 can use desktop drives?We have all kinds of drives,but i am not sure if it is fit for xbox360.
Thanks
That has nothing to do with this guide. If you have any question regarding this equipment, go to the answer section.
Very easy to follow, got my drive fixed...thanks!
" Replacing a defective optical drive with a replacement optical drive does not work. The replacement will have a different DVD drive key, which the game console will not accept."
Not entirely accurate, that statement.
Having fixed a PS3 blu-ray drive by following the excellent guide on here, tried the same technique.
I had a bad drive in my xbox, and I replaced it with a new drive (of the same type). I took the daughter-board from the faulty drive and transplanted it to the good drive. It involved stripping down both drives, disconnecting 2 ribbon cables and unsoldering about 8 wires, transplanting the daughter-board - and resoldering the wires. Then reassembling. It worked for me, anyway.