Ir para o conteúdo principal

Whirlpool WED87HED Dryer Idler Arm Replacement

O que você precisa

  1. Whirlpool WED87HED Dryer Idler Arm Replacement, Safety Precautions: passo 1, imagem 1 %32
    • Before you begin your repair, unplug your dryer.

    • Your power cord may have four prongs rather than three. The additional prong is a ground connection.

  2. Whirlpool WED87HED Dryer Idler Arm Replacement, Unfasten the top panel: passo 2, imagem 1 %32 Whirlpool WED87HED Dryer Idler Arm Replacement, Unfasten the top panel: passo 2, imagem 2 %32 Whirlpool WED87HED Dryer Idler Arm Replacement, Unfasten the top panel: passo 2, imagem 3 %32
    Ferramenta utilizada nesse passo:
    FixMat
    $36.95
    Comprar
    • Throughout this guide, keep track of each screw and reinstall it exactly where it came from.

    • Use a 5/16 inch nut driver to remove the two 15.7 mm-long screws securing the top panel to the rear panel bracket.

  3. Whirlpool WED87HED Dryer Idler Arm Replacement, Remove the top panel: passo 3, imagem 1 %32 Whirlpool WED87HED Dryer Idler Arm Replacement, Remove the top panel: passo 3, imagem 2 %32
    • Grasp the top and slide it 1/2 to 1 inch toward the rear of the machine.

  4. Whirlpool WED87HED Dryer Idler Arm Replacement: passo 4, imagem 1 %32 Whirlpool WED87HED Dryer Idler Arm Replacement: passo 4, imagem 2 %32
    • Lift the top panel upward to separate it from the chassis.

    • Remove the top panel from the machine.

  5. Whirlpool WED87HED Dryer Idler Arm Replacement, Unfasten the cover plate: passo 5, imagem 1 %32
    • Use a 5/16 inch nut driver to remove the 16.2 mm-long cover plate screw.

  6. Whirlpool WED87HED Dryer Idler Arm Replacement, Remove the cover plate: passo 6, imagem 1 %32 Whirlpool WED87HED Dryer Idler Arm Replacement, Remove the cover plate: passo 6, imagem 2 %32 Whirlpool WED87HED Dryer Idler Arm Replacement, Remove the cover plate: passo 6, imagem 3 %32
    • Remove the cover plate.

  7. Whirlpool WED87HED Dryer Idler Arm Replacement, Disconnect the cord: passo 7, imagem 1 %32
    • Mark the cables with a permanent marker if needed and take a picture or draw a diagram.

    • Use a Phillips driver or a 1/4 inch nut driver to remove the three 21.4 mm-long screws.

    • If your plug has 4 prongs, there will be a ground connection from the cord as well. Use a 5/16 inch nut driver to remove this connection.

  8. Whirlpool WED87HED Dryer Idler Arm Replacement, Remove the cord: passo 8, imagem 1 %32 Whirlpool WED87HED Dryer Idler Arm Replacement, Remove the cord: passo 8, imagem 2 %32 Whirlpool WED87HED Dryer Idler Arm Replacement, Remove the cord: passo 8, imagem 3 %32
    • Pull the cord carefully down through the round hole.

    • Make sure you replace the connections correctly when you reassemble.

  9. Whirlpool WED87HED Dryer Idler Arm Replacement, Unfasten the cord terminal block: passo 9, imagem 1 %32
    • Use a 5/16 inch hex driver to remove the 16.5 mm-long green ground screw.

    • Use a Phillips driver to remove the two 15.3 mm‑long cord terminal block screws.

  10. Whirlpool WED87HED Dryer Idler Arm Replacement, Move the cord terminal block: passo 10, imagem 1 %32 Whirlpool WED87HED Dryer Idler Arm Replacement, Move the cord terminal block: passo 10, imagem 2 %32 Whirlpool WED87HED Dryer Idler Arm Replacement, Move the cord terminal block: passo 10, imagem 3 %32
    • Move the cord terminal block behind the rear panel.

  11. Whirlpool WED87HED Dryer Idler Arm Replacement, Unfasten the rear panel: passo 11, imagem 1 %32 Whirlpool WED87HED Dryer Idler Arm Replacement, Unfasten the rear panel: passo 11, imagem 2 %32
    Ferramenta utilizada nesse passo:
    FixMat
    $36.95
    Comprar
    • Use a 1/4 inch nut driver to remove the eleven rear panel screws.

    • Ten 20 mm-long screws

    • One 12.9 mm-long screw under the water inlet.

    • Throughout this guide, keep track of each screw and reinstall it exactly where it came from.

  12. Whirlpool WED87HED Dryer Idler Arm Replacement: passo 12, imagem 1 %32 Whirlpool WED87HED Dryer Idler Arm Replacement: passo 12, imagem 2 %32
    • Use a 1/4 inch nut driver to remove the 16.4 mm-length screw holding the main board bracket to the chassis.

    • Use a 1/4 inch nut driver to remove the two 20 mm-long screws from the top rear of the machine.

  13. Whirlpool WED87HED Dryer Idler Arm Replacement, Remove the rear panel: passo 13, imagem 1 %32 Whirlpool WED87HED Dryer Idler Arm Replacement, Remove the rear panel: passo 13, imagem 2 %32 Whirlpool WED87HED Dryer Idler Arm Replacement, Remove the rear panel: passo 13, imagem 3 %32
    • Put on gloves before continuing, as the rear panel is sharp.

    • Lift the panel about 1/2 inch and tilt it to the rear to release it from the vent pipe.

    • Slide the panel off the vent pipe and remove it.

  14. Whirlpool WED87HED Dryer Idler Arm Replacement, Reassembly information: passo 14, imagem 1 %32 Whirlpool WED87HED Dryer Idler Arm Replacement, Reassembly information: passo 14, imagem 2 %32
    • During reassembly, perform the following:

    • Make sure that the vent pipe is fitted into the collar on the panel.

    • Make sure the tabs at the bottom are aligned to the bottom rim of the chassis.

    • Position the panel so its screw holes match with the chassis.

  15. Whirlpool WED87HED Dryer Idler Arm Replacement, Unfasten the idler arm: passo 15, imagem 1 %32 Whirlpool WED87HED Dryer Idler Arm Replacement, Unfasten the idler arm: passo 15, imagem 2 %32
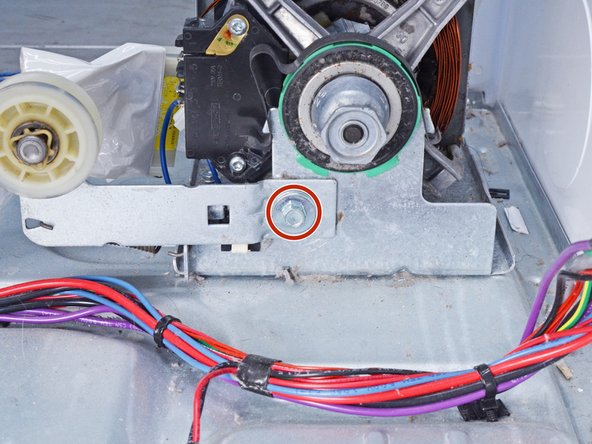
    • Use a 3/8 inch socket, or a nut driver, to remove the bolt securing the idler arm to the motor frame.

  16. Whirlpool WED87HED Dryer Idler Arm Replacement, Remove the idler arm: passo 16, imagem 1 %32 Whirlpool WED87HED Dryer Idler Arm Replacement, Remove the idler arm: passo 16, imagem 2 %32 Whirlpool WED87HED Dryer Idler Arm Replacement, Remove the idler arm: passo 16, imagem 3 %32
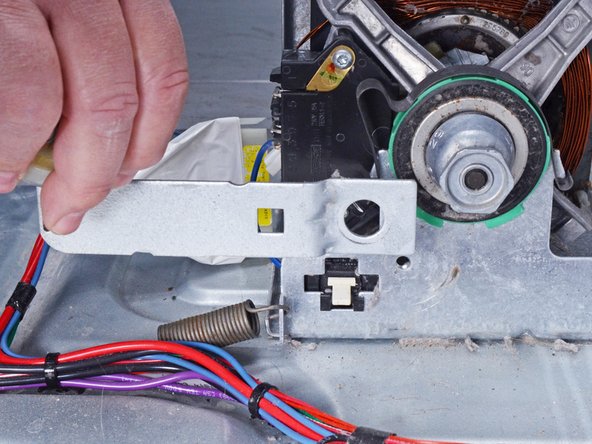
    • Move the idler arm toward the side of the dryer to unhook the idler arm tension spring from the arm.

    • Remove the idler arm.

    • During reassembly, be sure to reattach the spring before securing the arm.

Conclusão

To reassemble your device, follow these instructions in reverse order.

Repair didn’t go as planned? Ask our Answers community for help.

Bill Gilbert

Membro desde: 06/30/22

30.362 Reputação

Autoria de 213 guias

Equipe

iFixit Membro de iFixit

Staff

Membros da 137

Autoria de 17.524 guias

0 comentários

Adicione um comentário

Exibir estatísticas:

Últimas 24 horas: 0

Últimos 7 dias: 0

Últimos 30 dias: 1

Duração total: 58