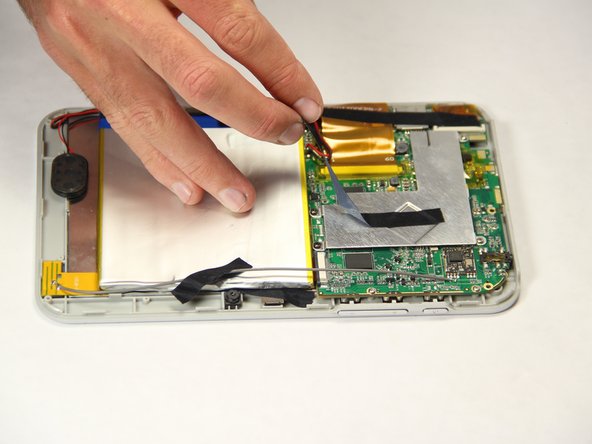
Ir para o conteúdo principal

Vivitar XO 7 Motherboard Replacement

O que você precisa

  1. Vivitar XO 7 Motherboard Replacement, Back Cover: passo 1, imagem 1 %32
    • Remove the two 3mm Phillips #00 screws on the bottom of the tablet.

  2. Vivitar XO 7 Motherboard Replacement: passo 2, imagem 1 %32
    • With the plastic opening tools, pry open the back cover.

  3. Vivitar XO 7 Motherboard Replacement: passo 3, imagem 1 %32
    • Remove the back cover from the tablet.

  4. Vivitar XO 7 Motherboard Replacement, Battery: passo 4, imagem 1 %32 Vivitar XO 7 Motherboard Replacement, Battery: passo 4, imagem 2 %32
    • Peel off the black pieces of tape from the internal components.

  5. Vivitar XO 7 Motherboard Replacement: passo 5, imagem 1 %32 Vivitar XO 7 Motherboard Replacement: passo 5, imagem 2 %32
    • Carefully remove the battery from the tablet.

  6. Vivitar XO 7 Motherboard Replacement: passo 6, imagem 1 %32 Vivitar XO 7 Motherboard Replacement: passo 6, imagem 2 %32
    • With the tweezers, firmly grab the wire at the base and pull to disconnect the battery from the motherboard.

  7. Vivitar XO 7 Motherboard Replacement, Speaker: passo 7, imagem 1 %32
    • Carefully remove the speaker from the metal plate with your hands.

  8. Vivitar XO 7 Motherboard Replacement: passo 8, imagem 1 %32 Vivitar XO 7 Motherboard Replacement: passo 8, imagem 2 %32
    • With tweezers, firmly grab the wire at the base and pull to disconnect the speaker from the motherboard.

  9. Vivitar XO 7 Motherboard Replacement, Camera: passo 9, imagem 1 %32
    • Peel off black tape that is holding the camera in place.

  10. Vivitar XO 7 Motherboard Replacement: passo 10, imagem 1 %32
    • Carefully disconnect the ribbon cables from the motherboard.

  11. Vivitar XO 7 Motherboard Replacement: passo 11, imagem 1 %32 Vivitar XO 7 Motherboard Replacement: passo 11, imagem 2 %32
    • Using the tweezers, firmly grab wires and pull to disconnect them from the motherboard.

  12. Vivitar XO 7 Motherboard Replacement, Motherboard: passo 12, imagem 1 %32
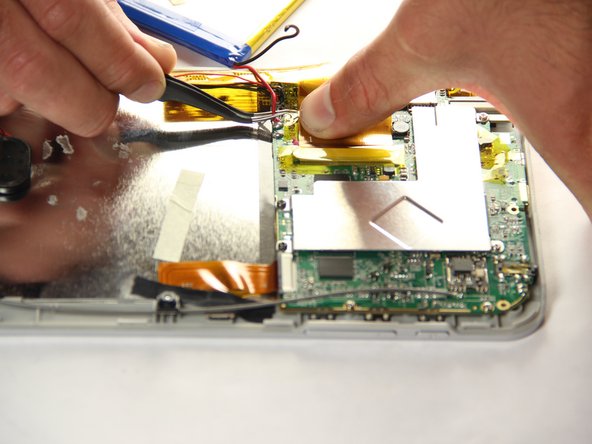
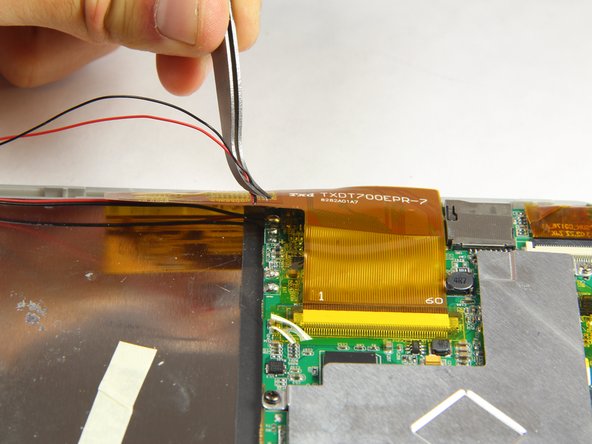
    • Disconnect the large golden ribbon cable that is connected to the digitizer. Firmly grab the cable close to the connection and pull to disconnect.

  13. Vivitar XO 7 Motherboard Replacement: passo 13, imagem 1 %32
    • Remove four 4mm PH00 silver screws from the motherboard.

  14. Vivitar XO 7 Motherboard Replacement: passo 14, imagem 1 %32
    • Remove two 2mm PH00 black screws from the motherboard.

  15. Vivitar XO 7 Motherboard Replacement: passo 15, imagem 1 %32
    • Carefully remove the silver cover from the motherboard.

  16. Vivitar XO 7 Motherboard Replacement: passo 16, imagem 1 %32 Vivitar XO 7 Motherboard Replacement: passo 16, imagem 2 %32
    • Gently pick up and turn over the motherboard. While turned over, disconnect the last ribbon cable that connects to screen.

Conclusão

To reassemble your device, follow these instructions in reverse order.

James Lunn

Membro desde: 01/20/15

116 Reputação

Autoria de 1 guia

Equipe

USF Tampa, Team 11-1, Blackwell Winter 2015 Membro de USF Tampa, Team 11-1, Blackwell Winter 2015

USFT-BLACKWELL-W15S11G1

Membros da 4

Autoria de 10 guias

0 comentários

Adicione um comentário

Exibir estatísticas:

Últimas 24 horas: 0

Últimos 7 dias: 0

Últimos 30 dias: 0

Duração total: 925