Ir para o conteúdo principal

Ultimate Ears Wonderboom 3 Charging Port Replacement

O que você precisa

  1. Ultimate Ears Wonderboom 3 Charging Port Replacement, Speaker Mesh: passo 1, imagem 1 %32 Ultimate Ears Wonderboom 3 Charging Port Replacement, Speaker Mesh: passo 1, imagem 2 %32 Ultimate Ears Wonderboom 3 Charging Port Replacement, Speaker Mesh: passo 1, imagem 3 %32
    • To unclip the top of the speaker from the body, insert the metal spudger to the left of the speaker's center. To find the correct position, make sure the pointed end of the spudger is inserted entirely.

    • While in this position, press down and into the speaker to unclip the top. You should feel and hear and audible click.

    • Repeat this on all four sides of the speaker. The speaker's top will snap off when you press down on it, so make sure you hold onto the top so it does not fly off.

  2. Ultimate Ears Wonderboom 3 Charging Port Replacement: passo 2, imagem 1 %32
    • Take the top off of the speaker to reveal the inside of the speaker.

    • Carefully set the top cover to the side and make sure the clear plastic button tabs stay intact.

  3. Ultimate Ears Wonderboom 3 Charging Port Replacement: passo 3, imagem 1 %32 Ultimate Ears Wonderboom 3 Charging Port Replacement: passo 3, imagem 2 %32
    • Take the mesh covering off of the speaker by pressing on the center of the speaker and pulling the mesh upwards.

  4. Ultimate Ears Wonderboom 3 Charging Port Replacement, Speaker Drivers: passo 4, imagem 1 %32
    • Unscrew the four M3 x 6mm Phillips head screws in each corner of the speaker.

  5. Ultimate Ears Wonderboom 3 Charging Port Replacement: passo 5, imagem 1 %32
    • Using the metal spudger, slowly wedge it behind the speaker.

    • Slowly and gently push the spudger forward to dislodge waterproofing adhesive that holds the speaker in place.

    • This step will affect the waterproof quality of the speaker.

  6. Ultimate Ears Wonderboom 3 Charging Port Replacement: passo 6, imagem 1 %32
    • Pull the speaker driver forward to dislodge it from the speaker.

    • Next, turn the speaker driver to where the wires are facing upwards.

  7. Ultimate Ears Wonderboom 3 Charging Port Replacement: passo 7, imagem 1 %32
    • Using the soldering iron, desolder the white and black wires (the 2 connections) at the top of the speaker driver.

  8. Ultimate Ears Wonderboom 3 Charging Port Replacement, Battery: passo 8, imagem 1 %32 Ultimate Ears Wonderboom 3 Charging Port Replacement, Battery: passo 8, imagem 2 %32
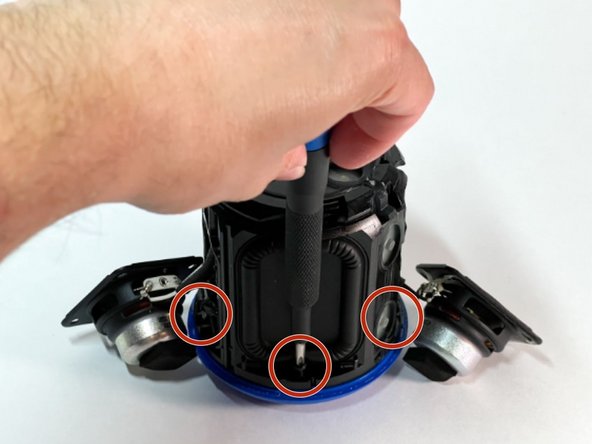
    • Locate and unscrew the M3 x 8mm screws found under each of the four speakers.

  9. Ultimate Ears Wonderboom 3 Charging Port Replacement: passo 9, imagem 1 %32 Ultimate Ears Wonderboom 3 Charging Port Replacement: passo 9, imagem 2 %32 Ultimate Ears Wonderboom 3 Charging Port Replacement: passo 9, imagem 3 %32
    • Remove the main center of the speaker, exposing the bottom and the battery.

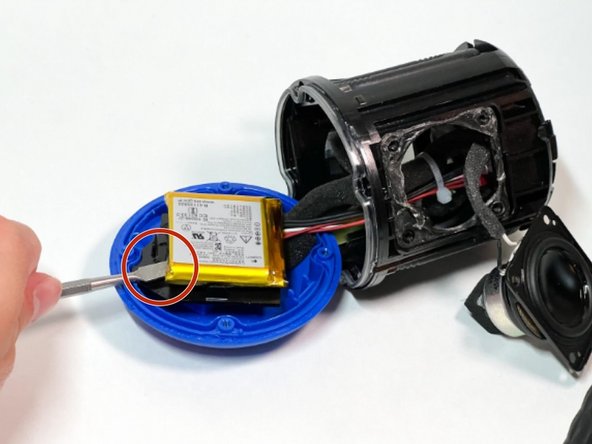
    • Carefully place the metal spudger under the battery. Being slow yet forceful, push the spudger under the battery and force upwards. This will pry the waterproof adhesive, affecting its ability to be waterproof in the future.

    • Be careful not to puncture the battery when doing this step.

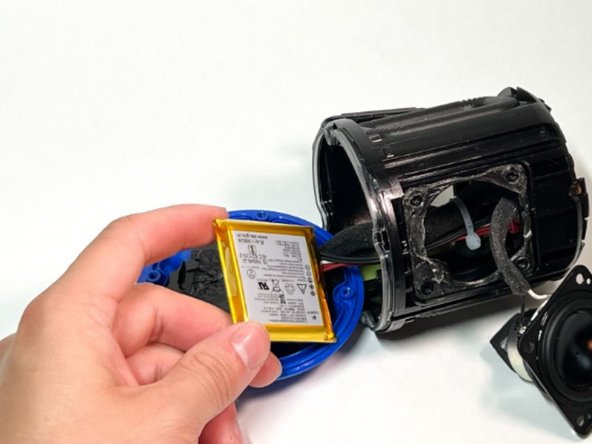
    • Remove the battery from the adhesive and set it aside.

  10. Ultimate Ears Wonderboom 3 Charging Port Replacement: passo 10, imagem 1 %32
    • Using the iFixit Large Needle Nose Pliers, remove the red wire connecter that is attached to the battery.

    • Sometimes there is a little bit of glue on the connecter that can make it difficult to remove.

    • Pull the battery out of the device

  11. Ultimate Ears Wonderboom 3 Charging Port Replacement, Charging Port: passo 11, imagem 1 %32 Ultimate Ears Wonderboom 3 Charging Port Replacement, Charging Port: passo 11, imagem 2 %32
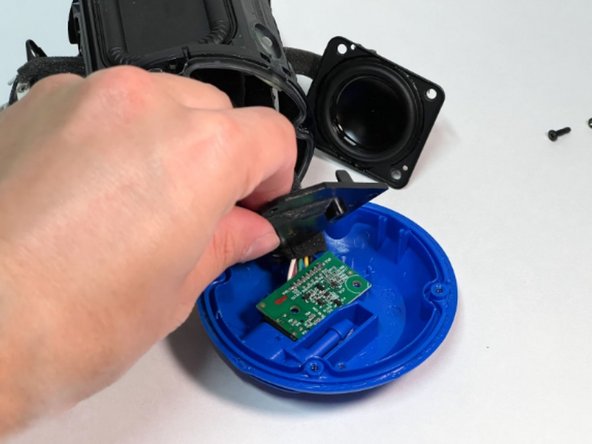
    • Using the iFixit screwdriver, unscrew the three M2 x 5mm screws on the battery base plate.

    • Once all three M2 x 5mm screws are removed, take the battery plate completely off of the device and set it to the side.

  12. Ultimate Ears Wonderboom 3 Charging Port Replacement: passo 12, imagem 1 %32
    • Remove the charging port and replace it with a new one

Conclusão

To reassemble your device, follow these instructions in reverse order.

0 comentários

Adicione um comentário

Exibir estatísticas:

Últimas 24 horas: 1

Últimos 7 dias: 6

Últimos 30 dias: 29

Duração total: 77