Ir para o conteúdo principal

UE BOOM 2 Motherboard Replacement

O que você precisa

  1. UE BOOM 2 Motherboard Replacement, Motherboard: passo 1, imagem 1 %32 UE BOOM 2 Motherboard Replacement, Motherboard: passo 1, imagem 2 %32
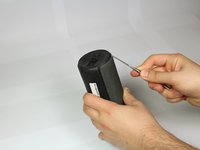
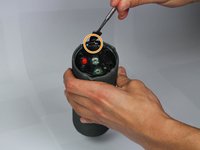
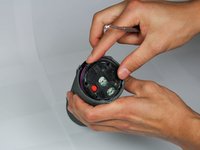
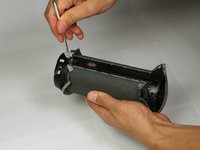
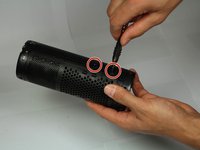
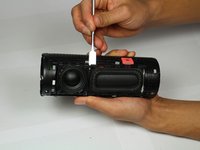
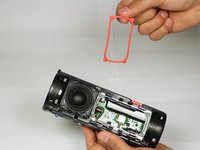
    • First, remove the D-ring located on the bottom of the UE Boom 2, the opposite end of the power button.

    • Remove by twisting in a counter-clockwise motion.

  2. UE BOOM 2 Motherboard Replacement: passo 2, imagem 1 %32 UE BOOM 2 Motherboard Replacement: passo 2, imagem 2 %32
    • Remove the rubber port cover, peeling up from one end.

  3. UE BOOM 2 Motherboard Replacement: passo 3, imagem 1 %32 UE BOOM 2 Motherboard Replacement: passo 3, imagem 2 %32 UE BOOM 2 Motherboard Replacement: passo 3, imagem 3 %32
    • Remove the rubber stripping using a metal spudger.

    • Work around the edge of the rubber stripping slowly prying up the edge.

  4. UE BOOM 2 Motherboard Replacement: passo 4, imagem 1 %32
    • Continue removing the rubber stripping down the side.

  5. UE BOOM 2 Motherboard Replacement: passo 5, imagem 1 %32 UE BOOM 2 Motherboard Replacement: passo 5, imagem 2 %32 UE BOOM 2 Motherboard Replacement: passo 5, imagem 3 %32
    • On the bottom, unscrew the four 15mm Phillips head screws, using a #2 Phillips head screwdriver.

    • Pry up at the location marked, and remove the plastic end cap.

  6. UE BOOM 2 Motherboard Replacement: passo 6, imagem 1 %32 UE BOOM 2 Motherboard Replacement: passo 6, imagem 2 %32 UE BOOM 2 Motherboard Replacement: passo 6, imagem 3 %32
    • Now on the top, unscrew the four 15mm Phillips head screws, using a #2 Phillips head screwdriver.

    • Using the metal spudger, pry up the plastic cap at the point marked and remove the cap.

  7. UE BOOM 2 Motherboard Replacement: passo 7, imagem 1 %32 UE BOOM 2 Motherboard Replacement: passo 7, imagem 2 %32 UE BOOM 2 Motherboard Replacement: passo 7, imagem 3 %32
    • Carefully un-loop the cable with a plastic opening tool or spudger and unplug it from motherboard.

    • Pull out the battery, and handle with care.

  8. UE BOOM 2 Motherboard Replacement: passo 8, imagem 1 %32 UE BOOM 2 Motherboard Replacement: passo 8, imagem 2 %32 UE BOOM 2 Motherboard Replacement: passo 8, imagem 3 %32
    • Using the metal spudger, pry up the plastic tab on the inside.

    • Pry up around the entire inside circumference.

    • Repeat on the other end.

  9. UE BOOM 2 Motherboard Replacement: passo 9, imagem 1 %32 UE BOOM 2 Motherboard Replacement: passo 9, imagem 2 %32 UE BOOM 2 Motherboard Replacement: passo 9, imagem 3 %32
    • Using the metal spudger tool, pry up the inside edge of the mesh lining.

    • Working down the strip on both sides. Careful as to not rip the mesh.

  10. UE BOOM 2 Motherboard Replacement: passo 10, imagem 1 %32 UE BOOM 2 Motherboard Replacement: passo 10, imagem 2 %32 UE BOOM 2 Motherboard Replacement: passo 10, imagem 3 %32
    • Unscrew the two 5 mm Phillips head screws using a Phillips head #1 screwdriver.

    • Using the metal spudger, pry open the edge of the cover.

  11. UE BOOM 2 Motherboard Replacement: passo 11, imagem 1 %32 UE BOOM 2 Motherboard Replacement: passo 11, imagem 2 %32 UE BOOM 2 Motherboard Replacement: passo 11, imagem 3 %32
    • Using the metal spudger, pry the plastic casing up.

    • Repeat on the other side of the speaker.

  12. UE BOOM 2 Motherboard Replacement: passo 12, imagem 1 %32 UE BOOM 2 Motherboard Replacement: passo 12, imagem 2 %32
    • Pull each cover off.

  13. UE BOOM 2 Motherboard Replacement: passo 13, imagem 1 %32 UE BOOM 2 Motherboard Replacement: passo 13, imagem 2 %32 UE BOOM 2 Motherboard Replacement: passo 13, imagem 3 %32
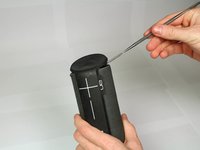
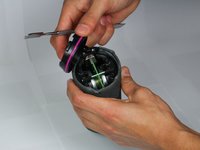
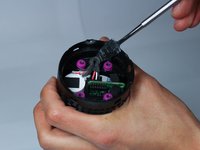
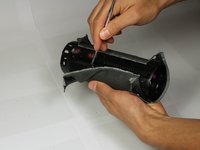
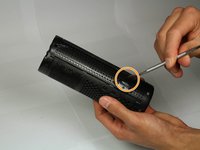
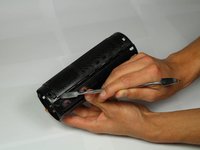
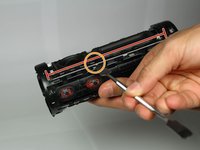
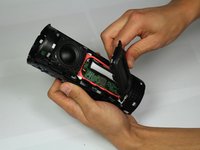
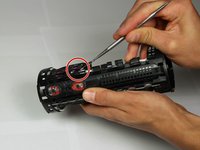
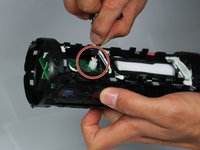
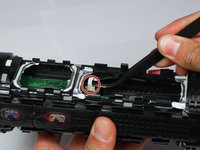
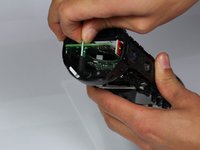
    • Using the metal spudger, specifically the pointy end, find the gap between the speaker and the passive radiator (the larger rectangular speaker-like-object next to the speaker).

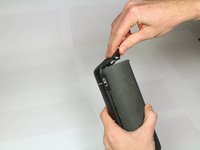
    • Pry the metal wire up and out at exactly this gap, then slide down wire towards one end to pop it out completely.

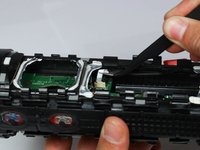
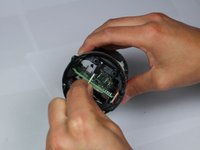
    • Once one end is out, use your fingers to gently pull off completely so as not to bend the wire too aggressively.

  14. UE BOOM 2 Motherboard Replacement: passo 14, imagem 1 %32
    • Repeat previous process for other side of the speaker and passive radiator (boxed).

  15. UE BOOM 2 Motherboard Replacement: passo 15, imagem 1 %32 UE BOOM 2 Motherboard Replacement: passo 15, imagem 2 %32 UE BOOM 2 Motherboard Replacement: passo 15, imagem 3 %32
    • Using the metal spudger, work it under the passive radiator.

    • Work the passive radiator up around all edges, and pull out of casing.

  16. UE BOOM 2 Motherboard Replacement: passo 16, imagem 1 %32 UE BOOM 2 Motherboard Replacement: passo 16, imagem 2 %32 UE BOOM 2 Motherboard Replacement: passo 16, imagem 3 %32
    • With the passive radiator removed, pry up the pink rubber seal using a metal spudger.

    • Remove using fingers.

    • Do not use excessive force with the metal spudger, doing so could cut the seal.

  17. UE BOOM 2 Motherboard Replacement: passo 17, imagem 1 %32 UE BOOM 2 Motherboard Replacement: passo 17, imagem 2 %32 UE BOOM 2 Motherboard Replacement: passo 17, imagem 3 %32
    • Using the metal spudger, work it under the edge of the speaker.

    • Work around the speaker on all sides.

    • Pull up slowly as there is a cable attached to the motherboard.

  18. UE BOOM 2 Motherboard Replacement: passo 18, imagem 1 %32 UE BOOM 2 Motherboard Replacement: passo 18, imagem 2 %32
    • Once speaker is detached from casing, remove cable from motherboard.

  19. UE BOOM 2 Motherboard Replacement: passo 19, imagem 1 %32 UE BOOM 2 Motherboard Replacement: passo 19, imagem 2 %32
    • With both the speaker and passive radiator removed from one side of the Boom 2, repeat steps 13-18 for the other side.

  20. UE BOOM 2 Motherboard Replacement: passo 20, imagem 1 %32 UE BOOM 2 Motherboard Replacement: passo 20, imagem 2 %32 UE BOOM 2 Motherboard Replacement: passo 20, imagem 3 %32
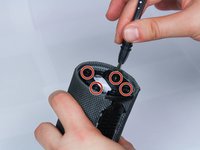
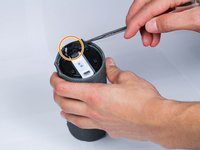
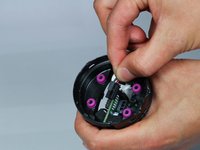
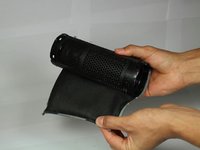
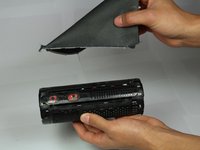
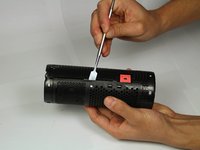
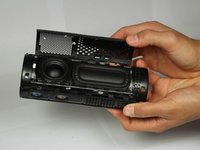
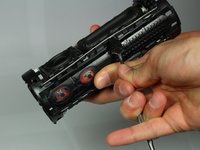
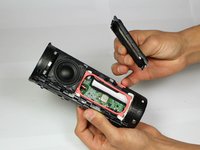
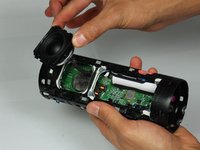
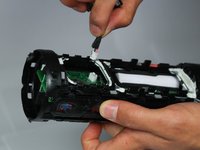
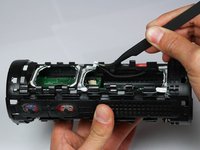
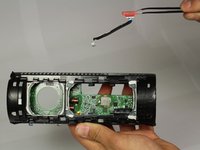
    • Using angled tweezers, pull up the black sheath on tan connector port.

    • Gently pull the white ribbon cable out from connector.

  21. UE BOOM 2 Motherboard Replacement: passo 21, imagem 1 %32 UE BOOM 2 Motherboard Replacement: passo 21, imagem 2 %32
    • With the ribbon cable disconnected from the motherboard, remove the Bluetooth antennas.

  22. UE BOOM 2 Motherboard Replacement: passo 22, imagem 1 %32 UE BOOM 2 Motherboard Replacement: passo 22, imagem 2 %32 UE BOOM 2 Motherboard Replacement: passo 22, imagem 3 %32
    • Confirm that all cables from speakers, Bluetooth antenna, and battery have been disconnected from the motherboard.

    • Grab the single piece of green motherboard that runs perpendicular to the motherboard, and pull out of casing.

Conclusão

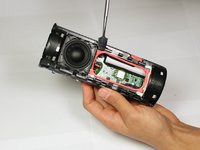
To reassemble your device, follow these instructions in reverse order.

4 outras pessoas executaram este guia.

iRobot

Membro desde: 09/24/09

1 Reputação

Autoria de 636 guias

4 comentários

There was a lot of white glue around the rubber seals. Even after removing excess glue residue it is very difficult to get speaker tight enough to fit retaining  wires in that hold speakers down.  Any easy way of doing this?

kmmm05 - Responder

Buenas tardes

Disculpe las molestias. En mi equipo ue boom 2 no sale audio, ya desarme siguiendo los paso y medi Ω de sus parlantes, y estan en su valor me puede ayudar con este problema.

O se puede cambiar toda la tarjeta madre.

Le agradezco de antemano .

Estare atento a cualquier respuesta.

Rodrigo Flores - Responder

Where can I get a new motherboard or get my current one repaired?

Samantha Reid - Responder

My Boom 2 won’t respond. Doesn’t make any sounds when pressing bottoms, and Bluetooth doesn’t work. If it’s connected to power and using an aux cord it works. But unless connected to power the speaker won’t turn on or work at all. I checked the condition of the battery and it’s voltage was perfect. Could this problem be to do with the mother board and would replacing it fix these problems. Any advice you have would be brilliant. Thanks

Jonathan - Responder

Adicione um comentário

Exibir estatísticas:

Últimas 24 horas: 3

Últimos 7 dias: 16

Últimos 30 dias: 55

Duração total: 6,080