Introdução
This guide will assist you in replacing the vibration motors in your REACT-R controller, which can be used for tactile feedback experience during gameplay. If the vibration feature is weak or non-existent, replacing the motors can rejuvenate the immersive aspect of your games.
You'll need a Phillips #00 screwdriver for this task. Follow the steps outlined in this guide to replace the vibration motors.
O que você precisa
-
-
Place the controller face down.
-
Use a Phillips #00 screwdriver to remove the seven 9.2 mm Phillips screws that secure the rear case.
-
Use both hands to lift the backplate away from the controller.
 Pergunte ao FixBot
-
-
-
-
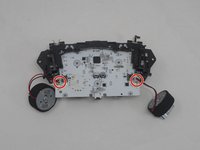
Use a Phillips #00 to remove the four 9.2 mm screws that secure the motherboard.
-
Gently lift the motherboard up and out of the chassis.
-
-
-
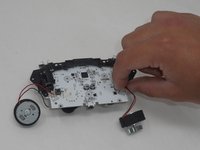
Place the motherboard down on its back.
-
Grip white rumble motor connector and pull it directly out of its socket to disconnect it from the motherboard. Repeat for the other motor.
-


To reassemble your device, follow these instructions in reverse order.
Equipe

University of Memphis, Team 1-5, Sneed Spring 2024 Membro de University of Memphis, Team 1-5, Sneed Spring 2024
UM-SNEED-S24S1G5
4 Membros
Autoria de 6 guias