Ir para o conteúdo principal

Toshiba Satellite U405D-S2902 Hard Drive Replacement

O que você precisa

  1. Toshiba Satellite U405D-S2902 Hard Drive Replacement, Hard Drive: passo 1, imagem 1 %32 Toshiba Satellite U405D-S2902 Hard Drive Replacement, Hard Drive: passo 1, imagem 2 %32
    • Lay laptop on it's face and remove the two #1 Phillips screws in the back of the black plastic panel with a raised center.

    • The screws can not be removed from the panel, so loosen them until the panel can come off.

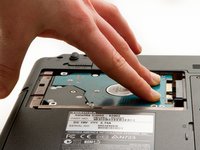
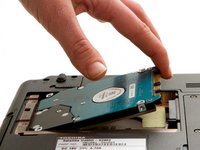
    • Carefully lift the panel using the thumb slot on the side closest to you while the battery is pointed out.

  2. Toshiba Satellite U405D-S2902 Hard Drive Replacement: passo 2, imagem 1 %32
    • After lifting the cover up carefully, slide it to the left to be removed.

  3. Toshiba Satellite U405D-S2902 Hard Drive Replacement: passo 3, imagem 1 %32 Toshiba Satellite U405D-S2902 Hard Drive Replacement: passo 3, imagem 2 %32 Toshiba Satellite U405D-S2902 Hard Drive Replacement: passo 3, imagem 3 %32
    • Place two fingers gently on the hard drive.

    • Slide it back to the left.

    • Lift the drive by the two corner tabs making sure not to touch the metel

    • Do not press down too hard on the top of the drive, or you will damage it. Only use enough pressure to be able to remove it from the SATA connection.

Conclusão

To reassemble your device, follow these instructions in reverse order.

2 outras pessoas executaram este guia.

Brandon Kirklen

Membro desde: 01/11/13

311 Reputação

Autoria de 8 guias

Equipe

Cal Poly, Team 7-8, Maness Winter 2013 Membro de Cal Poly, Team 7-8, Maness Winter 2013

CPSU-MANESS-W13S7G8

Membros da 4

Autoria de 8 guias

0 comentários

Adicione um comentário

Exibir estatísticas:

Últimas 24 horas: 0

Últimos 7 dias: 0

Últimos 30 dias: 0

Duração total: 492