Esta versão pode conter edições incorretas. Mude para o último instantâneo verificado.
O que você precisa
-
Este passo não foi traduzido. Ajude a traduzi-lo
-
The battery can be removed by sliding the mechanism on the left to the right. Once this is done slide the mechanism further to the right while pulling up on the battery.
-
Use the Phillips #0 screwdriver to remove the two screws under the battery.
-
-
Este passo não foi traduzido. Ajude a traduzi-lo
-
Remove nine screws with a Phillips #0 screwdriver and then remove the cover of the hard drive/RAM.
-
-
Este passo não foi traduzido. Ajude a traduzi-lo
-
Once the screw for the hard drive is removed, gently pull on the ribbon to completely unplug the hard drive.
-
Use a spudger to gently push the sides of the clip holding both RAM sticks into place. After that, simply pull the RAM sticks out.
-
-
-
Este passo não foi traduzido. Ajude a traduzi-lo
-
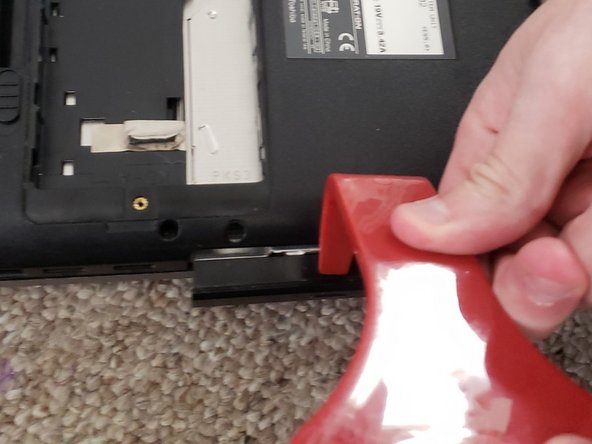
Use a plastic opening tool to pry the disc drive open and remove it. This will be easy, as you have already removed the screws holding the disc drive in place.
-
Do not forget to remove the three screws under the disc drive. I found the best way to do this is to use a long screwdriver with a small magnetic Phillips tip.
-
-
Este passo não foi traduzido. Ajude a traduzi-lo
-
Gently pry up with a plastic opening tool on the bottom of the trim in the little slots that are cut out.
-
Remove the four screws under the small piece.
-
-
Este passo não foi traduzido. Ajude a traduzi-lo
-
Gently pull up on the keyboard after the four screws have been removed.
-
There will be a ribbon anchoring the keyboard in place. Use a plastic opening tool to push against the small black clip holding it in place, then carefully remove the ribbon.
-
-
Este passo não foi traduzido. Ajude a traduzi-lo
-
Near the top of the keyboard there will be two power sources to unplug. Gently unplug both of them.
-
Near the bottom of the picture you'll see an area where a ribbon is plugged in. Remove the ribbon cable.
-
-
Este passo não foi traduzido. Ajude a traduzi-lo
-
Now the charging port will be exposed. Simply unplug and remove the old one, and plug in and properly place the new charging port.
-


Cancelar: não concluí este guia.
Uma outra pessoa concluiu este guia.
Equipe

Purdue University Northwest, Team S6-G1, Hingst Spring 2020 Membro de Purdue University Northwest, Team S6-G1, Hingst Spring 2020
PNW-HINGST-S20S6G1
1 Membro
Autoria de 2 guias