Ir para o conteúdo principal

Toshiba Satellite A105-S4074 Hard Drive Replacement

O que você precisa

  1. Toshiba Satellite A105-S4074 Hard Drive Replacement, Battery: passo 1, imagem 1 %32 Toshiba Satellite A105-S4074 Hard Drive Replacement, Battery: passo 1, imagem 2 %32
    • To prevent electrical shock, make sure the computer is turned off; and disconnect the power adapter from the computer and electrical outlet prior to beginning any repairs on this device.

    • Turn the laptop upside down with the battery facing you.

  2. Toshiba Satellite A105-S4074 Hard Drive Replacement: passo 2, imagem 1 %32 Toshiba Satellite A105-S4074 Hard Drive Replacement: passo 2, imagem 2 %32 Toshiba Satellite A105-S4074 Hard Drive Replacement: passo 2, imagem 3 %32
    • Slide both the left and right battery release tabs outwards away from center of the laptop.

    • Right release tab will remain locked in place.

    • While still holding the left release tab, slide the battery towards you using your right hand.

    • Fully remove the battery from the laptop.

  3. Toshiba Satellite A105-S4074 Hard Drive Replacement, Hard Drive: passo 3, imagem 1 %32 Toshiba Satellite A105-S4074 Hard Drive Replacement, Hard Drive: passo 3, imagem 2 %32 Toshiba Satellite A105-S4074 Hard Drive Replacement, Hard Drive: passo 3, imagem 3 %32
    • Turn the laptop around so that the battery slot is facing away from you, and locate the hard drive access panel in the lower left-hand corner.

    • Locate the hard drive access panel in the lower left-hand corner on the bottom of the laptop, and loosen the 4.0 mm screw in the top center of the panel using the Phillips #1 screwdriver.

    • This is a captive screw and will remain intact with the panel.

    • Carefully remove the panel with your fingers by lifting the edge at the indent.

  4. Toshiba Satellite A105-S4074 Hard Drive Replacement: passo 4, imagem 1 %32 Toshiba Satellite A105-S4074 Hard Drive Replacement: passo 4, imagem 2 %32 Toshiba Satellite A105-S4074 Hard Drive Replacement: passo 4, imagem 3 %32
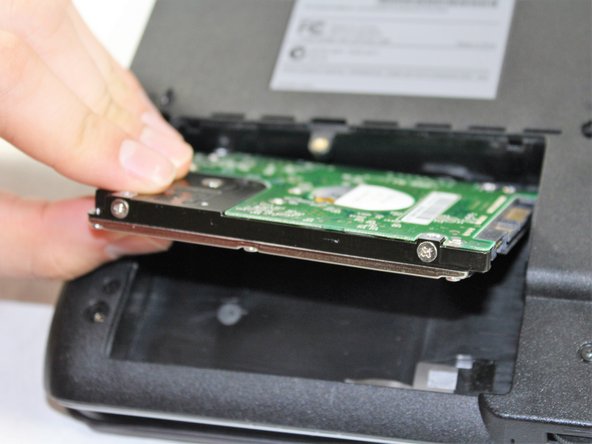
    • You should now have full access to the hard drive.

    • Slide the hard drive to the left.

    • Gently lift the hard drive from the side closest to you and remove it.

Conclusão

To reassemble your device after replacing the hard drive, follow these instructions in reverse order.

Uma outra pessoa concluiu este guia.

Ryan Bortnick

Membro desde: 03/20/17

722 Reputação

Autoria de 5 guias

Equipe

0 comentários

Adicione um comentário

Exibir estatísticas:

Últimas 24 horas: 0

Últimos 7 dias: 1

Últimos 30 dias: 8

Duração total: 1,247