O que você precisa
-
-
Turn the laptop over and locate the lock and battery release switches. Unlock the battery by changing the switch on the right from locked to unlocked by sliding the switch outward.
-
-
-
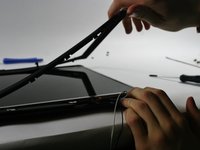
Open the laptop so the display screen is bent fully back with the display facing upward, parallel to the surface you are working on.
-
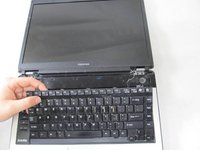
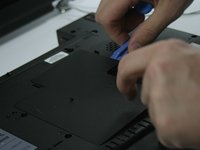
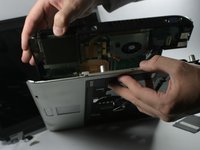
Wedge the Phillips 00 screwdriver above the F1 key, and separate the top piece of plastic from the body of the laptop. Don't worry about breaking it! You will need to forcefully wedge the screwdriver under the plastic, simultaneously pushing upward and forward.
-
Once that section has popped up, work on pulling the rest of the plastic piece up and out, alternating from left to right.
-
-
-
-
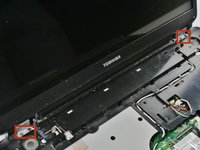
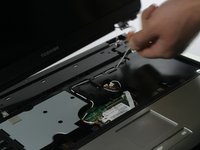
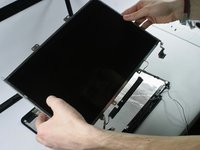
Now you need to detach the screen from the rest of the laptop. Start by removing the screws on the hinge (indicated in picture one).
-
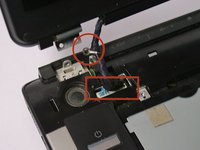
After removing the screws look to the right side of the laptop. Remove the white wire in the channel found there. To do this you only need to move the wire around the plastic pieces holding it down.
-
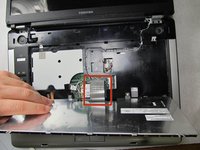
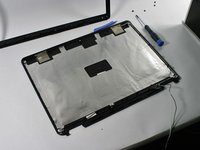
You will also find a connector on the left side of the laptop (indicated in picture two in the square). Pull gently on it to detach it. You may now pull the display completely off.
-
The eyelet in the circle is a necessary grounding wire for the LCD, when you reattached the hinges to the base you will need to put a screw through this eyelet.
-
-
-
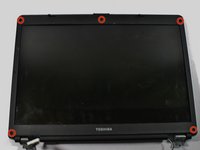
The next step is to remove the plastic from around the display. First you must remove the 5 screws found around the plastic part of the display (indicated in picture 1).
-
Note: There may be a rubber pieces covering the screws. You can just pry these off with your screwdriver or your fingernails.
-
After the screws are removed you can pry the plastic part off. This may require a bit of force, but be careful not to snap the plastic. Always start in one place and slowly lift around the screen.
-
-
-
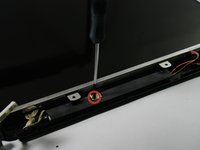
The last step is to remove the lcd from the plastic. To do this you must remove one screw found directly below the screen (indicated in picture one).
-
After the screw is removed lift the display up. It should come free easily. You can now replace the LCD with a new one. The assembly is the reverse of the removal.
-
-
-
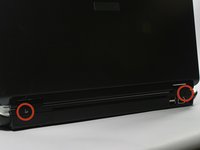
Go to the backside of the laptop and remove the two screws indicated with red circles.
-
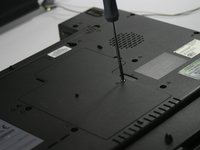
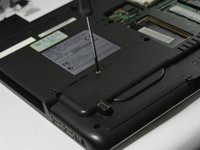
Then flip the laptop to it's bottom side. Remove the screw indicated in the second picture. This is a captive screw and will not come out. Just completely loosen it.
-
Now slowly pry up along the right side with a plastic pry tool to lift the memory door cover. Slide the door to your right and remove the door completely.
-
-
-
Remove the same screw as done in the first picture. This screw is also captive. This will also remove a second door where your hard drive should be located. Remove the hard drive from inside as well.
-
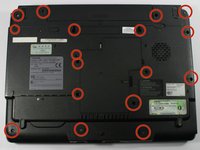
Next remove all the screws indicated in the circles. These screws vary in size and often have letters/numbers next to each screw location to indicate what kind of screw they are. You will want to do your best to keep these organized for reassembly.
-
-
-
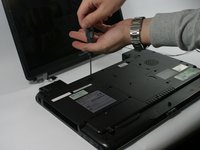
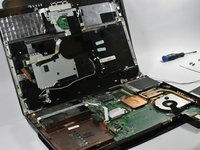
Using a similar process to the Step 2, slowly begin to separate the silver portion of the laptop from the black portion of the laptop.
-
This process can be accomplished by simply pulling these sections apart by hand or by using a plastic pry tool. Do not attempt to use a screw driver or you risk damaging/cracking the case!
-
A second helping hand may be wanted in the process of separating the laptop apart to keep it from snapping back together when attempting to work on another side of the laptop.
-
Slowly work your way around the laptop till the two pieces are completely separated from each other.
-
-
-
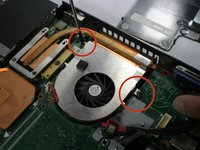
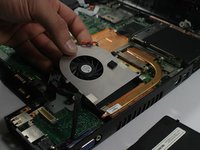
Now with the laptop separated you should be able to see the CPU fan.
-
Once located remove the two screwed indicated in the red circles.
-
Then gently remove the plug attached to the fan. Once again, avoid pulling on the wires and try to pull it apart from white connector.
-
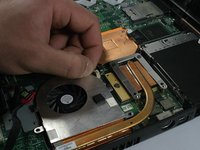
Next slowly lift up the fan from the back and slide it out. From here you can either clean the fans and heat sink with compressed air or replace the fan completely. Assembly is reverse of removal.
-


To reassemble your device, follow these instructions in reverse order.
To reassemble your device, follow these instructions in reverse order.
Cancelar: não concluí este guia.
2 outras pessoas executaram este guia.
Equipe

UMass Dartmouth, Team 4-6, Calaway Spring 2014 Membro de UMass Dartmouth, Team 4-6, Calaway Spring 2014
UMASSD-CALAWAY-S14S4G6
Membros da 4
Autoria de 12 guias