Ir para o conteúdo principal

Toshiba SD-K740 Front Flap Tray Door Replacement

O que você precisa

  1. Toshiba SD-K740 Front Flap Tray Door Replacement, Top Panel: passo 1, imagem 1 %32
    • Unplug the DVD player before beginning.

    • Remove the three 7.7 mm screws from the back panel using a Phillips #0 screwdriver.

  2. Toshiba SD-K740 Front Flap Tray Door Replacement: passo 2, imagem 1 %32 Toshiba SD-K740 Front Flap Tray Door Replacement: passo 2, imagem 2 %32
    • Turn the DVD player on its side.

    • Remove the 7.7 mm screw.

    • Flip the DVD player onto its other side.

    • Remove the 7.7 mm screw.

  3. Toshiba SD-K740 Front Flap Tray Door Replacement: passo 3, imagem 1 %32
    • Flip the DVD player over onto its front face.

    • Remove the back panel by lifting up and pulling it towards yourself.

  4. Toshiba SD-K740 Front Flap Tray Door Replacement, Front Panel: passo 4, imagem 1 %32
    • Flip the DVD player so its top is sitting on your working surface.

    • Lift and push away the two tabs located in the middle of the player.

    • The front panel will not detach during this step, so do not force it.

  5. Toshiba SD-K740 Front Flap Tray Door Replacement: passo 5, imagem 1 %32
    • Flip the DVD player on its side.

    • Lift and slide forward the single tab on the side.

    • The front panel will not detach during this step, so do not force it.

  6. Toshiba SD-K740 Front Flap Tray Door Replacement: passo 6, imagem 1 %32 Toshiba SD-K740 Front Flap Tray Door Replacement: passo 6, imagem 2 %32
    • Grasp the front panel and pull forward to your right to remove it.

  7. Toshiba SD-K740 Front Flap Tray Door Replacement, Front Flap Tray Door: passo 7, imagem 1 %32 Toshiba SD-K740 Front Flap Tray Door Replacement, Front Flap Tray Door: passo 7, imagem 2 %32
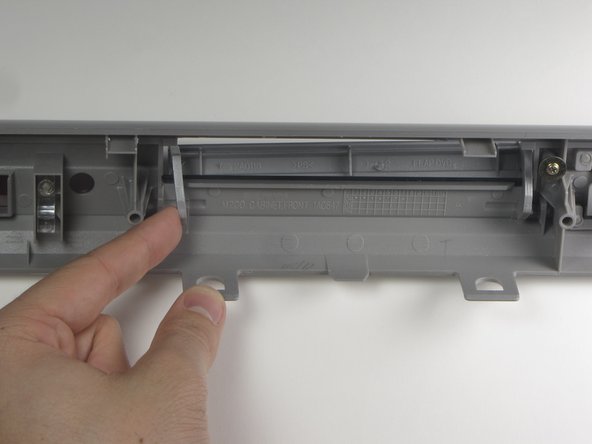
    • On back side of front panel very carefully apply pressure to the left hand side of the flap hinge.

    • There is just enough tolerance in the plastic to allow removal, be careful of brittle plastic.

  8. Toshiba SD-K740 Front Flap Tray Door Replacement: passo 8, imagem 1 %32
    • Once the peg is free from the left restraint, carefully remove the left part of the flap.

    • Carefully remove the right peg from the restraint.

    • Do not pull away from the front panel because the spring is still attached.

    • Do not force the plastic.

  9. Toshiba SD-K740 Front Flap Tray Door Replacement: passo 9, imagem 1 %32
    • Remove the spring from the end of the right peg by pulling the door away from the spring.

    • Do not pull away from the front panel until the spring has been removed from the flap.

Conclusão

To reassemble your device, follow these instructions in reverse order.

John Lokker

Membro desde: 01/20/11

324 Reputação

Autoria de 3 guias

Equipe

Cal Poly, Team 1-16, Amido Winter 2011 Membro de Cal Poly, Team 1-16, Amido Winter 2011

CPSU-AMIDO-W11S1G16

Membros da 4

Autoria de 8 guias

0 comentários

Adicione um comentário

Exibir estatísticas:

Últimas 24 horas: 0

Últimos 7 dias: 0

Últimos 30 dias: 2

Duração total: 1,390