Introdução
However, the shortcut method may also be applied to many other brands of toilet flush valves.
This is a shortcut, time/labor-saving, method of installing a replacement "flush valve seal" to stop water inside the toilet tank from seeping/leaking down the drain (and the continuous, annoying sound that accompanies this water loss).
O que você precisa
-
-
Remove the top of the toilet tank.
-
With a towel nearby, roll-up your sleeves. Flush the toilet to lower the tank water level.
-
Immediately identify the old, worn [red] Valve Seal at bottom of the vertical assembly of Overflow Tube and Float.
-
Reach into water tank and remove the worn valve seal by pulling it, like an old rubber band, with your finger tips (or pliers) until it breaks.
-
-
-
-
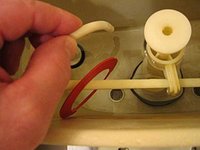
Roll the new seal and stick it through the square trip lever holder and lasso the free end of the trip lever (the opposite end of the lever is attached to the flush lever outside of the tank).
-
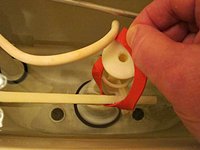
Keeping the trip lever through large center hole of the new seal, pull the new seal in the reverse direction back through the square trip lever holder. Turn the trip lever holder as you do this to allow more space to ease the new seal back through.
-
-
-
When the new seal is between where the trip lever is connected to tank and where trip lever protrudes through square trip lever holder, for a moment, pull the flexible water refill tube out of the center of the stop cap. Point the free end of it down, as water may still be coming through it after flushing.
-
Take the new seal just over the stop cap and replace the water refill tube, being careful not to splash any water coming out of it.
-
-
-
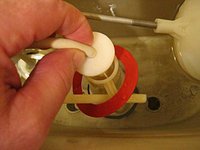
Gently stretch and pull the new seal all the way down the vertical assembly of the overflow tube and float near the bottom and position it into its top groove of the flush valve.
-
Once in place, you should be able to gently grasp the edge of the new seal and turn it in place in the groove, around the base of the flush valve. Check the seal by flushing, watching and listening.
-


Flush Valve Seals will need to be replaced, at least, once every few years, depending on water condition. Other kinds of toilet water tanks may have similar assemblies. Why call a plumber for something so easy to do yourself?!
Flush Valve Seals will need to be replaced, at least, once every few years, depending on water condition. Other kinds of toilet water tanks may have similar assemblies. Why call a plumber for something so easy to do yourself?!
Cancelar: não concluí este guia.
33 outras pessoas executaram este guia.
Documentos anexados
12 comentários
I followed the instructions on the package (turn off water, disassemble the flush valve).
It was so simple, I think this "shortcut" would have been more difficult.
You "think" it would have been more difficult? No disassembly (and reassembly) required on this one.
I just followed this instruction and it was fixed in less than 2 minutes.
apexmi -