Ir para o conteúdo principal

Texas Instruments TI-92 Display Replacement

O que você precisa

  1. Texas Instruments TI-92 Display Replacement, Back Cover: passo 1, imagem 1 %32 Texas Instruments TI-92 Display Replacement, Back Cover: passo 1, imagem 2 %32 Texas Instruments TI-92 Display Replacement, Back Cover: passo 1, imagem 3 %32
    • The first step to any repair operation is to remove the front cover.

    • Grab the back of the calculator with one hand and the cover with the other.

    • Pull the cover off from one of the sides for easy removal.

  2. Texas Instruments TI-92 Display Replacement: passo 2, imagem 1 %32 Texas Instruments TI-92 Display Replacement: passo 2, imagem 2 %32
    • Orientate the calculator with the top facing towards you.

    • Slide the locking tab,found on the top part of the calculator, to the unlock position.

  3. Texas Instruments TI-92 Display Replacement: passo 3, imagem 1 %32 Texas Instruments TI-92 Display Replacement: passo 3, imagem 2 %32
    • "Locking Tab"

    • To remove the back cover, slide the cover away from the locking tab towards the bottom of the calculator until the cover no longer slides.

    • Then with the front of the calculator facing down, pull up on the back cover.

    • The calculator should now be orientated with the front facing down, as shown in picture 2.

  4. Texas Instruments TI-92 Display Replacement, Batteries: passo 4, imagem 1 %32 Texas Instruments TI-92 Display Replacement, Batteries: passo 4, imagem 2 %32 Texas Instruments TI-92 Display Replacement, Batteries: passo 4, imagem 3 %32
    • The Batteries are now exposed and the calculator is face down with the back towards you.

    • Remove the bottom batteries by pressing the battery towards you while pulling it out from the far end.

    • If you can not do the previous step with your finger try using a flat ended tool such as an Ipod opening tool.

    • After the bottom battery has been removed push or slide the other(top) battery towards you until it is fully exposed in the battery slot.

    • Now simply remove the battery.

  5. Texas Instruments TI-92 Display Replacement, Texas Instruments TI-92 Back Case Disassembly: passo 5, imagem 1 %32 Texas Instruments TI-92 Display Replacement, Texas Instruments TI-92 Back Case Disassembly: passo 5, imagem 2 %32 Texas Instruments TI-92 Display Replacement, Texas Instruments TI-92 Back Case Disassembly: passo 5, imagem 3 %32
    • Using a Philips Screwdriver #00 unscrew the twelve 11.8mm screws shown in the picture and located on the back of the calculator.

  6. Texas Instruments TI-92 Display Replacement: passo 6, imagem 1 %32
    • Unscrew the 19mm screw located near center of the back of the calculator.

    • Remove the panel being held by the screw.

  7. Texas Instruments TI-92 Display Replacement: passo 7, imagem 1 %32
    • Using the same Phillips screwdriver, unscrew the remaining three 11.8mm screws.

  8. Texas Instruments TI-92 Display Replacement: passo 8, imagem 1 %32 Texas Instruments TI-92 Display Replacement: passo 8, imagem 2 %32
    • Using the Ipod Opening Tool pull up on both sides of the rectangular module while keeping the rest of the calculator flat on a surface face down

    • You may get a lot of resistance from the module. Do not use too much force as you risk damage. Use small amounts of force to work the module out.

  9. Texas Instruments TI-92 Display Replacement: passo 9, imagem 1 %32 Texas Instruments TI-92 Display Replacement: passo 9, imagem 2 %32
    • Pull out the rectangular module when it is finally loose enough.

  10. Texas Instruments TI-92 Display Replacement: passo 10, imagem 1 %32 Texas Instruments TI-92 Display Replacement: passo 10, imagem 2 %32
    • Now pull up on the back cover of the calculator while holding the rest of it flat on a surface.

    • Be careful not to tilt the front of the calculator at this point. The keyboard buttons are now unsupported and will fall out of place.

    Some models might require removing the two battery screws before the back cover can be pulled up. These screws are somewhat smaller than the others but can easily be removed with the same screwdriver.

    Christopher - Responder

  11. Texas Instruments TI-92 Display Replacement, Motherboard: passo 11, imagem 1 %32 Texas Instruments TI-92 Display Replacement, Motherboard: passo 11, imagem 2 %32 Texas Instruments TI-92 Display Replacement, Motherboard: passo 11, imagem 3 %32
    • Pull the motherboard up while holding the rest of the calculator firmly in place

    • The motherboard has now separated from the rest of the calculator

  12. Texas Instruments TI-92 Display Replacement, Display: passo 12, imagem 1 %32
    • Place the motherboard flat on a surface with the LCD screen facing down.

    • Using a #00 Philip Screwdriver remove the screw located on the left side of a spring-like object located near the center of the motherboard.

  13. Texas Instruments TI-92 Display Replacement: passo 13, imagem 1 %32 Texas Instruments TI-92 Display Replacement: passo 13, imagem 2 %32
    • Lift up on the material covering the motherboard starting from the upper right corner. Peel foil back only about half way down.

    • Make sure to slowly lift up on the plastic of the covering material and not the foil or the foil will rip.

  14. Texas Instruments TI-92 Display Replacement: passo 14, imagem 1 %32 Texas Instruments TI-92 Display Replacement: passo 14, imagem 2 %32
    • Now slowly lift up the black tape located at the top of the calculator.

    • You will need to replace tape if removed so if you do not have this replacement part do not attempt to remove it

  15. Texas Instruments TI-92 Display Replacement: passo 15, imagem 1 %32 Texas Instruments TI-92 Display Replacement: passo 15, imagem 2 %32 Texas Instruments TI-92 Display Replacement: passo 15, imagem 3 %32
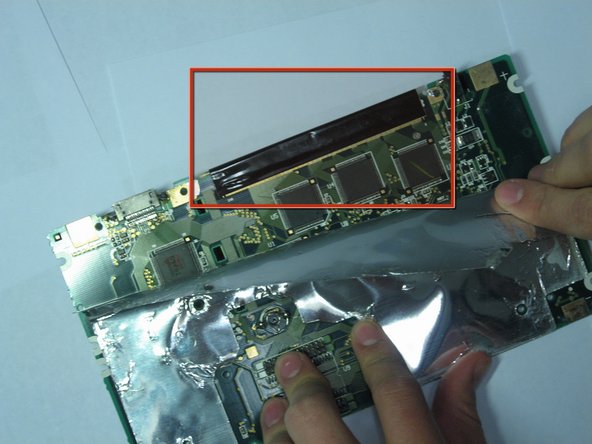
    • Tilt the calculator up from the front so that you can see the LCD screen

    • Finish removing the black tape on this side of the motherboard.

    Hi.

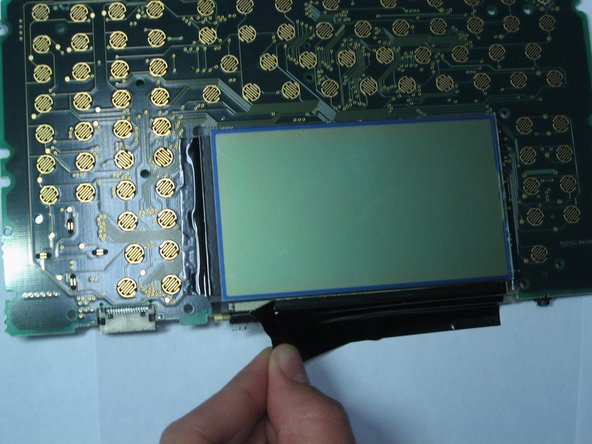
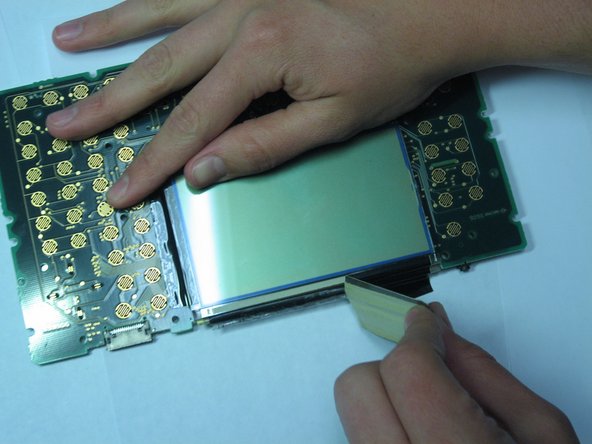
    Really, if you remove the connector strip, the bonding substance is removed, even the electrical cables will be broken. They are so delicate

    I have this experience, and it's impossible to rebond the ancient connector band.

    The main question is: Where to adquire a new connector band?.

    Thx

    Jose Antonio - Responder

    Hello, is there any information which display is used? I would need to change it, but don't find anywhere spare parts... Thx

    Manuel Gosch - Responder

  16. Texas Instruments TI-92 Display Replacement: passo 16, imagem 1 %32
    • Do not know next step

Conclusão

To reassemble your device, follow these instructions in reverse order.

Uma outra pessoa concluiu este guia.

Equipe

Cal Poly, Team 15-51, Garner Spring 2010 Membro de Cal Poly, Team 15-51, Garner Spring 2010

CPSU-GARNER-S10S15G51

Membros da 5

Autoria de 9 guias

0 comentários

Adicione um comentário

Exibir estatísticas:

Últimas 24 horas: 3

Últimos 7 dias: 13

Últimos 30 dias: 52

Duração total: 8,431