Introdução
The built in speaker comes in handy when experimenting outside your perfectly equipped studio environment. So what to do when it won't work any more? Just replace it.
This guide shows you how to replace the speaker in your OP-1.
O que você precisa
-
-
The four longer keys from the fingerboard are to be handled from the left side to get them off.
-
The eight smaller keys need to be levered from the bottom up.
-
-
-
The scissor mechanism of the eight small keys are obstructing the underlying screws.
-
By using again an opening tool or opening pick these can be snapped off easily.
-
-
-
-
Loosen those 12 screws with a Phillips #00 screwdriver.
-
Then just pull off the four rotary knobs and the volume knob.
-
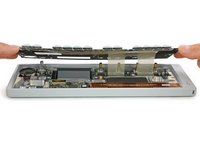
Now it is possible to slightly lift the keyboard and set it back.
-
-
-
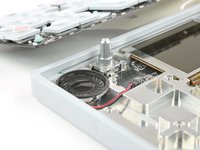
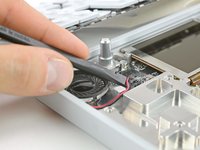
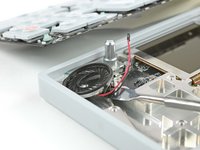
Disconnect the speaker by using a spudger and lifting the connector up.
-
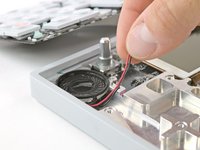
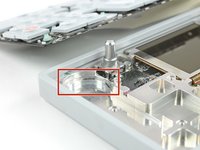
The cables run through a small notch and are glued in place.
-
If everything is fine, pull the cables from the old speaker out of their recess.
-


To reassemble your device, follow these instructions in reverse order.
Cancelar: não concluí este guia.
6 outras pessoas executaram este guia.

Equipe

Tobias Isakeit - Repairability Engineer Membro de Tobias Isakeit - Repairability Engineer
Business
1 Membro
Autoria de 1.145 guias
12Comentários do guia
is there a way to function test the speaker?
Everything else works perfectly fine including the in and out lines, internal microphone power button and accessory is on my key is everything… But certainly no sound comes out of the internal speaker and I’m super excited to see that it’s only about $30 to buy a replacement one but I’d much prefer to not have to disassemble my precious if not necessary… Also I’m considering opening it up and just checking to see if the wires connecting to the speaker are messed up or something… Maybe I can push it back in as it got wiggled her around or something I don’t know… Is it possible to fully blow out the speaker from crashing the iOS when using the GeForce accelerometer and shaking the eff outta it while in etchasketch mode and having a very short loop from the tape playing while keys and knobs were being twiddled with??…
… tbc…
…continued…
%#*@…
In Absolute typical style of me, I wrote way too many characters before so cut the second half in tending to paste it in this second post but I guess it isn’t happening… All that pastes are the words function test
ha oh well.
I probably got the main points and questions out that I needed to make… Any other links or tips or advice appreciated… I’ve had my hope yvonne for over six years it was bought off eBay from the original owner and I have taken very good care of it… Again I wish I could just test to see if there’s a loose connection on the internal speaker… It passes all of the other tests of the keys in the knobs in on is in the offs and stuff…
can’t believe that there is no speaker test… At least it totally works fine plugged into another speaker I’ve been using a jam box… that reminds me of another question since that jam box is Bluetooth capable have people had any good results Using some sort of Bluetooth dongle that ben can connect the OP one to a speaker wirelessly? OK thanks bye
Hi MarZ Star, I can understand that you don’t want to open up your “precious” unnecessarily. But believe me, it is easer than you might think. The speaker repair is quite straight forward. You just have to carefully handle the scissor mechanism under the keyboard. You don’t even have to detach the keyboard, just set it aside to the top. As mentioned in step 4, the cables of the speaker run through a small notch and are glued in place. You can check the cable by sight and maybe even fix it by a small solder job. Shaking the OP-1 for checking probably won’t solve the issue. A speaker check might just be turning on and hammering away on the weirdest setting ;)
Thanks for the reply Tobias! I ordered a new speaker & some tools after posting & already got emailed that the order’s in process. shipped, even!? :)
also, The ONLY other hardware issue I’ve had, I fixed FINALLY, just the other day, thanks to this site & YOUR details+pics. (I’m hoping it’s a silly lil fix, with the speaker, too, & nothing involving other parts/wiring)
A “piano” key popped off, 2nd or 3rd leftmost one, & it’s finally back on, securely. Trick was to pop off the middle white, what’d you call it?, scissor mechanism, which was still attached to the KEY, not the board. once I snapped it on to the board, 1st, I was able to snap the key in place!! YAY I had a feeling nothing was broken, but that stuff is so delicate that wo researching for, literally months (&years) (&still constantly am,) I would not have dared that simple task. ..Guess my point is THANK YOU! I’m handy but careful.
FINGERS CROSSED that no soldering is required. SO temped to take it apart now!… let you know how it goes :) cheers! marz*