Introdução
The display not only gives you useful information, it is also fun to watch the small animations while making sounds. If the display should fail this guide will show you how to replace it.
O que você precisa
-
-
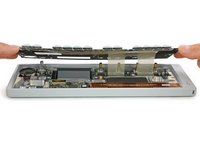
The four longer keys from the fingerboard are to be handled from the left side to get them off.
-
The eight smaller keys need to be levered from the bottom up.
-
-
-
The scissor mechanism of the eight small keys are obstructing the underlying screws.
-
By using again an opening tool or opening pick these can be snapped off easily.
-
-
-
-
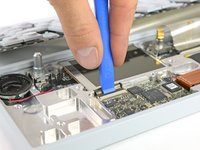
Loosen those 12 screws with a Phillips #00 screwdriver.
-
Then just pull off the four rotary knobs and the volume knob.
-
Now it is possible to slightly lift the keyboard and set it back.
-
-
-
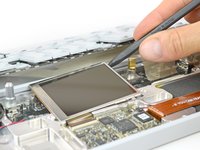
Open the display cable connector by using a plastic opening tool to flip the latch upwards.
-
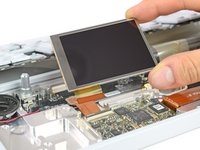
The display is held in place with a mild adhesive. A spudger helps you to get it free.
-
Now you can unplug the cable and take out the whole display.
-


To reassemble your device, follow these instructions in reverse order.
Cancelar: não concluí este guia.
6 outras pessoas executaram este guia.

Equipe

Tobias Isakeit - Repairability Engineer Membro de Tobias Isakeit - Repairability Engineer
Business
1 Membro
Autoria de 1.145 guias
15Comentários do guia
Hey guys,
Can someone from IFIXIT please let us know where we can buy the screen please.
my screen is cracked and i desperately need to replace it.
Thanks!
Hi Jack, unfortunately we do not know where to get a replacement screen for the OP-1. You might want to get in contact with the guys from Teenage Engineering directly. Sorry
Jack, look for “part number 74-x000045”, there are few of them out there. Cheers.
Peter O -