Ir para o conteúdo principal

Esta tradução pode não refletir as atualizações mais recentes do guia de fontes. Ajude a atualizar a tradução ou veja guia de fontes.

Substituição do conjunto do display com a armação para o Huawei P10 Lite

O que você precisa

  1. Substituição do conjunto do display com a armação para o Huawei P10 Lite, Tampa traseira: passo 1, imagem 1 %32 Substituição do conjunto do display com a armação para o Huawei P10 Lite, Tampa traseira: passo 1, imagem 2 %32 Substituição do conjunto do display com a armação para o Huawei P10 Lite, Tampa traseira: passo 1, imagem 3 %32
    • Insira a ponta de uma palheta de abertura entre a tampa traseira e a estrutura intermediária e deslize ao redor do smartphone, para desfazer a união adesiva.

    • Usar um punho de sucção para levantar a tampa traseira pode ser um recurso útil para abrir uma primeira fenda e entrar com a palheta.

    • Se o adesivo estiver difícil de cortar, use uma bolsa térmica de gel iOpener para amolecê-lo.

    Mit dem Saugnapf die Rückseite anheben hilft ungemein…

    Matthias Eberle - Responder

    Had to use blue wedge tool to wedge open bottom plate from the rim part in order to then use the tip of the blue opening pick under the back plate to then cut the glue. It’s like placing a pie server or knife under the plate once there’s a gap between the rim and the back plate.

    Jane - Responder

    Be careful, there’s a cable to fingerprint sensor, very close to the edge (see pictures below)… It’s very easy to cut it through with the pick, as I just learned :)

    dambig - Responder

  2. Substituição do conjunto do display com a armação para o Huawei P10 Lite: passo 2, imagem 1 %32 Substituição do conjunto do display com a armação para o Huawei P10 Lite: passo 2, imagem 2 %32 Substituição do conjunto do display com a armação para o Huawei P10 Lite: passo 2, imagem 3 %32
    • Uma vez desfeita a união adesiva em todos os cantos, faça alavanca girando sua palheta, para separar a tampa traseira do smartphone.

    • Vire a tampa traseira para o lado direito do smartphone.

  3. Substituição do conjunto do display com a armação para o Huawei P10 Lite: passo 3, imagem 1 %32 Substituição do conjunto do display com a armação para o Huawei P10 Lite: passo 3, imagem 2 %32
    • Use uma pinça para remover o indicador.

    • Remova ambos os parafusos Phillips tipo #00.

    • Remova os quatro parafusos Phillips tipo #00, tamanho 2,5 mm.

    Schritt 3 und 4 kann man sich komplett sparen. Wozu auch. Kann gleich mit Schritt 5 weitergemacht werden, zuvor einfach das Flachbandkabel vom Fingerabdrucksensor an der Rückabdeckung abklemmen und fertig.

    Bobby mcgee - Responder

    There are four silver screws and two black to be removed.

    Jane - Responder

    Translate what Bobby mcgee said:

    Step 3 and 4 can be completely ignored. What for? You can continue with step 5, just disconnect the ribbon cable from the fingerprint sensor on the back cover and you're done.

    Antonio Sun - Responder

    However, the reason step 3 and 4 should not be skipped is Step 6 — Use an iOpener to loosen the adhesive beneath the battery. I.e., the adhesive cannot be easily removed without heat, however, that heat might damage the electric chips. Thus they’d better be removed first.

    Antonio Sun - Responder

  4. Substituição do conjunto do display com a armação para o Huawei P10 Lite: passo 4, imagem 1 %32 Substituição do conjunto do display com a armação para o Huawei P10 Lite: passo 4, imagem 2 %32
    • Use uma pinça para remover a placa protetora da placa-mãe.

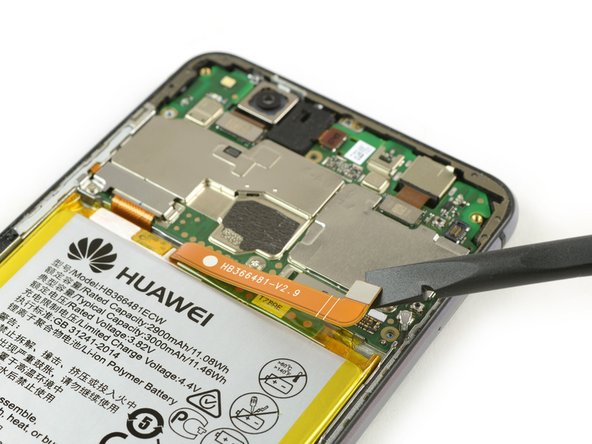
    • Use a ponta achatada de uma espátula para desconectar o cabo conector flex do sensor de impressão digital.

    • Ao montar novamente, aplique novo adesivo, quando necessário.

    Welchen Klebstoff soll man verwenden?

    josef navratil - Responder

    Hallo Josef,

    sollte bei deinem Ersatzteil kein Klebstoff oder Klebeband dabei gewesen sein, kannst du dünne Streifen Doppelseitiges Klebeband verwenden. Es gibt für das Huawei P10 Lite auch schon zugeschnittene Klebestreifen zu erwerben, hierbei gilt aber je nach Händler Rezessionen zu lesen, ob die Klebestreifen auch wirklich halten.

    Dominik Schnabelrauch -

    Note that there is a copper-colored sticker to lift up near the flat cable connected from the phone the finger pad. Lift the main board plate (shield) up SLOWLY from the camera side to the other end as the plate is wedged in place.

    Jane - Responder

    what adhesive is recommended? thanks

    darren - Responder

    Hi darren,
    pre-cut adhesive would be the best solution if you can source it. Otherwise a two-sided adhesive tape or carefully used E6000 adhesive glue will be your friend.

    Tobias Isakeit -

  5. Substituição do conjunto do display com a armação para o Huawei P10 Lite, Desconexão da bateria: passo 5, imagem 1 %32 Substituição do conjunto do display com a armação para o Huawei P10 Lite, Desconexão da bateria: passo 5, imagem 2 %32 Substituição do conjunto do display com a armação para o Huawei P10 Lite, Desconexão da bateria: passo 5, imagem 3 %32
    • Remova o parafuso Phillips tipo #00.

    • Remova a placa metálica que cobre o cabo conector flex da bateria.

    • Use a ponta fina de uma espátula para desconectar o cabo conector flex da bateria.

    Very gently lift the silver connecter that was under the battery connecter plate and is at the end of the orange battery cable with the flat end of the spudger as indicated.

    Jane - Responder

  6. Substituição do conjunto do display com a armação para o Huawei P10 Lite, Bateria: passo 6, imagem 1 %32 Substituição do conjunto do display com a armação para o Huawei P10 Lite, Bateria: passo 6, imagem 2 %32
    • Use uma bolsa iOpener para derreter o adesivo sob a bateria.

    • Insira uma espátula entre a bateria e a estrutura intermediária para criar um vão.

    • Tenha cuidado para não perfurar ou machucar a bateria.

    • Insira uma palheta de abrir ou use a espátula no vão para desfazer a união adesiva abaixo da bateria.

    • Cabos conectores flex se encontram abaixo da bateria. Não os danifique com suas ferramentas.

    Ohne eine Erwärmung des Klebers ist die Entfernung des Akkus wirklich sehr hakelig und zeitintensiv!

    Marcel Tischer - Responder

    You must heat the battery two or more times with the iOpener in order to remove it because if you don’t (and even if you do) the battery will certainly bend. So the battery removal has to be done delicately. Lift each corner a very tad bit and the sides to finally lift out as shown.

    Jane - Responder

    This step takes at least 15-20 minutes.

    Jane - Responder

    Battery easily torn. The kit should include a battery as it’s VERY delicate and would be saved if you have the replacement battery.

    Jane - Responder

    Ich habe es mit Zahnseide recht gut hinbekommen! Habe die Seide oben angelegt um gut unter den Akku zu kommen und habe mit Wärme und hin- und herbewegen der Seide den Akku ohne verbiegen gelöst bekommen. Hat auch ein paar Minuten gedauert, aber hat sich gelohnt!

    Sash - Responder

    Is it possible to soften the adhesive using isopropyl alcohol?

    Michele Matteoni - Responder

    Hi Michele,

    yes, the use of isopropyl alcohol is a common technique when removing a battery in a smartphone. Especially when the adhesive is very strong. Try to apply the alcohol to every corner of the battery and let it penetrate the adhesive for several minutes. Start the prying procedure with the spudger afterwards. In case the adhesive isn’t loose enough you can reapply isopropyl alcohol any time during the removal. Keep in mind, that there’s a gap in the midframe for the display flex cable. It can happen that the isopropyl alcohol runs trough that gap and loosens the adhesive of the display as well. When the display adhesive gets loose you’ll need replacement adhesive for the display. To avoid that, apply as less alcohol as possible at a time and take especially care during prying to avoid damage to the flex cables underneath the battery. The adhesive of the cables will get loose as well.

    Dominik Schnabelrauch -

    The battery was very hard to remove. Please note: it is glued everywhere around the ribbon cables at the bottom. The battery is not glued with little strips like the back cover. The spudger and the blue cutting triangles were not very strong and the plastic tip bent upon removal of the battery. I eventually got the battery out with a metallic spatula. Be careful not to rip the shining lining of the battery while cutting the adhesive. I don’t know how people get the battery out without bending it, also every YT video I watched had - slightly - bent batteries. The glue is so strong snd sticky I did not need to apply new adhesive strips.

    anya__savina - Responder

    If you are operating on aged ones:

    The Old double sided tape doesn’t really much care about the heat from the iOpener.

    Use a metal spudger (round edges) instead but use it with care. Slowly and evenly lift the battery and go around it in a circle. Stay close to the edges to not damage cables under the battery (seen in step 7). Start pushing closer towards the middle only when you can see the cables yet and are sure not to damage them.

    If this still doesn’t bring you closer to lifting the battery safely:

    Two Options:

    1. Try to use some small drops of adhesive remover . Best to use not to much is use Q-Tips or Cotton Swabs to evenly apply the remover through a little crack under the battery.

    2. Use unwaxed dental floss push it under the battery. Then gently move it upwards with a pulling-side-to-side motion. To accelerate the process you can also use ***adhesive remover***. The dental floss will soak it up (only works with unwaxed dental floss) and assure that it will only be where it’s needed.

    Doron Karaman - Responder

  7. Substituição do conjunto do display com a armação para o Huawei P10 Lite: passo 7, imagem 1 %32 Substituição do conjunto do display com a armação para o Huawei P10 Lite: passo 7, imagem 2 %32
    Ferramenta utilizada nesse passo:
    Tesa 61395 Tape
    $5.99
    Comprar
    • Use uma espátula para desfazer uniões adesivas restantes e remova a bateria fazendo alavanca.

    • Remova a bateria.

    • Ao montar novamente seu smartphone, reponha fitas adesivas gastas com fita adesiva dupla face ou adesivo pré-cortado.

    • Jamais reinstale uma bateria que tenha sido dobrada ou danificada durante a remoção.

    Merci pour ce tuto absolument parfait.

    IKO - Responder

  8. Substituição do conjunto do display com a armação para o Huawei P10 Lite, Conjunto do display com armação: passo 8, imagem 1 %32 Substituição do conjunto do display com a armação para o Huawei P10 Lite, Conjunto do display com armação: passo 8, imagem 2 %32
    • Remova o único parafuso Phillips tipo #00.

    • Remova o suporte do cabo flex do display flex cable bracket usando uma pinça.

  9. Substituição do conjunto do display com a armação para o Huawei P10 Lite: passo 9, imagem 1 %32 Substituição do conjunto do display com a armação para o Huawei P10 Lite: passo 9, imagem 2 %32
    • Use uma espátula para desconectar o cabo flex do conector de entrada para o fone de ouvido.

    • Emboro conector de entrada do fone de ouvido não está colado na estrutura intermediária, ele está um pouco escondido em seu suporte. Tenha cuidado para não danificá-lo durante a remoção.

    • Remova o conector de entrada para fone de ouvido.

    Wiggle the black rubber cover off a little in order to see how to lift out.

    Jane - Responder

  10. Substituição do conjunto do display com a armação para o Huawei P10 Lite: passo 10, imagem 1 %32 Substituição do conjunto do display com a armação para o Huawei P10 Lite: passo 10, imagem 2 %32
    • Use uma espátula para desconectar o cabo flex da câmera traseira.

    • Remove the rear camera.

  11. Substituição do conjunto do display com a armação para o Huawei P10 Lite: passo 11, imagem 1 %32 Substituição do conjunto do display com a armação para o Huawei P10 Lite: passo 11, imagem 2 %32 Substituição do conjunto do display com a armação para o Huawei P10 Lite: passo 11, imagem 3 %32
    • Use uma espátula para desconectar os cabos flex do botão volume e power, do display e principal.

  12. Substituição do conjunto do display com a armação para o Huawei P10 Lite: passo 12, imagem 1 %32 Substituição do conjunto do display com a armação para o Huawei P10 Lite: passo 12, imagem 2 %32 Substituição do conjunto do display com a armação para o Huawei P10 Lite: passo 12, imagem 3 %32
    • Desplugue o cabo da antena com uma pinça.

    • Use uma palheta de abrir para fazer alavanca e remover a placa-mãe até que você consiga apertá-la bem com a mão.

    • A câmera frontal ainda está fixa à placa-mãe. Não a danifique enquanto remove a placa-mãe.

    • Remova a placa-mãe.

    • Na traseira da placa-mãe encontram-se dissipadores de calor (peças emborrachadas cor-de-rosa). Se esses dissipadores de calor tiverem quebrado ou estiverem ressecados, você pode aplicar novos dissipadores de calor no novo conjunto de display ou na nova placa-mãe.

    The instructions did not say to remove the sim tray or the screw holding the motherboard down that is in the bottomcenter of the mother board. Unless these are removed first, the motherboard cannot be removed.

    ronald - Responder

    Thanks ronald for your input. The missing steps and actions have been added and edited.

    Tobias Isakeit -

  13. Substituição do conjunto do display com a armação para o Huawei P10 Lite: passo 13, imagem 1 %32 Substituição do conjunto do display com a armação para o Huawei P10 Lite: passo 13, imagem 2 %32
    • Remova o alto-falante auricular com uma pinça.

    • Use uma pinça para remover a tampa de plástica que cobre o cabo flex do botão de volume e power.

  14. Substituição do conjunto do display com a armação para o Huawei P10 Lite: passo 14, imagem 1 %32 Substituição do conjunto do display com a armação para o Huawei P10 Lite: passo 14, imagem 2 %32
    • Use uma palheta de abrir para desfazer a união adesiva entre o cabo flex do botão de volume/power e a estrutura intermediária.

    • O cabo flex do botão de volume e power é um pouco pegajoso e difícil de remover. Ele pode romper facilmente durante a remoção. Você pode usar uma bolsa térmica iOpener para amolecer um pouco o adesivo.

    • Remova cuidadosamente o cabo flex do botão de volume e power usando uma pinça.

  15. Substituição do conjunto do display com a armação para o Huawei P10 Lite: passo 15, imagem 1 %32
    • Remova os oito parafusos Phillips tipo #00 que fixam o alto-falante.

    The seventh black screw nearest the silver screw has smaller crosshairs then the others so the screwdriver bit furnished is slightly too large and will damage the screw if you insist. Better to find a smaller one from an eyeglasses repair kit.

    Jane - Responder

    Die achte, silberne Schraube unten rechts muss nicht gelöst werden, um die Lautsprechereinheit herauszunehmen!

    TeeLittle - Responder

  16. Substituição do conjunto do display com a armação para o Huawei P10 Lite: passo 16, imagem 1 %32 Substituição do conjunto do display com a armação para o Huawei P10 Lite: passo 16, imagem 2 %32
    • Insira uma palheta de abrir por debaixo do conjunto do alto-falante e faça alavanca nele até que você consiga segurá-lo bem com a mão.

    • Remova o alto-falante.

    Pry up in both corners to remove.

    Jane - Responder

  17. Substituição do conjunto do display com a armação para o Huawei P10 Lite: passo 17, imagem 1 %32 Substituição do conjunto do display com a armação para o Huawei P10 Lite: passo 17, imagem 2 %32 Substituição do conjunto do display com a armação para o Huawei P10 Lite: passo 17, imagem 3 %32
    Ferramenta utilizada nesse passo:
    Tesa 61395 Tape
    $5.99
    Comprar
    • Use a ponta plana de uma espátula para desconectar o cabo de interconexão e remova-o.

    • Use uma pinça para desconectar o cabo da antena e remova-o.

    • Remova a placa do carregador com uma pinça.

    • Se estiver tendo dificuldade enquanto remove a placa do carregador, você pode usar uma bolsa térmica iOpener para amolecer o adesivo que se encontra abaixo dela.

    • Antes de montar novamente, verifique se há componentes faltando em sua peça nova que precisam ser transferidas da peça antiga. Também verifique se é necessário repor os dissipadores de calor (peças emborrachadas cor-de-rosa).

    • Ao montar novamente seu smartphone, reponha adesivo usado trocando-o por fita adesiva de dupla face ou adesivo pré-cortado em tiras.

    My connector to the antenna cable had been pulled up and even trying to remove it carefully was to no avail so the connecter broke from the green strip. Might be best to go to next step and slightly lift up the entire assembly if yours is like mine was.

    Jane - Responder

Conclusão

Para montar novamente seu dispositivo, siga estas instruções na ordem inversa.

12 outras pessoas executaram este guia.

Um agradecimento especial a esses tradutores:

en pt

85%

Udo Baingo está nos ajudando a consertar o mundo! Quer contribuir?
Comece a traduzir ›

Dominik Schnabelrauch

Membro desde: 11/23/16

202.836 Reputação

Autoria de 682 guias

Equipe

iFixit Membro de iFixit

Staff

Membros da 135

Autoria de 16.732 guias

4 comentários

Hello!

Thanks for the assembly guide! My phones display glass was broken, and I bought new display with frame (since the frame might have been bent), and this guide proved to be helpful. Though, I ought to mention that you did not show how the upper left metal cover for display port was removed (not that I needed it).

However, I think I slightly damaged the main cord between upper and lower motherboards, the orange one, when I was removing the battery. I can still recharge my phone and listen to music through loudspeaker, but I can not hear or be heard when I am having a phone call with someone. I can use hands-free with a microphone to get around the problem, but I wanted to ask that is it possible for the damaged cord to cause this problem, or could it be something else? I would imagine that I should at least hear the other person even if the cord is slightly damaged.

- Jesse

Jesse Hettula - Responder

Hello Jesse

It could be, that cable sends data from the top to the bottom. The micro of the calls is the lower one, so the information could not reach the top if that part is damaged. Look at step 17, in that small plate is the microphone, it could be covered by dirt or not embedded in its hole. But the headset does not depend on that cable, could it have misplaced the headset? Look at step 13, if it is reversed, it will not work.

Oscar -

Hello all!

As we continue getting more and more boards with the same problem, I’d like to point out that you should be very careful when disconnecting the antenna cable. The soldering quality is probably not the best, and this may lead to the antenna cable coming out of the board along with the connector to which it is connected.. This is not so critical, but you will have to do some jewelry work to solder the detached connector.

iliazt - Responder

Thank you for the good guide which helped us to save my son’s phone!

P.S.: I recommend buying the spare parts here - I had ordered the first display on ebay (this was before my brother recommended ifixit to me) and it was broken. The parts from ifixit came in perfect quality.

Stefan Krokowski - Responder

Adicione um comentário

Exibir estatísticas:

Últimas 24 horas: 1

Últimos 7 dias: 5

Últimos 30 dias: 50

Duração total: 13,129