Esta tradução pode não refletir as atualizações mais recentes do guia de fontes. Ajude a atualizar a tradução ou veja guia de fontes.
Introdução
Neste guia, nós lhe mostramos como remover e substituir o conjunto do display junto com armação de seu smartphone modelo Huawei P10.
Para proteger seus olhos de estilhaços de vidro e facilitar
o serviço de abrir o smartphone, você pode colocar uma fita na tela.
Ao montar novamente, aplique adesivos novos, quando necessário. Antes de montar, verifique se estão faltando componentes na sua peça nova que necessitem ser transferidos da peça usada.
O que você precisa
-
-
Desligue o seu smartphone.
-
Remova os dois parafusos Pentalobe P2 da parte inferior.
-
Remova a bandeja do chip SIM.
-
-
-
Insira uma ferramenta de abertura de plástico entre o display e o invólucro, começando pela área inferior de seu smartphone.
-
Faça alavanca cuidadosamente e libere o display e suas partes para fora do invólucro.
-
Depois de liberar a extremidade inferior, use a ferramenta de abertura para abrir os clipes em ambos os lados.
Hi! I cannot find a way to insert the plastic opening tool. Any suggestions on how I can create a gap to start. Everything seems quit rigid.
Also, where will I find your reply.
vbr/lars.skoldebring@gmail.com
Hi Lars, you might want to use a suction handle to lift the display and create a small gap to insert the plastic tool. If you don’t have a suction handle you can “build” a handle with tape that you stick onto the display in a shape similar to this —> __∏__ (also you may want to edit your post and remove your email address ;) )
Hi,
I’m stuck at this step for about two hours… There’s nothing I can do to open the case. Tried all kinds of opening tools and a suction handle. There is no gap at all between the display and the body. How can anything be inserted into a gap that practically does not exist? Please help.
Sorry to hear that. You could try and lift the display by using a suction cup and pull to create a small gap for a tool to get in.
-
-
-
Abra o smartphone virando uma parte para trás.
-
Use uma espátula para desconectar o cabo flex dos botões de ligar e volume.
Thanks JaL, of course it is.
-
-
-
Remova os dois parafusos Phillips tipo #00.
-
-
-
-
Retire a fita adesiva que está sob a bateria, puxando constantemente a tira, incidindo em um ângulo plano.
-
Use uma bolsa térmica iOpener para amolecer os resíduos de adesivo.
It wasn’t easy to find the piece to pull. It was a black label, folded and stuck to the battery
-
-
-
Remova os quatro parafusos Phillips tipo #00.
-
Use uma pinça para remover a placa metálica que cobre a placa de carregamento e o cabo flex principal.
-
-
-
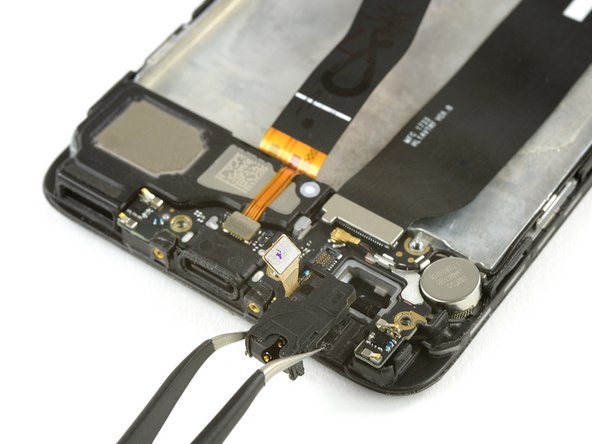
Use a ponta plana de uma espátula para desconectar o cabo flex da entrada do fone de ouvido.
-
Remova o conector de entrada do fone de ouvido usando a pinça. Há um pequeno adesivo debaixo dele, portanto pode ser que ele esteja um pouco pegajoso.
-
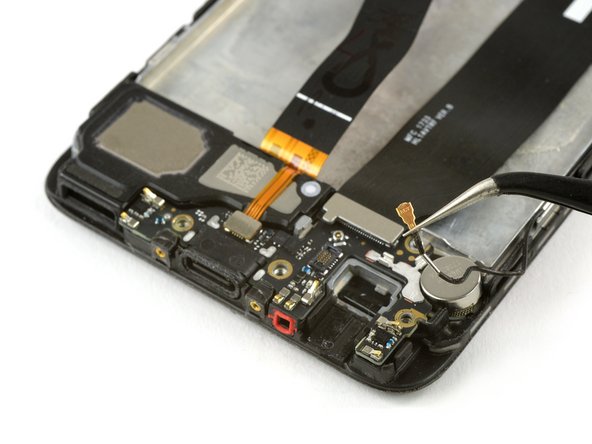
Desplugue o cabo da antena usando uma pinça.
-
-
-
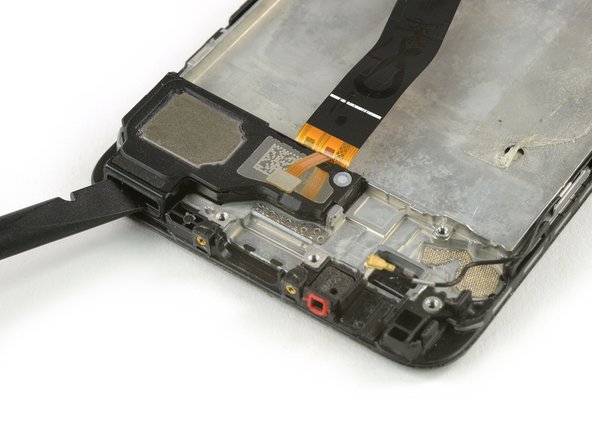
Remova o motor de vibração. Se o adesivo estiver forte, aqueça uma bolsa térmica iOpener para amolecê-lo e facilitar a remoção.
-
Use a ponta plana de uma espátula para fazer alavanca por debaixo do alto-falante.
-
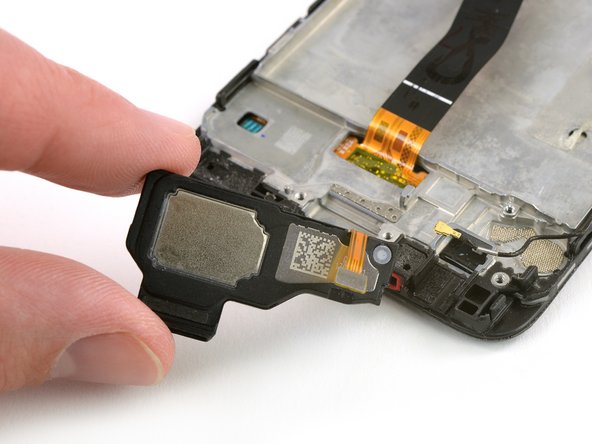
Remova o alto-falante.
-
-
-
Use a ponta pontiaguda de uma espátula no canto direito superior da placa-mãe e faça alavanca até que você consiga usar a mão.
-
Remova a placa-mãe.
Can I replace the pink thermal pad with thermal paste? Because I can't any online store sell pink thermal paste for phone.
-


Para montar novamente seu dispositivo, siga estas instruções na ordem inversa. Durante a montagem, aplique adesivos novos, quando necessário.
Para montar novamente seu dispositivo, siga estas instruções na ordem inversa. Durante a montagem, aplique adesivos novos, quando necessário.
Cancelar: não concluí este guia.
25 outras pessoas executaram este guia.
Um agradecimento especial a esses tradutores:
92%

Udo Baingo está nos ajudando a consertar o mundo! Quer contribuir?
Comece a traduzir ›


5 comentários
Are the pink/purple blobs unter the motherboard thermal paste? If so, should I re-apply any when reassembling?
The answer might come to late, as you most likely finished the repair in the last 5 years, but it might still be useful for others:
Yes, the purple blobs under the mainboard are thermal paste.
If the paste is still soft you could potentially reuse it but I would highly recommend to use some new thermal paste.
Gonna upload an easy and faster way to do it whitout removibg the battery or upper boards and cameras, wait for it, my 1st guide.
I didn’t add the tape. I don’t know why the battery comes with it, plus, it is ultra strong, I was all the time afraid to ruin the battery, but fortunatly, everything went well
Das Honor 9 hat an der Unterkante keine Schrauben.
Wie ist das Honor 9 zu öffnen?
Michael Tuschek - Responder
Vielleicht beantwortet diese Anleitung deine Frage ;)
Tobias Isakeit -
Hi, my P10 does not have screws, just two tiny holes. Do I push in here to unfasten? Einar, Norway
Einar Ryvarden - Responder
Hi Einar Ryvarden,
in case you bought a used or refurbished phone, someone might have forgotten to put them back in. Since you have holes at the bottom edge next to the charging port this is likely. You can try to start with step 2 and see if you can lift the phone assembly (don’t forget to remove the SIM tray first). As far as I know there is no version of the regular Huawei P10 with no screws. However you there are none in the P10 lite and in the P10 plus, maybe one of the opening procedures for those phones might help you.
Dominik Schnabelrauch -