Introdução
Replace the Sony Xperia Z3 Compact LCD screen, step by step.
This video will show you all the steps and it is recommended you watch it before starting.
Note that this guide describes how to replace the LCD + touchscreen (digitizer) assembly.
A less common alternative repair is to replace LCD + touchscreen (digitizer) + midframe, which can sometimes be bought as a pre-assembled set.
Finally, it is also possible (but much, much harder) to replace the touchscreen part (digitizer) only while keeping a functioning LCD screen. The process requires specialised tools and is not covered here.
O que você precisa
Vídeo de Apresentação
-
-
-
Prepare the removal of the back frame:
-
Unclip the NFC antenna.
-
Put the information label aside.
-
Unscrew all the screws and put them aside.
-
For reassembly: Silver screws (2) belong to the side of the frame. Golden screws (3) for top and bottom.
-
Remove the back frame: carefully pop it out, using a spudger as a lever to lift it out, for example.
-
-
-
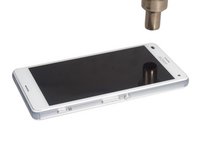
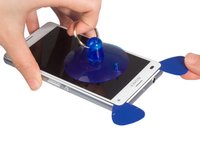
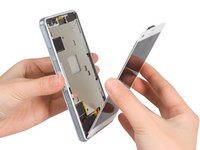
The steps are same as removing the back cover but a bit more difficult. Heat up for 3 minutes, lift the screen with the suction cup and if necessary, cut through the adhesive.
-
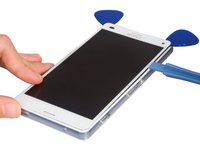
When removing the screen, be careful: the earpiece is stuck to it. Don't lose it.
-
If your screen is cracked or broken, be careful when removing as bits of glass may come off and cut your fingers.
-
Why does the disassembled screen come with the earpiece? The reason is that the earpiece is stuck in place on the touch panel/screen combination directly, rather than kept in a frame on the main flex (like the cameras, for instance).
-
-
-
Before going any further, test your new screen by plugging it to the device's main flex and powering it on. If all is well, power off. If not, contact your screen reseller.
-
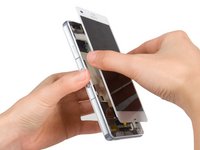
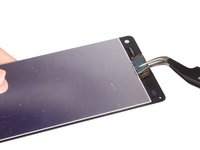
Carefully remove the earpiece from screen, by pulling on it gently and separating the adhesive. Notice the position of the earpiece on the back of the screen, as you will need to put it back in the same position on the new screen.
-
Ideally, remove the earpiece with its adhesive, as you will need to put the earpiece back on the new screen when you reassemble the device. Earpiece adhesive keeps the earpiece properly in place on the screen.
-
Make sure the earpiece is in the right position and connects properly with the main flex before you reassemble for good. Otherwise you will not get sound from the earpiece, and won't be able to make calls normally.
-
-
-
Ensure the midframe is clean: any glue residue will limit the new adhesive's capacity to stick to the midframe
-
Carefully apply the front screen adhesive, starting at one end of the phone (top or bottom) and slowly applying it along the midframe edges, on the sides.
-
Finally, put the new screen in place, pressing it firmly into place.
-
Be careful: don't press too hard on the earpiece area at the top, as the screen is particularly fragile around the earpiece.
-
Don't forget to put the information label back in the phone!
-


To reassemble your device, follow these instructions in reverse order.
To reassemble your device, follow these instructions in reverse order.
Cancelar: não concluí este guia.
104 outras pessoas executaram este guia.
41 comentários
Be really careful placing the glue/sticker for the front cover to go back on, I had a small ruck underneath and it cracked my replacement screen, so annoyed! Other than that everything is pretty easy.
so true,
also to note is the earpiece speaker sits below the plane of the glass if you remove the existing adhesive on the earpiece. when pressing down the new glass in this area, it's soo easy to break your brand new replacement screen because of the depression. in my opinion, Xperia phones have an excessively fragile construction and very brittle, thin glass..
Andrew -
My screen was broken so unable to switch of phone so switched screen with power on.
When the screen was replaced everything seemed Ok but the digitizer/touch did not work so I thought I had zapped the screen.
I then disconnected - reconnected the battery and cold rebooted the phone and that got the digitizer working.
So I suggest that You disconnect the battery before connecting the new screen to ensure the power is off
Ingemar 1508027
are this devise water proof after it and what is the name of the Glue that u used for glue the new lcd
You magnificent responder!!! I totally panicked when everything worked except for the touch part of my screen, then I just detached and reattached the battery and now everything works perfectly. Thank you!