Ir para o conteúdo principal
Participe da comunidade de reparos - Criar conta

Sony Xperia Z Ultra Front Camera Replacement

O que você precisa

  1. Sony Xperia Z Ultra Front Camera Replacement, Battery: passo 1, imagem 1 %32
    • Use the small suction cup to lift the back panel:

    • Press the small suction cup on to the middle of the back panel.

    Pergunte ao FixBot

    Comentar

  2. Sony Xperia Z Ultra Front Camera Replacement: passo 2, imagem 1 %32
    • While holding the Sony Xperia Z ultra down with your left hand, slightly pull the small suction cup upwards to create a small opening between the back panel and the front panel.

    • While continuing to pull the small suction cup upwards, insert the spudger in the small opening.

    • Pry the front panel downwards with the spudger while continuing to pull the small suction cup upwards.

    Pergunte ao FixBot

    Comentar

  3. Sony Xperia Z Ultra Front Camera Replacement: passo 3, imagem 1 %32
    • Remove the back panel by pulling the small suction cup upwards.

    Pergunte ao FixBot

    Comentar

  4. Sony Xperia Z Ultra Front Camera Replacement: passo 4, imagem 1 %32
    • Remove the following six screws with a Phillips #000 screwdriver:

    • five silver 2.1 mm screws

    • one gold 3.1 mm screw

    Pergunte ao FixBot

    Comentar

  5. Sony Xperia Z Ultra Front Camera Replacement: passo 5, imagem 1 %32
    • Pry the plastic motherboard shield open by placing the spudger under the shield and running it along the edges.

    Pergunte ao FixBot

    Comentar

  6. Sony Xperia Z Ultra Front Camera Replacement: passo 6, imagem 1 %32
    • Use care to remove the motherboard shield, as it may break. The motherboard shield is made of a very thin plastic.

    • Remove the motherboard shield by lifting the lower end upwards first.

    Pergunte ao FixBot

    Comentar

  7. Sony Xperia Z Ultra Front Camera Replacement: passo 7, imagem 1 %32 Sony Xperia Z Ultra Front Camera Replacement: passo 7, imagem 2 %32
    • Detach the battery connection cable by prying it upward with the spudger.

    Pergunte ao FixBot

    Comentar

  8. Sony Xperia Z Ultra Front Camera Replacement: passo 8, imagem 1 %32
    • Pry the upper end of the antenna upwards with the spudger.

    Pergunte ao FixBot

    Comentar

  9. Sony Xperia Z Ultra Front Camera Replacement: passo 9, imagem 1 %32
    • Detach the antenna by pulling the upper end upwards and outwards.

    Pergunte ao FixBot

    Comentar

  10. Sony Xperia Z Ultra Front Camera Replacement: passo 10, imagem 1 %32
    • Insert the spudger underneath the battery and run it back and forth to remove any adhesive.

    Pergunte ao FixBot

    Comentar

  11. Sony Xperia Z Ultra Front Camera Replacement: passo 11, imagem 1 %32
    • Remove the battery from the phone.

    Pergunte ao FixBot

    Comentar

  12. Sony Xperia Z Ultra Front Camera Replacement, Front Camera: passo 12, imagem 1 %32
    • Use care to pry the front camera off, as it can easily be damaged if too much force is used. The connection from the front facing camera to the motherboard is delicate.

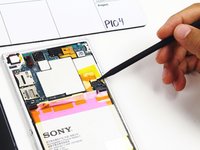
    • Pry the connection upwards from the motherboard with the spudger to reveal the front facing camera.

    Pergunte ao FixBot

    Comentar

  13. Sony Xperia Z Ultra Front Camera Replacement: passo 13, imagem 1 %32
    • Remove the front facing camera by pulling upward on the flap to its right .

    Pergunte ao FixBot

    Comentar

Conclusão

To reassemble your device, follow these instructions in reverse order.

Cancelar: não concluí este guia.

4 outras pessoas executaram este guia.

Aaron Quinn

Membro desde: 10/01/15

930 Reputação

Autoria de 3 guias

Equipe

Cal Poly, Team 4-6, Maness Fall 2015 Membro de Cal Poly, Team 4-6, Maness Fall 2015

CPSU-MANESS-F15S4G6

4 Membros

Autoria de 10 guias

0Comentários do guia

Comentar

Visualizações:

Últimas 24 horas: 3

Últimos 7 dias: 12

Últimos 30 dias: 43

Ao todo: 2,440