Ir para o conteúdo principal

Sony Vaio VGN-Z48GD SSDs Replacement

O que você precisa

  1. Sony Vaio VGN-Z48GD SSDs Replacement, SSDs: passo 1, imagem 1 %32
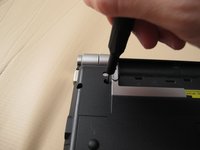
    • Power off your laptop before starting.

    • Disconnect all external cables from the device.

  2. Sony Vaio VGN-Z48GD SSDs Replacement: passo 2, imagem 1 %32
    • Flip the device over so that the battery is facing away from you.

    • Unlock the battery by using your finger to push the "Lock" latch to the right.

    • You will hear a soft click when the latch has been disengaged.

  3. Sony Vaio VGN-Z48GD SSDs Replacement: passo 3, imagem 1 %32
    • Place your finger on the "Release" latch.

    • Slide the latch to the right and hold it.

    • Use your other hand to lift the battery from the groove.

    • Remove the battery.

  4. Sony Vaio VGN-Z48GD SSDs Replacement: passo 4, imagem 1 %32
    • Remove a 5 mm Phillips #000 screw from the RAM cover located in the centre of the device.

    • Remove the RAM cover.

    • There is no need to remove the RAMs as they won't get in the way.

  5. Sony Vaio VGN-Z48GD SSDs Replacement: passo 5, imagem 1 %32 Sony Vaio VGN-Z48GD SSDs Replacement: passo 5, imagem 2 %32
    • Remove the following eleven screws:

    • Five 13 mm Phillips #000 screws

    • Six 5 mm Phillips #000 screws

  6. Sony Vaio VGN-Z48GD SSDs Replacement: passo 6, imagem 1 %32
    • Flip the device and open the lid so that the keyboard is facing upwards.

    • Use an opening tool to lift the keyboard assembly slightly.

    • Make sure you don't lift the keyboard assembly too much as there is a ribbon cable in between.

  7. Sony Vaio VGN-Z48GD SSDs Replacement: passo 7, imagem 1 %32
    • Flip the keyboard assembly towards you.

  8. Sony Vaio VGN-Z48GD SSDs Replacement: passo 8, imagem 1 %32
    • Use an opening tool to pry the keyboard assembly connector up from its socket on the motherboard.

    • Remove the keyboard assembly.

  9. Sony Vaio VGN-Z48GD SSDs Replacement: passo 9, imagem 1 %32
    • Use an opening tool to pry the uSATA ribbon cable connector up from its socket on the motherboard.

  10. Sony Vaio VGN-Z48GD SSDs Replacement: passo 10, imagem 1 %32 Sony Vaio VGN-Z48GD SSDs Replacement: passo 10, imagem 2 %32
    • Remove two 13 mm screws from the SSD bracket using a Phillips #000 screwdriver.

    • Remove the SSD bracket.

  11. Sony Vaio VGN-Z48GD SSDs Replacement: passo 11, imagem 1 %32
    • Flip the SSD bracket.

    • Use your hand to disconnect the uSATA connector on the right.

  12. Sony Vaio VGN-Z48GD SSDs Replacement: passo 12, imagem 1 %32
    • Flip the SSD bracket.

    • Use your hand to disconnect the uSATA connector on the left.

    • Remove the uSATA ribbon cable.

  13. Sony Vaio VGN-Z48GD SSDs Replacement: passo 13, imagem 1 %32
    • Remove two 2 mm Phillips #00 screws.

  14. Sony Vaio VGN-Z48GD SSDs Replacement: passo 14, imagem 1 %32
    • Flip the SSD bracket.

    • Remove two 2 mm Phillips #00 screws.

  15. Sony Vaio VGN-Z48GD SSDs Replacement: passo 15, imagem 1 %32
    • Take out the SSDs from the bracket.

Conclusão

To reassemble your device, follow these instructions in reverse order.

Uma outra pessoa concluiu este guia.

Vincent L

Membro desde: 01/10/19

265 Reputação

Autoria de 1 guia

Equipe

0 comentários

Adicione um comentário

Exibir estatísticas:

Últimas 24 horas: 0

Últimos 7 dias: 1

Últimos 30 dias: 23

Duração total: 836