Ir para o conteúdo principal

Este guia tem alterações mais recentes. Mudar para a última versão não verificada.

Sony Vaio VGN-S260 Ethernet Ports Replacement

O que você precisa

  1. Sony Vaio VGN-S260 Ethernet Ports Replacement, Battery: passo 1, imagem 1 %32 Sony Vaio VGN-S260 Ethernet Ports Replacement, Battery: passo 1, imagem 2 %32 Sony Vaio VGN-S260 Ethernet Ports Replacement, Battery: passo 1, imagem 3 %32
    • Flip the laptop over so the Vaio logo is facing down.

    • Locate the battery at the top and Find the release and unlock slides on the battery.

    • Slide the unlock tab to the unlock position.

    • Slide the release tab in the direction of the arrow, i.e. towards the unlock tab.

  2. Sony Vaio VGN-S260 Ethernet Ports Replacement: passo 2, imagem 1 %32 Sony Vaio VGN-S260 Ethernet Ports Replacement: passo 2, imagem 2 %32
    • With the tabs still in the unlock position, slide the battery away from the main case.

  3. Sony Vaio VGN-S260 Ethernet Ports Replacement, Keyboard: passo 3, imagem 1 %32 Sony Vaio VGN-S260 Ethernet Ports Replacement, Keyboard: passo 3, imagem 2 %32
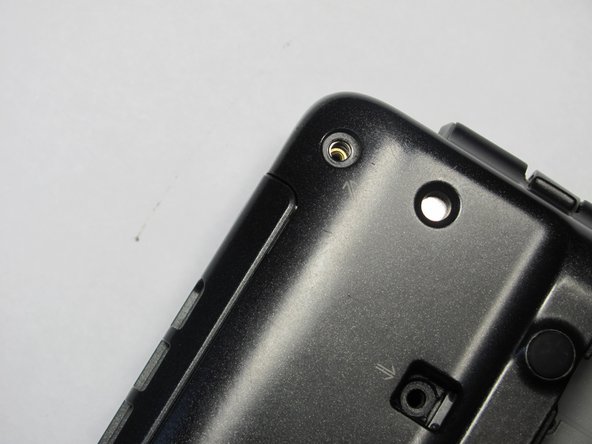
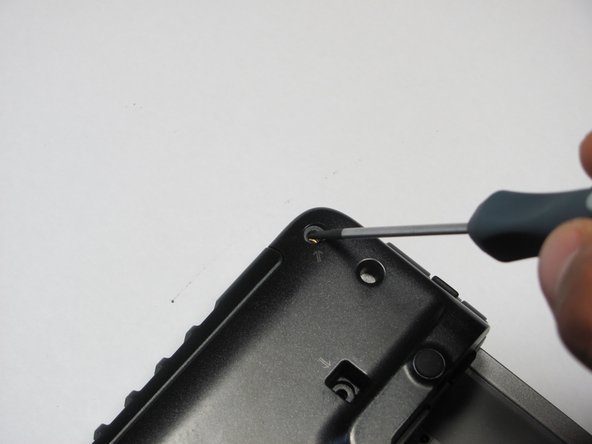
    • Flip the computer over so the Vaio logo is facedown.

    • Unscrew the 2 screws next to the battery.

  4. Sony Vaio VGN-S260 Ethernet Ports Replacement: passo 4, imagem 1 %32
    • Flip the computer over again so the Vaio logo is face up.

    • Open the lid.

  5. Sony Vaio VGN-S260 Ethernet Ports Replacement: passo 5, imagem 1 %32 Sony Vaio VGN-S260 Ethernet Ports Replacement: passo 5, imagem 2 %32
    • Press down on the outer gray shell around the keyboard.

    • Use the spudger to gently lift keyboard.

    • Do not pull up the keyboard too far as it is attached to a ribbon underneath.

  6. Sony Vaio VGN-S260 Ethernet Ports Replacement: passo 6, imagem 1 %32 Sony Vaio VGN-S260 Ethernet Ports Replacement: passo 6, imagem 2 %32
    • Lift up lever underneath the ribbon to detach the keyboard.

  7. Sony Vaio VGN-S260 Ethernet Ports Replacement, Upper Casing: passo 7, imagem 1 %32
    • Remove memory/wireless compartment cover.

  8. Sony Vaio VGN-S260 Ethernet Ports Replacement: passo 8, imagem 1 %32 Sony Vaio VGN-S260 Ethernet Ports Replacement: passo 8, imagem 2 %32 Sony Vaio VGN-S260 Ethernet Ports Replacement: passo 8, imagem 3 %32
    • Flip so the Vaio Logo is face down.

    • Locate and remove a total of 8 screws on the bottom.

  9. Sony Vaio VGN-S260 Ethernet Ports Replacement: passo 9, imagem 1 %32
    • Find and remove 5 screws (they all have arrows next to them) from cover.

  10. Sony Vaio VGN-S260 Ethernet Ports Replacement: passo 10, imagem 1 %32 Sony Vaio VGN-S260 Ethernet Ports Replacement: passo 10, imagem 2 %32 Sony Vaio VGN-S260 Ethernet Ports Replacement: passo 10, imagem 3 %32
    • Flip the laptop over so the Vaio logo is face up.

    • Use the spudger to pop up the upper casing.

    • Do not lift too much as the upper casing is attached to wires underneath.

    • Remove the wires that are attaching the upper casing to the motherboard.

  11. Sony Vaio VGN-S260 Ethernet Ports Replacement: passo 11, imagem 1 %32
    • Remove the upper casing.

  12. Sony Vaio VGN-S260 Ethernet Ports Replacement, Optical Drive: passo 12, imagem 1 %32
    • Remove the screw holding the optical drive casing to the logic board.

  13. Sony Vaio VGN-S260 Ethernet Ports Replacement: passo 13, imagem 1 %32
    • Locate ribbon connecting optical drive case to logic board.

    • Pop off the ribbon.

    • Remove the metal PC-Card cage.

  14. Sony Vaio VGN-S260 Ethernet Ports Replacement: passo 14, imagem 1 %32
    • Remove the four screws holding the optical drive to the logic board.

  15. Sony Vaio VGN-S260 Ethernet Ports Replacement: passo 15, imagem 1 %32 Sony Vaio VGN-S260 Ethernet Ports Replacement: passo 15, imagem 2 %32
    • Locate brown locking tab above optical drive.

    • Lift up on brown locking tab until ribbon is loose.

    • Gently slide out and remove the optical drive from the computer.

  16. Sony Vaio VGN-S260 Ethernet Ports Replacement, Ethernet Ports: passo 16, imagem 1 %32 Sony Vaio VGN-S260 Ethernet Ports Replacement, Ethernet Ports: passo 16, imagem 2 %32
    • Remove the blue ribbon from the Ethernet Circuit Board.

  17. Sony Vaio VGN-S260 Ethernet Ports Replacement: passo 17, imagem 1 %32
    • Remove the screws near the Ethernet Port circuit board.

  18. Sony Vaio VGN-S260 Ethernet Ports Replacement: passo 18, imagem 1 %32
    • Remove the screws for the second ethernet circuit board.

  19. Sony Vaio VGN-S260 Ethernet Ports Replacement: passo 19, imagem 1 %32 Sony Vaio VGN-S260 Ethernet Ports Replacement: passo 19, imagem 2 %32
    • Remove the ethernet ports.

Conclusão

To reassemble your device, follow these instructions in reverse order.

Uma outra pessoa concluiu este guia.

Jeffrey Bryan

Membro desde: 04/20/10

570 Reputação

Autoria de 11 guias

Equipe

Cal Poly, Team 16-4, Maness Spring 2010 Membro de Cal Poly, Team 16-4, Maness Spring 2010

CPSU-MANESS-S10S16G4

Membros da 4

Autoria de 30 guias

0 comentários

Adicione um comentário

Exibir estatísticas:

Últimas 24 horas: 0

Últimos 7 dias: 0

Últimos 30 dias: 3

Duração total: 3,538