Introdução
If your hard drive is broken or you want to upgrade it, follow these instructions to remove it. Replacing or repairing the hard drive requires first removing the keyboard.
CAUTION: Static electricity in your body can ruin you computer. Use an anti-static wristband.
O que você precisa
-
-
The battery is located on the left side of the laptop, as shown by the red circle.
-
Make sure the laptop is disconnected and turned completely off.
 Pergunte ao FixBot
-
-
-
Pull the plastic cover down (indicated by the arrow on the cover) and then swing it upwards to reveal the battery compartment.
-
The battery can now be removed by pulling it.
-
-
-
Use your Philips #00 screwdriver to unscrew the small screw counterclockwise. This screw is for the audio/visual jacks on the left side of the laptop.
-
-
-
Unlock the cover between the keyboard and screen.
-
Gently slide it to the right and lift it up.
-
Exercise caution to avoid excessive force, as wires are connected.
-
-
-
Lift up the cover and lean it against the display so it is out of the way for the rest of the process.
-
Remove the small screw above the F6 key on the keyboard. Place screw in container to ensure it wont be lost.
-
-
-
-
Find the green ribbon as indicated in the picture by the red circle. This is what connects the keyboard to the motherboard.
-
-
Ferramenta utilizada neste passo:Tweezers$4.99
-
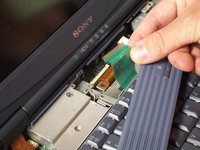
Carefully unplug the ribbon cable using a pair of tweezers.
-
Lift up the white bar near the connection to the motherboard, and lightly lift the ribbon to release it from the motherboard.
-
-
-
Now, pull on the ribbon cable, and it will detach from the motherboard.
-
-
-
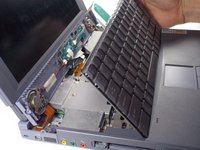
Your keyboard is now safety detached. Necessary repairs or replacements can be made from here.
-
-
-
The hard drive is the metal box in the middle. Use your Philips Head screwdriver to remove the four screws that attach the cage to the motherboard.
-
-
-
The Hard Drive box is now unfastened. You can free it from the laptop by pulling up, but be careful because it is held in place by the surrounding metal pieces so a little strength, yet care, is needed. When free, do not immediately remove it, there is a ribbon cable connecting it to the laptop.
-
-
-
Slowly pull the hard drive away from the ribbon by holding the plastic connector at the end of the ribbon and pulling on the Hard Drive. The Hard Drive should now be completely free of the laptop and the two connecting ends displayed in the picture should be visible.
-
-
-
The hard drive is attached to the metal outer case by four screws, two on each side.
-
-
-
The Hard Drive is now exposed. You are now free to replace it, clean it, or repair it.
-




To reassemble your device, follow these instructions in reverse order.
Cancelar: não concluí este guia.
Uma outra pessoa concluiu este guia.

Equipe

Cal Poly, Team 29-77, Johann Spring 2010 Membro de Cal Poly, Team 29-77, Johann Spring 2010
CPSU-JOHANN-S10S29G77
5 Membros
Autoria de 12 guias
