Ir para o conteúdo principal

Este guia tem alterações mais recentes. Mudar para a última versão não verificada.

Sony Vaio PCG-F420 Display Replacement

O que você precisa

  1. Sony Vaio PCG-F420 Display Replacement, Battery: passo 1, imagem 1 %32
    • The battery is located on the left side of the laptop, as shown by the red circle.

    • Make sure the laptop is disconnected and turned completely off.

  2. Sony Vaio PCG-F420 Display Replacement: passo 2, imagem 1 %32
    • Remove the battery by following these steps.

    • Pull the plastic cover down (indicated by the arrow on the cover) and then swing it upwards to reveal the battery compartment.

    • The battery can now be removed by pulling it.

  3. Sony Vaio PCG-F420 Display Replacement, Keyboard: passo 3, imagem 1 %32
    • Use your Philips #00 screwdriver to unscrew the small screw counterclockwise. This screw is for the audio/visual jacks on the left side of the laptop.

  4. Sony Vaio PCG-F420 Display Replacement: passo 4, imagem 1 %32
    • Unlock the cover between the keyboard and screen.

    • Gently slide it to the right and lift it up.

    • Exercise caution to avoid excessive force, as wires are connected.

    • Be mindful not to pull the keyboard too forcefully as it remains connected to wires, which we will address in the next step.

  5. Sony Vaio PCG-F420 Display Replacement: passo 5, imagem 1 %32
    • Lift up the cover and lean it against the display so it is out of the way for the rest of the process.

    • Remove the small screw above the F6 key on the keyboard. Place screw in container to ensure it wont be lost.

  6. Sony Vaio PCG-F420 Display Replacement: passo 6, imagem 1 %32
    • Find the green ribbon as indicated in the picture by the red circle. This is what connects the keyboard to the motherboard.

  7. Sony Vaio PCG-F420 Display Replacement: passo 7, imagem 1 %32
    • Carefully unplug the ribbon cable using a pair of tweezers.

    • Lift up the white bar near the connection to the motherboard, and lightly lift the ribbon to release it from the motherboard.

  8. Sony Vaio PCG-F420 Display Replacement: passo 8, imagem 1 %32 Sony Vaio PCG-F420 Display Replacement: passo 8, imagem 2 %32
    • Now, pull on the ribbon cable, and it will detach from the motherboard.

    • Your keyboard is now safely detached, allowing for necessary repairs or replacements.

  9. Sony Vaio PCG-F420 Display Replacement: passo 9, imagem 1 %32
    • Your keyboard is now safety detached. Necessary repairs or replacements can be made from here.

  10. Sony Vaio PCG-F420 Display Replacement, Display: passo 10, imagem 1 %32
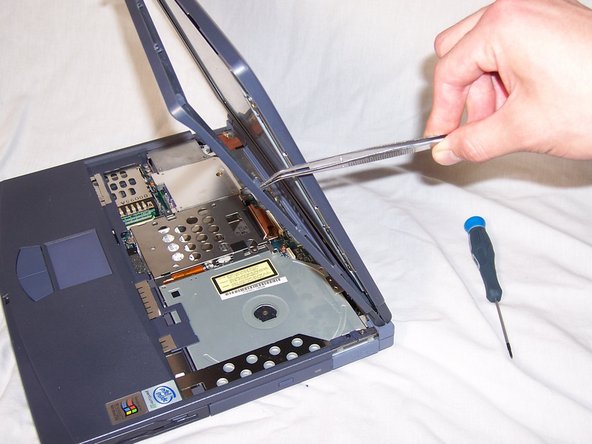
    • Use tweezers to remove the rubber covers on the four screws at the corners near the display.

  11. Sony Vaio PCG-F420 Display Replacement: passo 11, imagem 1 %32
    • Unscrew the four screws that attach the front bezel panel with the display assembly. The front bezel panel is the plastic frame around the display.

  12. Sony Vaio PCG-F420 Display Replacement: passo 12, imagem 1 %32
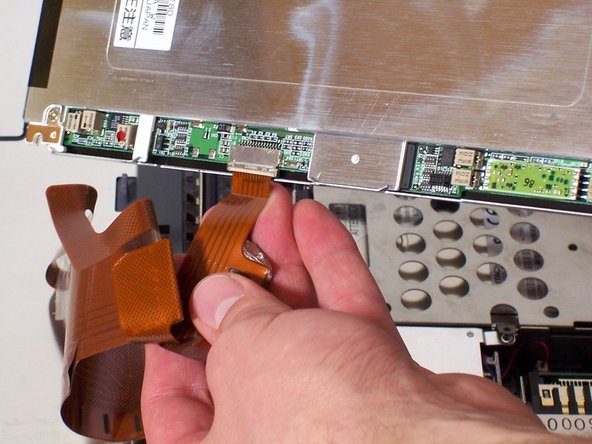
    • Using a spudger or another flat-headed tool, start to pry away the front bezel panel from the display assembly. While putting pressure on the front bezel, place the spudger on the seam connecting the front and rear bezel, and the clip attaching the two panels should start to come apart.

  13. Sony Vaio PCG-F420 Display Replacement: passo 13, imagem 1 %32 Sony Vaio PCG-F420 Display Replacement: passo 13, imagem 2 %32 Sony Vaio PCG-F420 Display Replacement: passo 13, imagem 3 %32
    • There are a total of 14 clips holding the two bezel panels together. Be careful when unclipping all of them, they break easily. After all the clips are off, the bezel will just pop right off the display panel.

  14. Sony Vaio PCG-F420 Display Replacement: passo 14, imagem 1 %32
    • Find and unscrew the four gold philips-head screws that attach the display to the rear bezel of the display assembly. Do not immediately remove the display, there are cables attaching it to the rear bezel.

  15. Sony Vaio PCG-F420 Display Replacement: passo 15, imagem 1 %32 Sony Vaio PCG-F420 Display Replacement: passo 15, imagem 2 %32
    • Locate the ribbon cable slot and the two-pin backlight cable. Simply pull both of the cables out of their sockets, using light to moderate force.

Conclusão

To reassemble your device, follow these instructions in reverse order.

Therin Irwin

Membro desde: 04/19/10

22 Reputação

Autoria de 2 guias

Equipe

Cal Poly, Team 29-77, Johann Spring 2010 Membro de Cal Poly, Team 29-77, Johann Spring 2010

CPSU-JOHANN-S10S29G77

Membros da 5

Autoria de 12 guias

0 comentários

Adicione um comentário

Exibir estatísticas:

Últimas 24 horas: 0

Últimos 7 dias: 1

Últimos 30 dias: 10

Duração total: 2,643