Ir para o conteúdo principal

Sony Vaio PCG-61411L RAM Replacement

Guia arquivado
Este guia é mantido exclusivamente para fins históricos. Use a versão atualizada do guia para executar o reparo.

O que você precisa

  1. Sony Vaio PCG-61411L RAM Replacement, Battery: passo 1, imagem 1 %32 Sony Vaio PCG-61411L RAM Replacement, Battery: passo 1, imagem 2 %32 Sony Vaio PCG-61411L RAM Replacement, Battery: passo 1, imagem 3 %32
    • Be sure to disconnect the device charger and power down the device before beginning.

    • Turn the device over onto its back, where the battery is at the top of the device. Slide the "lock" switch to the right.

  2. Sony Vaio PCG-61411L RAM Replacement: passo 2, imagem 1 %32 Sony Vaio PCG-61411L RAM Replacement: passo 2, imagem 2 %32 Sony Vaio PCG-61411L RAM Replacement: passo 2, imagem 3 %32
    • Slide the "release" switch to the left and gently lift the battery up to remove it.

    • Completely remove the battery from the device.

  3. Sony Vaio PCG-61411L RAM Replacement, RAM: passo 3, imagem 1 %32
    • The RAM cards reside in the rectangle shaped plate in the center of the back panel of the device.

  4. Sony Vaio PCG-61411L RAM Replacement: passo 4, imagem 1 %32 Sony Vaio PCG-61411L RAM Replacement: passo 4, imagem 2 %32
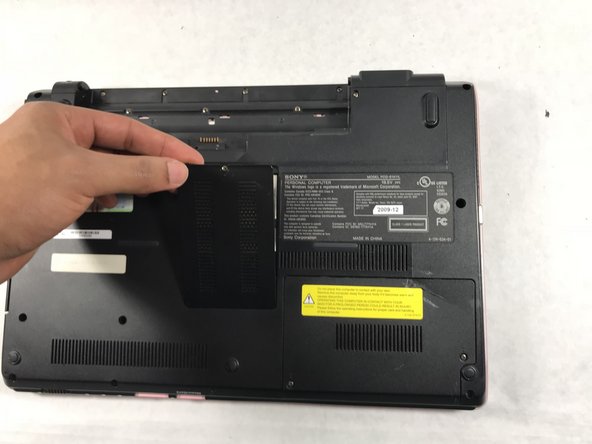
    • Unscrew the single PH1 6mm screw at the top of the panel. The screw remains in the panel.

    • Remove the panel by lifting it towards yourself.

  5. Sony Vaio PCG-61411L RAM Replacement: passo 5, imagem 1 %32 Sony Vaio PCG-61411L RAM Replacement: passo 5, imagem 2 %32 Sony Vaio PCG-61411L RAM Replacement: passo 5, imagem 3 %32
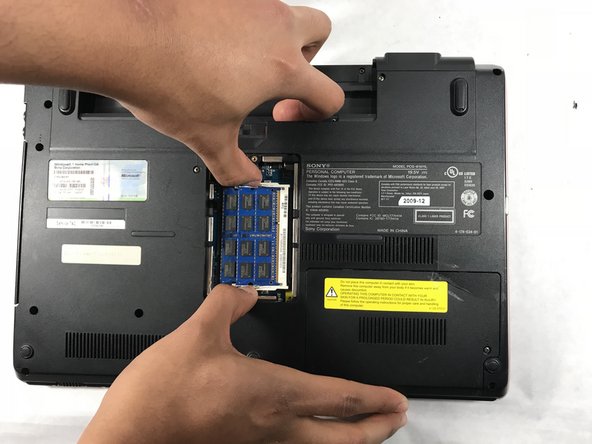
    • To remove the individual RAM card panels, snap back the metal latches on each side of the cards.

  6. Sony Vaio PCG-61411L RAM Replacement: passo 6, imagem 1 %32 Sony Vaio PCG-61411L RAM Replacement: passo 6, imagem 2 %32
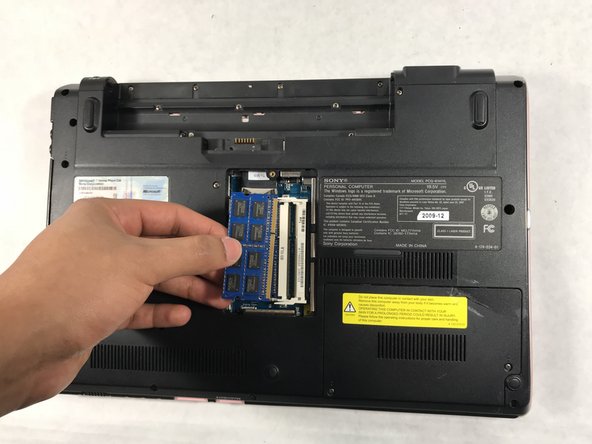
    • After pinching the metal latches, the RAM card should pop out slightly upward.

    • Remove the cards by pulling them out to the left.

    • Repeat for the second panel of RAM cards.

Conclusão

To reassemble your device, follow these instructions in reverse order.

Sean Lyon

Membro desde: 03/01/18

381 Reputação

Autoria de 3 guias

Equipe

0 comentários

Adicione um comentário

Exibir estatísticas:

Últimas 24 horas: 0

Últimos 7 dias: 0

Últimos 30 dias: 1

Duração total: 1,147