Ir para o conteúdo principal

Este guia tem alterações mais recentes. Mudar para a última versão não verificada.

Sony Vaio PCG-61112L Back Case

O que você precisa

  1. Sony Vaio PCG-61112L Back Case, Back case: passo 1, imagem 1 %32
    • Turn the laptop over and orient it as shown.

  2. Sony Vaio PCG-61112L Back Case: passo 2, imagem 1 %32 Sony Vaio PCG-61112L Back Case: passo 2, imagem 2 %32 Sony Vaio PCG-61112L Back Case: passo 2, imagem 3 %32
    • Remove the battery by pinching the two lock tabs towards the center.

    • Next, lift up on the battery to remove it.

  3. Sony Vaio PCG-61112L Back Case: passo 3, imagem 1 %32
    • Using a Phillips #00 screwdriver, remove the twenty-two 5.6 mm screws from the back of the laptop.

    • Be sure to remove all screws, including those that are typically covered by the battery.

  4. Sony Vaio PCG-61112L Back Case: passo 4, imagem 1 %32 Sony Vaio PCG-61112L Back Case: passo 4, imagem 2 %32 Sony Vaio PCG-61112L Back Case: passo 4, imagem 3 %32
    • Now, remove the small covers from the back of the case.

    • Using a Phillips #00 screwdriver, unscrew the three 5.6 mm screws from the covers (one screw on the RAM cover [middle] and two screws on the Hard Drive cover [bottom right]).

    • Then, lift up on and remove these covers as shown in the third image.

  5. Sony Vaio PCG-61112L Back Case: passo 5, imagem 1 %32 Sony Vaio PCG-61112L Back Case: passo 5, imagem 2 %32 Sony Vaio PCG-61112L Back Case: passo 5, imagem 3 %32
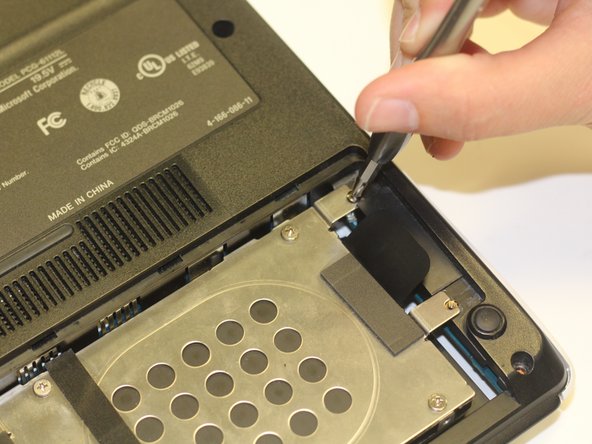
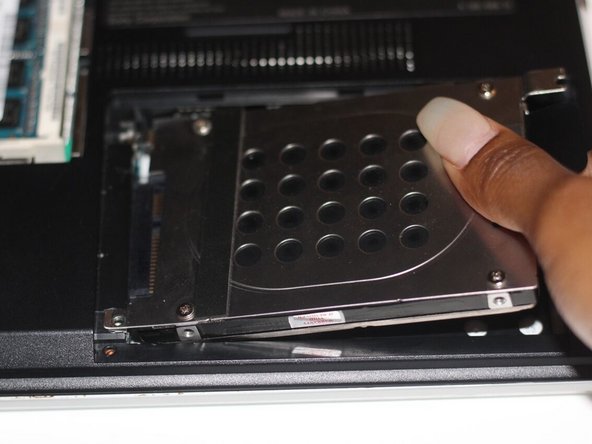
    • Remove the hard drive.

    • Using a Phillips #00 screwdriver, unscrew the two remaining 4.9 mm screws holding the hard drive into place.

    • Next, lift up and pull outwards to release the hard drive from its socket.

  6. Sony Vaio PCG-61112L Back Case: passo 6, imagem 1 %32
    • Using your fingers, grasp the black tab and lightly pull up on the ribbon cable to detach it from the motherboard.

  7. Sony Vaio PCG-61112L Back Case: passo 7, imagem 1 %32
    • After proper removal of all necessary screws, gently lift up on the back case to remove it.

Conclusão

To reassemble your device, follow these instructions in reverse order.

2 outras pessoas executaram este guia.

0 comentários

Adicione um comentário

Exibir estatísticas:

Últimas 24 horas: 0

Últimos 7 dias: 2

Últimos 30 dias: 11

Duração total: 958