Esta versão pode conter edições incorretas. Mude para o último instantâneo verificado.
O que você precisa
-
Este passo não foi traduzido. Ajude a traduzi-lo
-
To remove the speaker grill, insert the big spudger underneath it in each corner.
-
-
Este passo não foi traduzido. Ajude a traduzi-lo
-
With the Sony logo facing towards you, use the medium spudger to lift the side plates from the internal frame.
-
-
Este passo não foi traduzido. Ajude a traduzi-lo
-
Locate the four screws on the now exposed front panel.
-
-
Este passo não foi traduzido. Ajude a traduzi-lo
-
Next, remove the four outer edge screws, located on each corner of the speaker. The outer edge of the speaker is a clear plastic.
-
Remove each of the four corner screws (15.0 mm long).
-
-
Este passo não foi traduzido. Ajude a traduzi-lo
-
With a little force, carefully lift the lid of the speaker.
-
-
Este passo não foi traduzido. Ajude a traduzi-lo
-
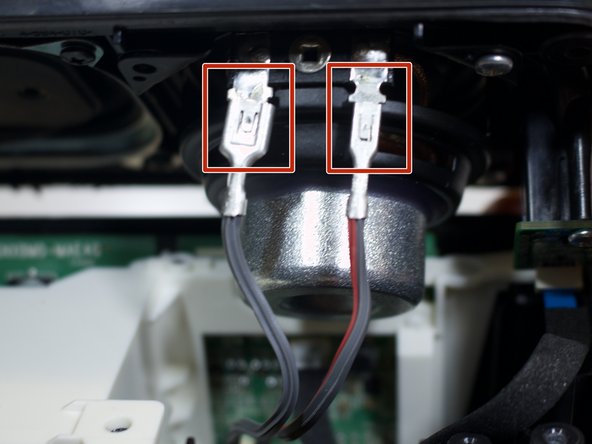
Unclip the four wire connectors (that are attached to the speaker lid).
-
Disconnect the thin yellow wire (attached to the speaker lid) from its port.
-
-
-
Este passo não foi traduzido. Ajude a traduzi-lo
-
Locate the two silver screws (9 mm) attached to the two LED-light-chips on the speaker lid.
-
-
Este passo não foi traduzido. Ajude a traduzi-lo
-
Separate the speaker lid entirely from the bottom frame.
-
-
Este passo não foi traduzido. Ajude a traduzi-lo
-
Locate and remove the three black screws (10.0 mm) within the internal frame. Use bit T7.
-
-
Este passo não foi traduzido. Ajude a traduzi-lo
-
Slightly lift the white box with all the wires still attached.
-
-
Este passo não foi traduzido. Ajude a traduzi-lo
-
Take the big spudger and pry the black casing up from the circuit box.
-
-
Este passo não foi traduzido. Ajude a traduzi-lo
-
Locate the blue film attached to the circuit box containing the charging port.
-
-
Este passo não foi traduzido. Ajude a traduzi-lo
-
Detach the yellow, black and red wires by pulling them directly up.
-
-
Este passo não foi traduzido. Ajude a traduzi-lo
-
Insert the spudger along the battery edge and firmly hold the wires. Lift both sides up. The battery will pop out from its encasement.
-
-
Este passo não foi traduzido. Ajude a traduzi-lo
-
Locate the circuit box containing the yellow charging port.
-
Remove the circuit box from any attachments connecting it to the speaker.
-


Cancelar: não concluí este guia.
4 outras pessoas executaram este guia.

Equipe

Eastern Washington University, Team S3-G1, Rowley Spring 2018 Membro de Eastern Washington University, Team S3-G1, Rowley Spring 2018
EWU-ROWLEY-S18S3G1
Membros da 5
Autoria de 6 guias
8 comentários
Hi where I can find new circuit box?
That’s right , at the very beginning it says that no parts are needed , what about the new charging port where can we get it?
I am incredibly curious, and a little bit excited, to hear what it is that was going through your mind at the start of this in comparison to when you reached the end? The exact moment that the very title of this article says very clearly the word “replacement” and then to see the amazing luck of the mistaken omission which read “No Parts Required” only to then be let down again when you realized that a part was in fact required. After-all it is called “Charging Port Replacement” so I’m sure you probably healed up pretty quick from the heartbreak you suffered.
Very clear instructions, thanks.
Any idea where I can find a new charging port for my speaker? Can’t find anything on the internet..
Thanks by advance
Dries