Ir para o conteúdo principal

Sony SRS-X5 USB/AUX plug in Replacement

O que você precisa

  1. Sony SRS-X5 USB/AUX plug in Replacement, Battery: passo 1, imagem 1 %32
    • To gain access to the 6 bottom screws remove the following. Remove the adhered 4 corner foam pads on the bottom of the speaker using the blue plastic opening tool to reveal the screws underneath. Remove the adhered 2 center plastic squares.

    • Make sure the speaker is unplugged and powered down before doing any work on the device.

  2. Sony SRS-X5 USB/AUX plug in Replacement: passo 2, imagem 1 %32 Sony SRS-X5 USB/AUX plug in Replacement: passo 2, imagem 2 %32
    • Unscrew the six 6mm screws with a Phillips head #1 screwdriver.

    • Remove the bottom panel of the speaker.

  3. Sony SRS-X5 USB/AUX plug in Replacement: passo 3, imagem 1 %32
    • Unplug the battery by gently pinching the plastic end connected to the smaller board and pull away.

    • Remove the battery.

  4. Sony SRS-X5 USB/AUX plug in Replacement, Speaker: passo 4, imagem 1 %32
    • To remove the speaker grill, first push down slightly on the 2 plastic hook tabs to release them, then push the middle plastic screw tab out.

  5. Sony SRS-X5 USB/AUX plug in Replacement: passo 5, imagem 1 %32
    • Remove the eight 0.5mm Phillips #1 screws from the speaker panel.

  6. Sony SRS-X5 USB/AUX plug in Replacement: passo 6, imagem 1 %32 Sony SRS-X5 USB/AUX plug in Replacement: passo 6, imagem 2 %32
    • Using the plastic opening tool, flip open the speaker panel.

  7. Sony SRS-X5 USB/AUX plug in Replacement: passo 7, imagem 1 %32 Sony SRS-X5 USB/AUX plug in Replacement: passo 7, imagem 2 %32 Sony SRS-X5 USB/AUX plug in Replacement: passo 7, imagem 3 %32
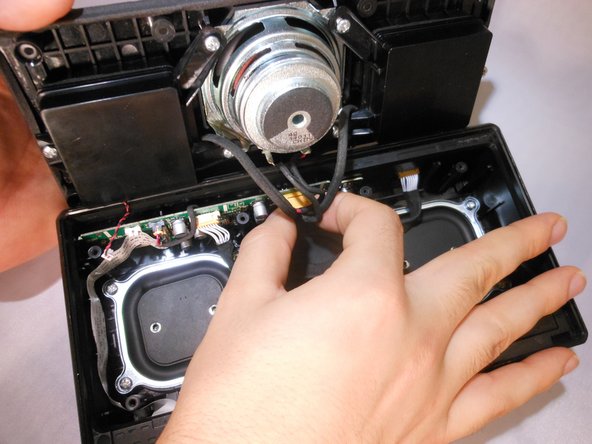
    • Unplug the 6-pin speaker connector and 2-pin microphone connector from the motherboard by squeezing the sides of the plastic ends.

  8. Sony SRS-X5 USB/AUX plug in Replacement, Bluetooth: passo 8, imagem 1 %32 Sony SRS-X5 USB/AUX plug in Replacement, Bluetooth: passo 8, imagem 2 %32
    • Unplug the cord connected to the motherboard by squeezing the plastic sides.

  9. Sony SRS-X5 USB/AUX plug in Replacement: passo 9, imagem 1 %32
    • Gently tug on the plastic ribbon connected to the bottom side of the speaker to unplug it.

  10. Sony SRS-X5 USB/AUX plug in Replacement: passo 10, imagem 1 %32
    • Remove the motherboard.

  11. Sony SRS-X5 USB/AUX plug in Replacement, USB/AUX plug in: passo 11, imagem 1 %32 Sony SRS-X5 USB/AUX plug in Replacement, USB/AUX plug in: passo 11, imagem 2 %32
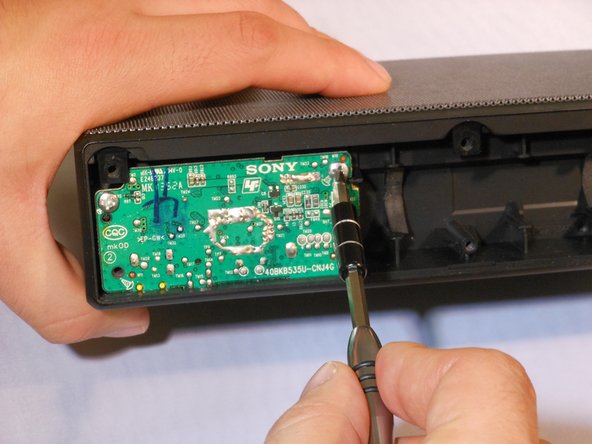
    • Using the Phillips #1 screwdriver, remove the two 6mm screws holding the AUX board in place.

  12. Sony SRS-X5 USB/AUX plug in Replacement: passo 12, imagem 1 %32
    • Remove the aux board. Be careful as the board might need some wiggling to get out.

Conclusão

To reassemble your device, follow these instructions in reverse order.

Uma outra pessoa concluiu este guia.

2 comentários

hi there, where can i buy aux board for replacement? thank you

Khánh Trần - Responder

Donde puedo conseguir la tarjeta?

Alan Castaneda - Responder

Adicione um comentário

Exibir estatísticas:

Últimas 24 horas: 0

Últimos 7 dias: 1

Últimos 30 dias: 14

Duração total: 1,633