Ir para o conteúdo principal

Sony Reader Touch Edition PRS-600 SD and Pro Duo Memory Card Holders Replacement

O que você precisa

  1. Sony Reader Touch Edition PRS-600 SD and Pro Duo Memory Card Holders Replacement, Back Panel: passo 1, imagem 1 %32
    • Using the Phillips head screwdriver PH000, remove the two 1.4 mm screws that are located on the backside of the device.

  2. Sony Reader Touch Edition PRS-600 SD and Pro Duo Memory Card Holders Replacement: passo 2, imagem 1 %32
    • Slide the back cover off by pushing it to the left, away from the side that held the screws.

    • Remove the cover.

  3. Sony Reader Touch Edition PRS-600 SD and Pro Duo Memory Card Holders Replacement: passo 3, imagem 1 %32
    • This is what the device should look like once the back cover panel has been removed.

  4. Sony Reader Touch Edition PRS-600 SD and Pro Duo Memory Card Holders Replacement, Battery: passo 4, imagem 1 %32
    • Once the back cover has been removed locate the battery in the bottom right corner of the device.

    • Using the pointed end of the spudger, push out the white plug that is connected to the battery from its beige base.

  5. Sony Reader Touch Edition PRS-600 SD and Pro Duo Memory Card Holders Replacement: passo 5, imagem 1 %32
    • Use the flat end of the spudger to pry the battery out of its holder. There may be glue holding it in place.

  6. Sony Reader Touch Edition PRS-600 SD and Pro Duo Memory Card Holders Replacement, Inner Casing: passo 6, imagem 1 %32
    • Using a screwdriver remove the four 1.4 mm screws that are holding the black plastic casing in place.

  7. Sony Reader Touch Edition PRS-600 SD and Pro Duo Memory Card Holders Replacement: passo 7, imagem 1 %32
    • Pry open the black casing to access the screw that is holding down the battery holder.

    • Remove the one 1.4 mm screw that is holding down the battery holder located under black casing.

    • Lift the black inner casing and the battery holder out of the device.

    • The battery holder and the black inner casing are connected by a thin strip of copper. There may be glue holding the black inner casing in place.

  8. Sony Reader Touch Edition PRS-600 SD and Pro Duo Memory Card Holders Replacement, Power Button: passo 8, imagem 1 %32
    • Remove the stylus from the device.

  9. Sony Reader Touch Edition PRS-600 SD and Pro Duo Memory Card Holders Replacement: passo 9, imagem 1 %32 Sony Reader Touch Edition PRS-600 SD and Pro Duo Memory Card Holders Replacement: passo 9, imagem 2 %32 Sony Reader Touch Edition PRS-600 SD and Pro Duo Memory Card Holders Replacement: passo 9, imagem 3 %32
    • Using the Phillips screwdriver remove the 1.4 mm screw from the top panel.

    • Using the same screwdriver, remove the 1.4 mm screw from the back of the device.

    • Pry apart off the top panel of the device.

  10. Sony Reader Touch Edition PRS-600 SD and Pro Duo Memory Card Holders Replacement, SD and Pro Duo Memory Cards Holder: passo 10, imagem 1 %32
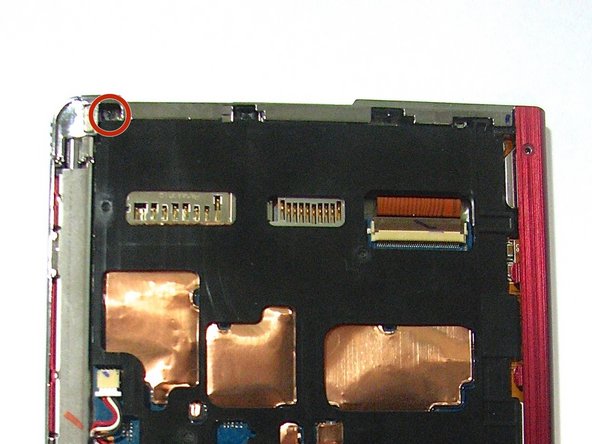
    • Using a Phillips head screwdriver, remove the three 1.4 mm screws located on the memory card holder.

  11. Sony Reader Touch Edition PRS-600 SD and Pro Duo Memory Card Holders Replacement: passo 11, imagem 1 %32
    • Using the flat end of the spudger, pry open the brown flap that connects the cardholder to the motherboard.

  12. Sony Reader Touch Edition PRS-600 SD and Pro Duo Memory Card Holders Replacement: passo 12, imagem 1 %32 Sony Reader Touch Edition PRS-600 SD and Pro Duo Memory Card Holders Replacement: passo 12, imagem 2 %32
    • Pull the orange strip out of the opened brown flap.

    • Remove the memory card holder.

Conclusão

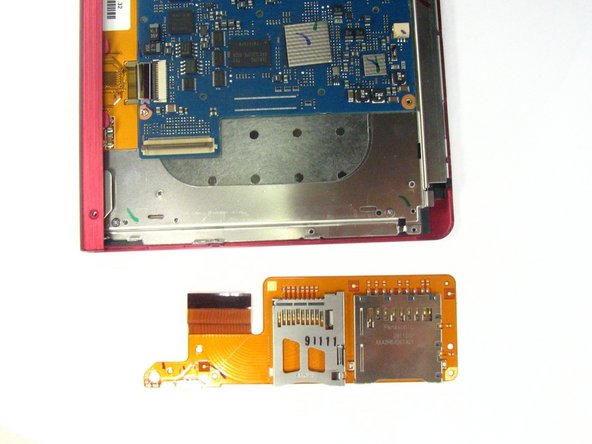
To reassemble your device, follow these instructions in reverse order.

Zachary Jeffers

Membro desde: 10/13/14

412 Reputação

Autoria de 4 guias

Equipe

Clemson, Team 1-4, Benson Fall 2014 Membro de Clemson, Team 1-4, Benson Fall 2014

CLEM-BENSON-F14S1G4

Membros da 4

Autoria de 22 guias

0 comentários

Adicione um comentário

Exibir estatísticas:

Últimas 24 horas: 0

Últimos 7 dias: 2

Últimos 30 dias: 3

Duração total: 329