Ir para o conteúdo principal

Sony Alpha NEX-6 LCD Screen Replacement

O que você precisa

  1. Sony Alpha NEX-6 LCD Screen Replacement, Battery: passo 1, imagem 1 %32
    • Prior to operating on this device, be sure the camera is turned OFF. With power, the camera can be a dangerous device to work with.

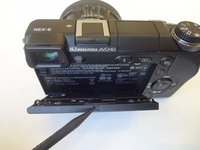
    • Turn the camera off by switching the power knob "OFF" text to the white selector dot.

  2. Sony Alpha NEX-6 LCD Screen Replacement: passo 2, imagem 1 %32
    • Flip the camera upside-down and carefully place it on a flat surface.

    • With the lens facing outward, locate the battery compartment - indicated by a grooved latch.

    • Push the latch to the right to unlock the battery compartment. The door should flip upward.

  3. Sony Alpha NEX-6 LCD Screen Replacement: passo 3, imagem 1 %32
    • With the compartment open, locate a blue tab shown with spudger

    • Press the tab to the side (to the left, or toward the camera wall). This will eject the camera battery.

  4. Sony Alpha NEX-6 LCD Screen Replacement, Removing back screws: passo 4, imagem 1 %32
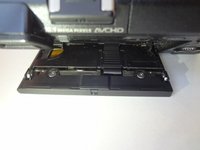
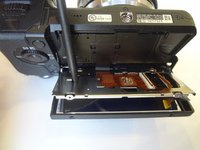
    • Remove the two 1.0 mm Phillips #00 screws from back of the LCD screen.

  5. Sony Alpha NEX-6 LCD Screen Replacement, Removing bottom screws: passo 5, imagem 1 %32
    • Remove the two 1.5 mm Phillips #00 screws from the bottom of the screen mount assembly.

  6. Sony Alpha NEX-6 LCD Screen Replacement, Back cover: passo 6, imagem 1 %32 Sony Alpha NEX-6 LCD Screen Replacement, Back cover: passo 6, imagem 2 %32
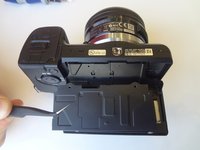
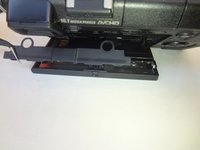
    • Using a plastic opening tool pry off the back cover from the screen assembly.

    • Remove back cover by lifting it away from the screen using tweezers.

  7. Sony Alpha NEX-6 LCD Screen Replacement, Ribbon cable: passo 7, imagem 1 %32 Sony Alpha NEX-6 LCD Screen Replacement, Ribbon cable: passo 7, imagem 2 %32 Sony Alpha NEX-6 LCD Screen Replacement, Ribbon cable: passo 7, imagem 3 %32
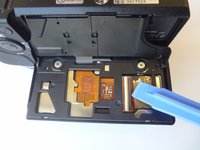
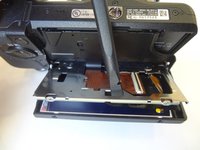
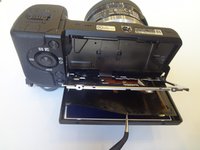
    • Release the ribbon cable by lifting the black locking latch with the plastic opening tool.

    • Pry out the ribbon cable by carefully sliding it out of the connection slot using a spudger.

  8. Sony Alpha NEX-6 LCD Screen Replacement, Upper plastic separator: passo 8, imagem 1 %32
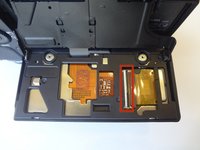
    • Lift and slide out the upper black plastic separator using tweezers.

  9. Sony Alpha NEX-6 LCD Screen Replacement, Lower plastic separator: passo 9, imagem 1 %32 Sony Alpha NEX-6 LCD Screen Replacement, Lower plastic separator: passo 9, imagem 2 %32 Sony Alpha NEX-6 LCD Screen Replacement, Lower plastic separator: passo 9, imagem 3 %32
    • Lift and remove the lower black plastic separator using tweezers.

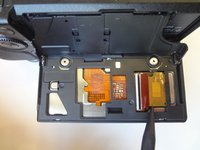
    • Using the pointy side of a spudger push in the screen lock button release it.

    • The screen lock button can now be removed.

  10. Sony Alpha NEX-6 LCD Screen Replacement, Black nylon sheet: passo 10, imagem 1 %32 Sony Alpha NEX-6 LCD Screen Replacement, Black nylon sheet: passo 10, imagem 2 %32 Sony Alpha NEX-6 LCD Screen Replacement, Black nylon sheet: passo 10, imagem 3 %32
    • Using the flat end of the spudger, push on the black nylon sheet glued to the metallic frame to peel it of.

    • Apply force from different spots to avoid tearing the sheet.

    • Remove the black nylon sheet using tweezers.

  11. Sony Alpha NEX-6 LCD Screen Replacement, Screen Removal: passo 11, imagem 1 %32
    • Gently wiggle the screen loose and remove it from the mount.

Conclusão

To reassemble your device, follow these instructions in reverse order.

6 outras pessoas executaram este guia.

Clayton Dale

Membro desde: 01/20/15

1.040 Reputação

Autoria de 7 guias

Equipe

USF Tampa, Team 11-2, Blackwell Winter 2015 Membro de USF Tampa, Team 11-2, Blackwell Winter 2015

USFT-BLACKWELL-W15S11G2

Membros da 4

Autoria de 14 guias

2 comentários

Thanks a million! Great guide and saved me $250 sending it back in.

Al Weiner - Responder

Hi - I am trying to fix one of these -- and the guy I bought it from pulled off and lost the black locking latch from the ribbon cable rather than just lifting it -- I can get the LCD screen to light but can't keep it on very long -- I bought another one of these internal cables with the black locking latch. Do you think I can pop that one off and move it to this one? Or do you have any source of instructions how to replace that cable?

Cheers and thanks for this!

PS -- If anyone is just trying to get rid of the dreaded bubbles in the screen saver that plagues these NEX cameras -- it does just peal off -- see youtubes,,,

Harvey Cat - Responder

Adicione um comentário

Exibir estatísticas:

Últimas 24 horas: 0

Últimos 7 dias: 9

Últimos 30 dias: 39

Duração total: 6,506