Introdução
If you have a shower head with a constant drip, follow this simple and easy guide to replace the rubber o-ring in your shower handle. Replacing the O-ring can help prevent hard water build up, rusting, and wasting water.
O que você precisa
-
-
Using your flat head screwdriver, remove the screw from the middle of the handle.
 Pergunte ao FixBot
-
-
-
Use your groove joint pliers to loosen and remove the escutcheon plate.
-
-
-
-
Using your groove joint pliers, loosen and remove the cartridge stem.
-
-
-
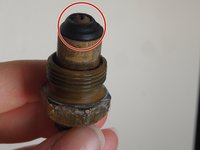
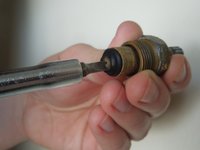
Using your flat head screwdriver, remove the screw from the end of the stem cartridge.
-
Once the screw is removed, replace the damaged O-ring with the new replacement O-ring.
-


Cancelar: não concluí este guia.
3 outras pessoas executaram este guia.

Equipe

Michigan Tech, Team 1-6, Lauer Spring 2016 Membro de Michigan Tech, Team 1-6, Lauer Spring 2016
MTU-LAUER-S16S1G6
1 Membro
1 Guia de autoria
4Comentários do guia
This fixed the dripping shower head but now my shower handles are tight and difficult to turn and the water pressure is affected after replacing the o-rings. What could the issue be?
Try putting petroleum jelly all over the outside of the stem/cartridge (including the threading/grooves) before screwing it all back together. That will keep your handles turning smoothly, and easily.
It's the plumbing equivalent to WD40.
As for the change in water pressure, I'm not sure what that would be. Did you use the same size O-ring?
I have the same handles and stems, but leaking not from the rubber. Leaking occuring when tuning on the handle. Do you know where to find the parts?